Overview
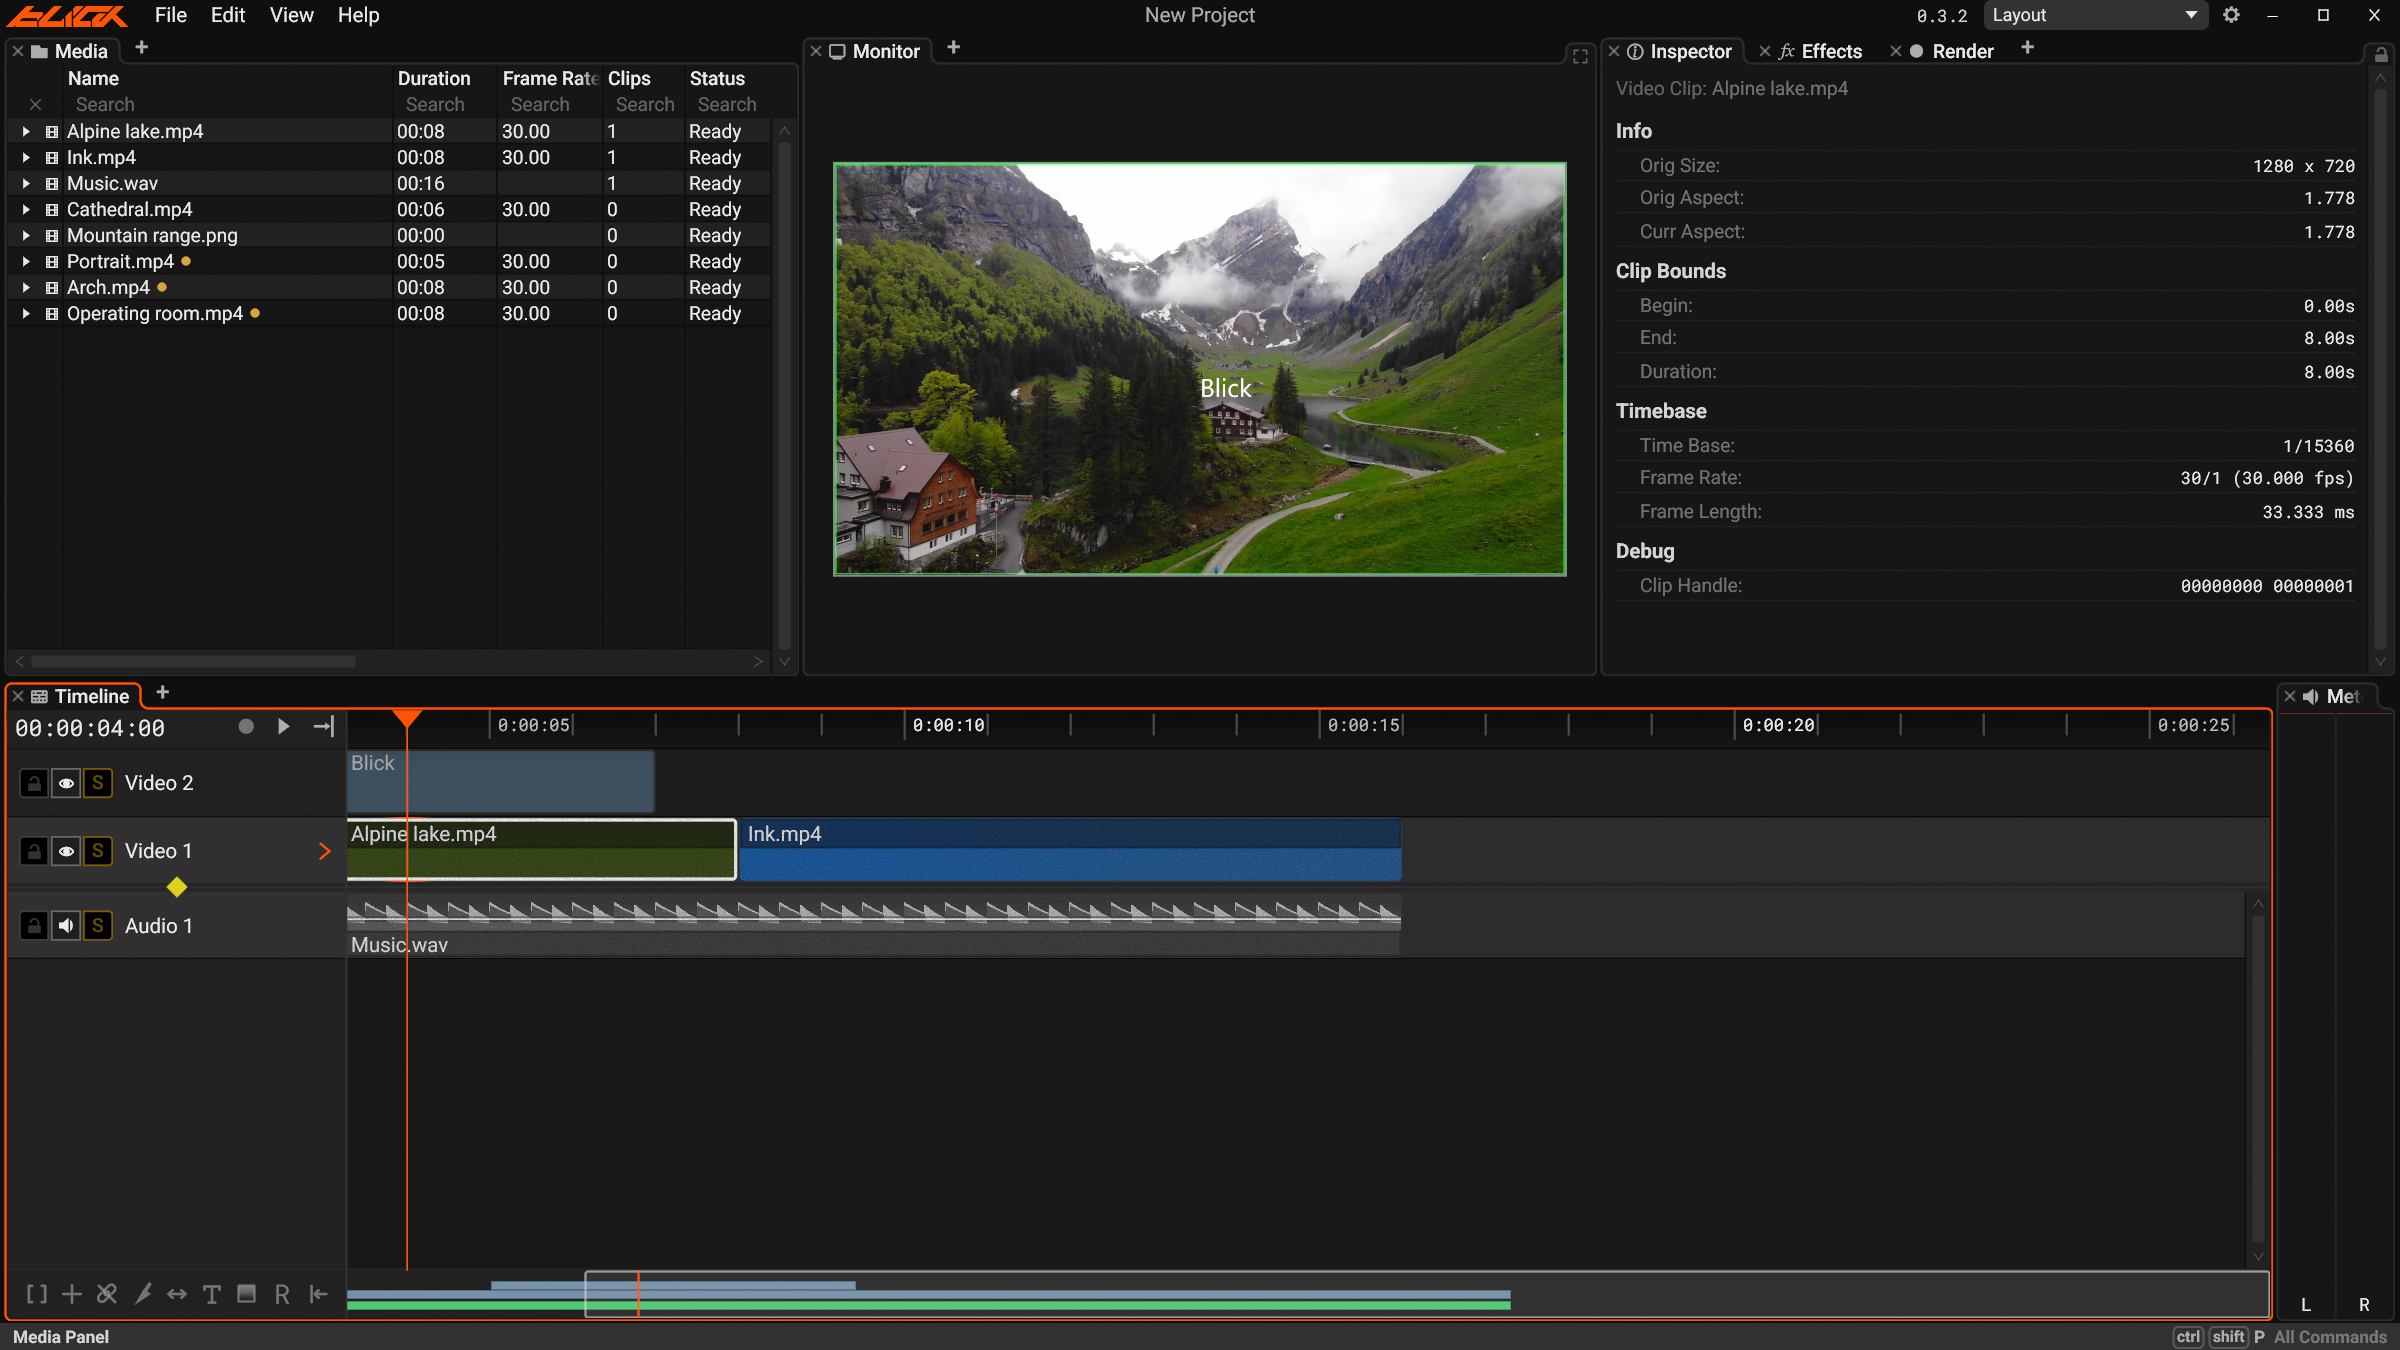
- Panels: fully customisable layout
- Media Panel: import project media
- Timeline Panel: edit video
- Inspector Panel: show media or clip information
- Effect Panel: edit video effects
- Render Panel: render video
- Monitor Panel: show frame at current playhead
- Meters Panel: show audio meter per channel
- Title Bar: settings, keybindings, activate licence
- Status Bar: show descriptions upon hovering on buttons and panels
Panels
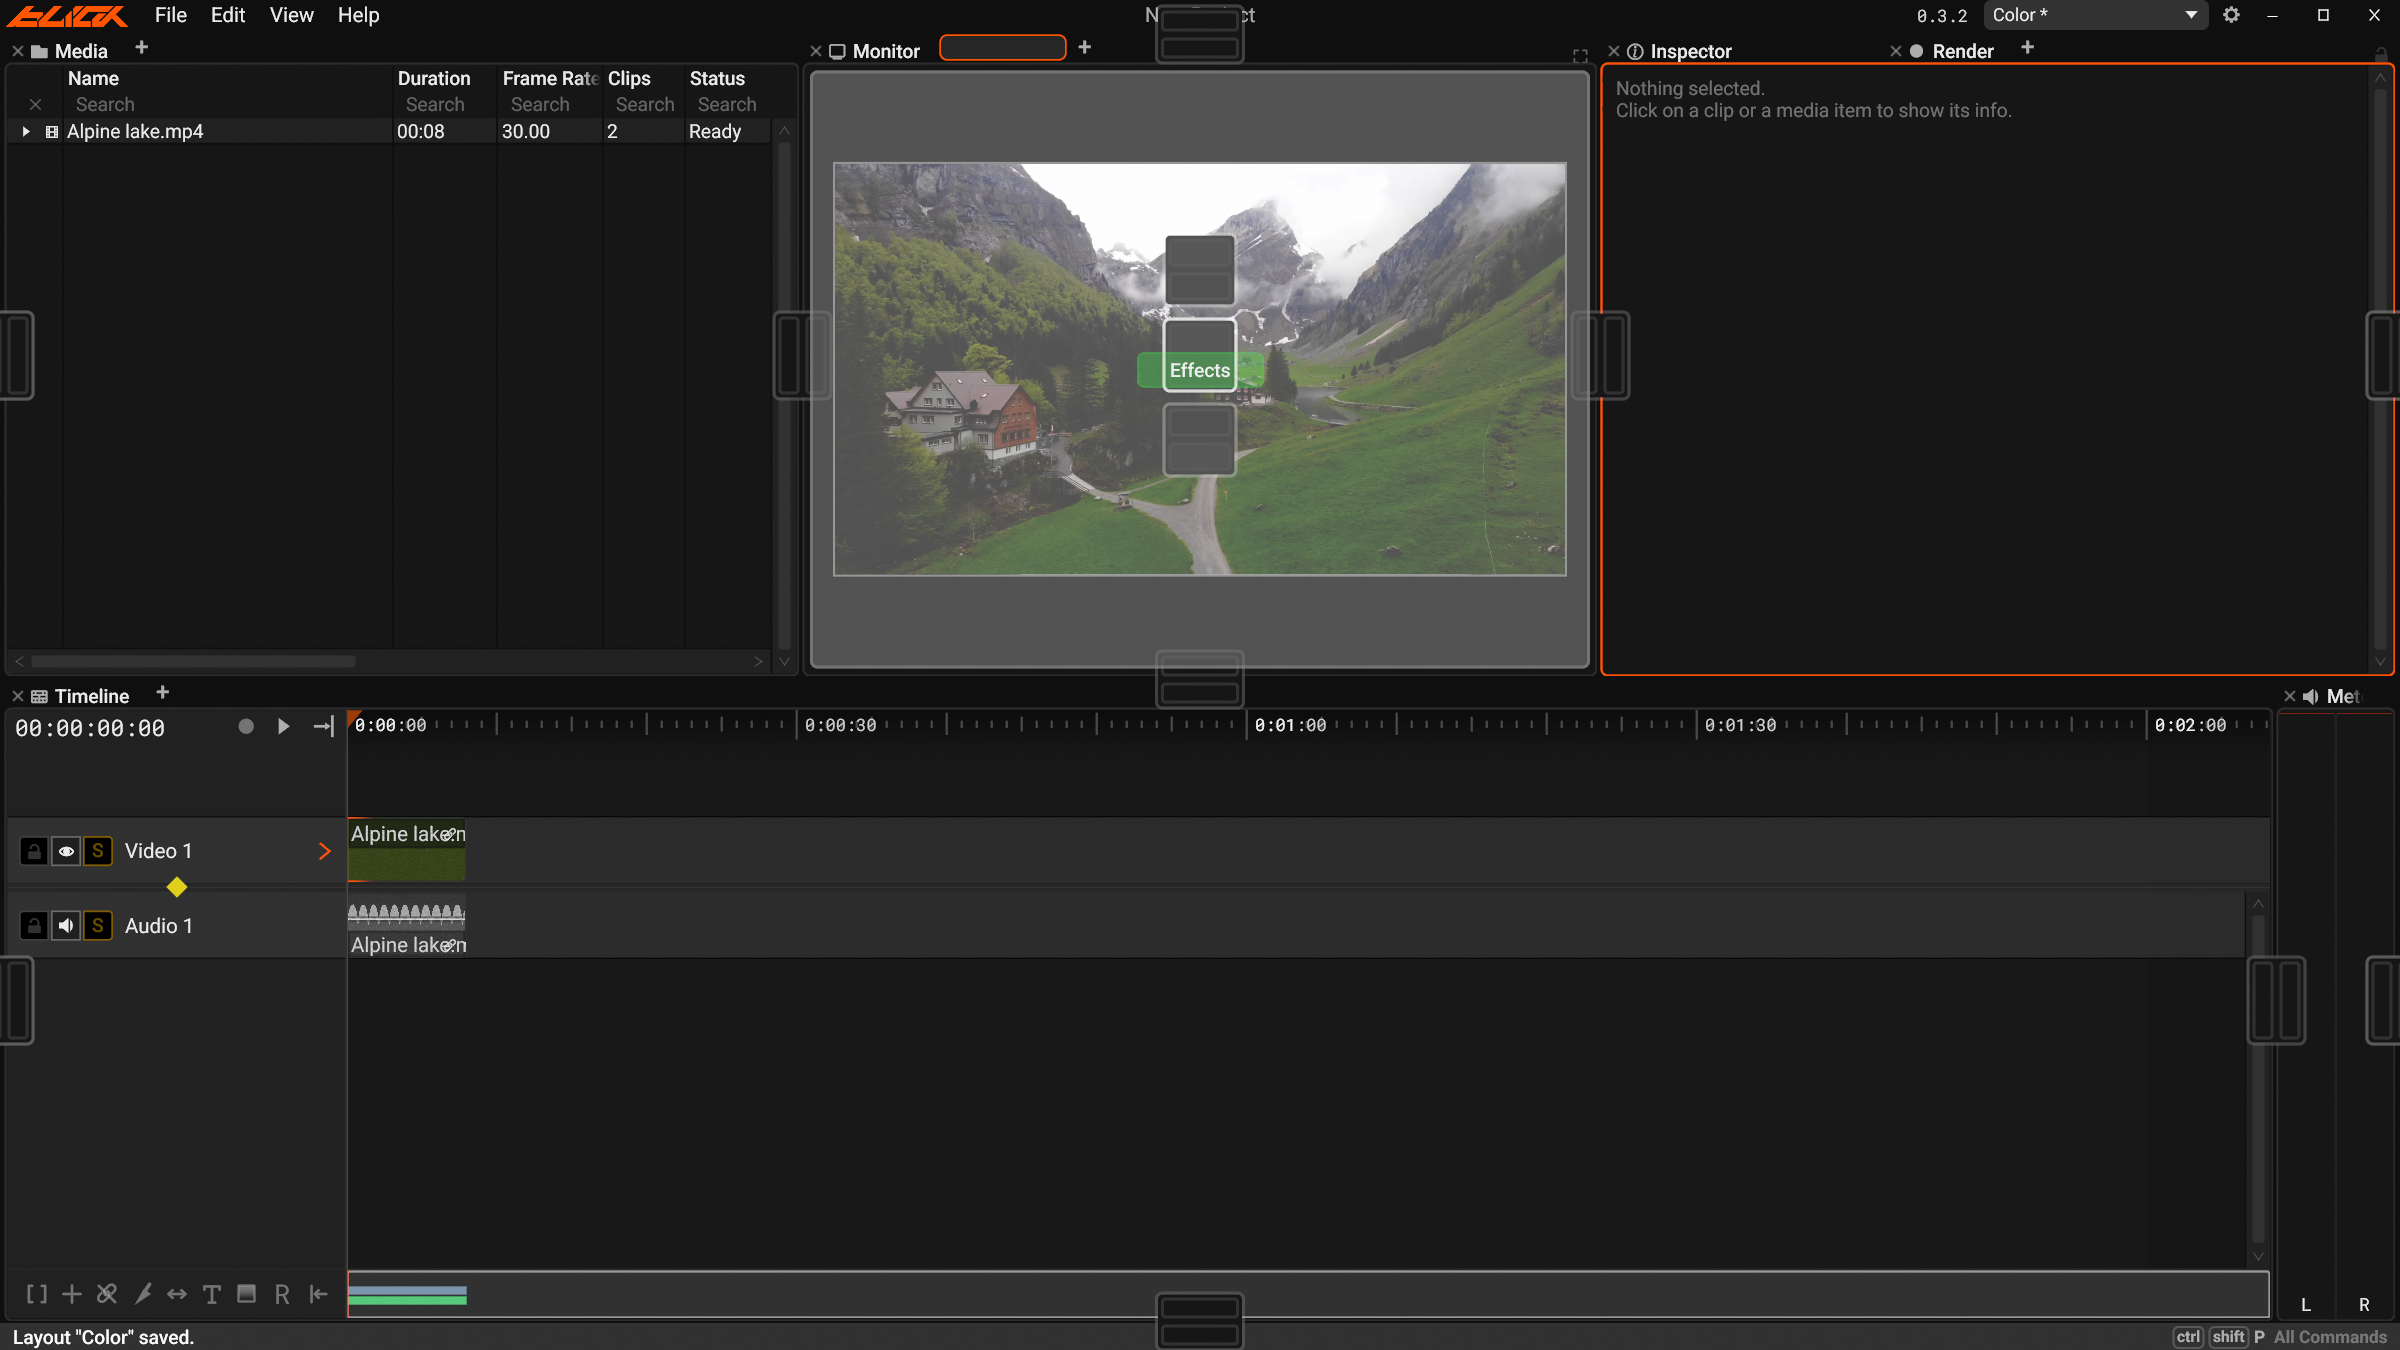
Once you start dragging a tab, you will see controls that let you relocate your tab or split an existing panel.
Add Tab
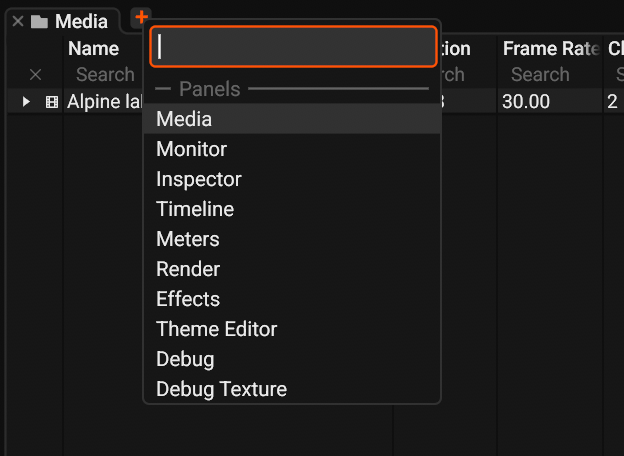
- Add tab
- Delete tab - if there is only one tab left, it will remove the panel
- Search tab by name
- Pick a panel to open it in a new tab
You can also middle click a tab to close it. A highlight shows which tab is about to close.
Relocate Tab
Drag on the tab name to relocate tab
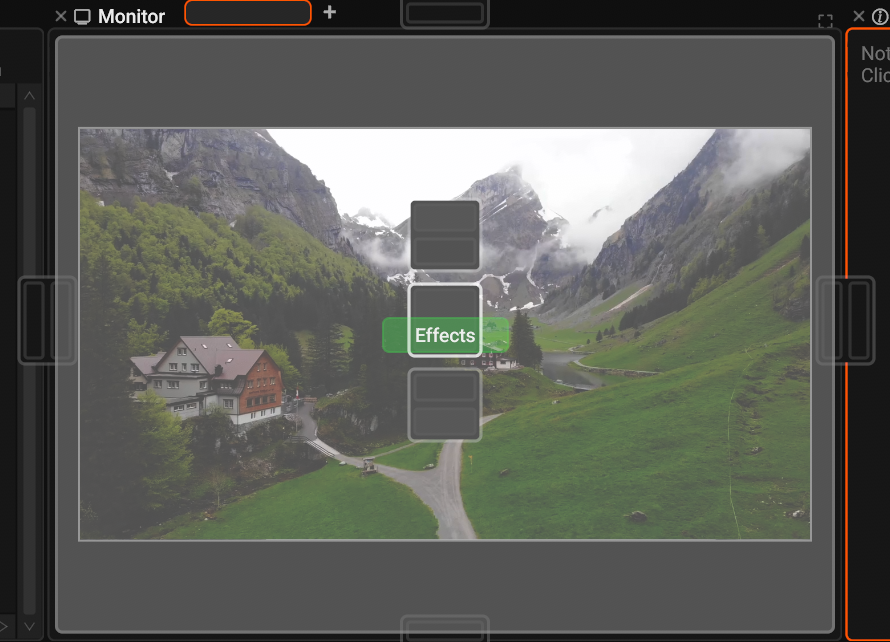
- Split panel and put the new panel before the target panel
- Append tab in the target panel
- Split panel and put the new panel after the target panel
- Insert panel before the target panel
- Insert panel after the target panel
Panel Windows
Panels do not have to stay in the main window. Drag a tab out and it becomes its own floating window. Drag its tab back into any other window to dock it again, with the same split and append controls as inside a panel.
- Move panel to its own window in the Command Palette pops out the focused panel
- Media drags cross windows: pick a file up in one window and drop it on a timeline or Monitor in another
- Floating panel windows are part of the layout. Save one and they come back, see Layouts below
Put the Monitor on a second display, or keep the Media panel and Inspector on their own screen while the timeline fills the main one.
Layouts
The Layout dropdown at the right end of the title bar holds named panel arrangements. A layout stores the whole workspace: every panel, split, and tab, floating panel windows, and the Media panel's columns and sorting.
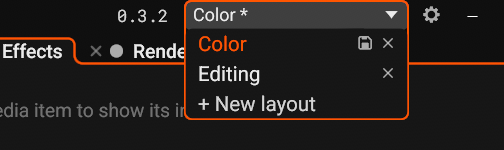
- The dropdown shows the active layout's name, with an asterisk once you change the arrangement
- + New layout saves the current arrangement under a name
- Click a layout in the list to apply it
- The save button on the active layout's row overwrites it with the current arrangement
- Delete a layout from its row. Blick asks for confirmation
Layouts belong to the app, not the project. They apply to whatever project is open and are stored as .blick-layout files next to Blick's configuration.
Media Panel
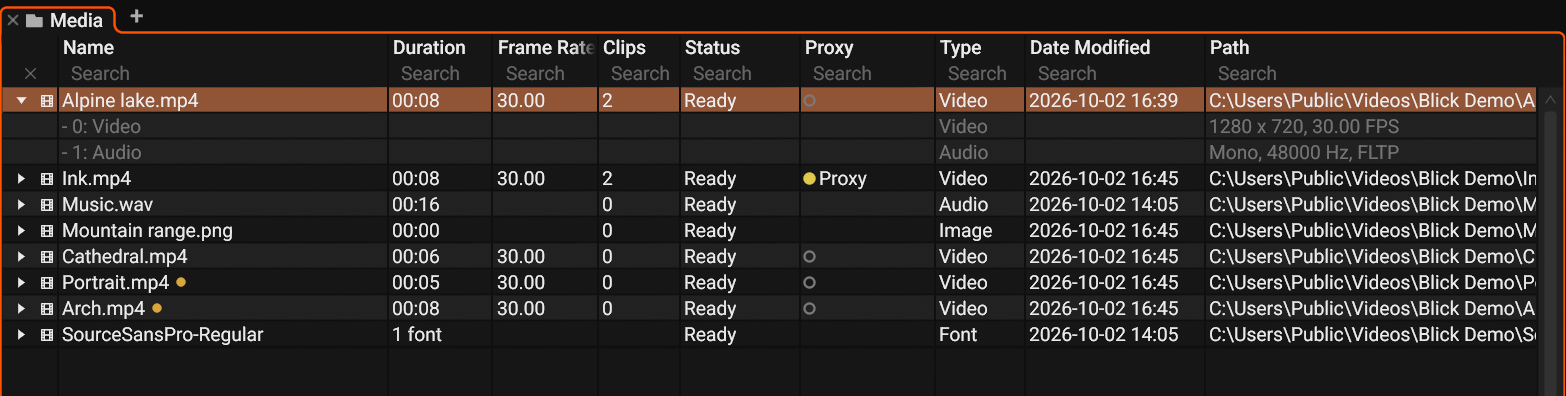
- Media list. Every file you have imported into the project lives here. Click a file to inspect it, drag it onto the timeline to use it.
- Streams: each media file may contain different streams of data. A typical video file carries one video stream and one audio stream. Click the triangle in front of a file to expand its streams.
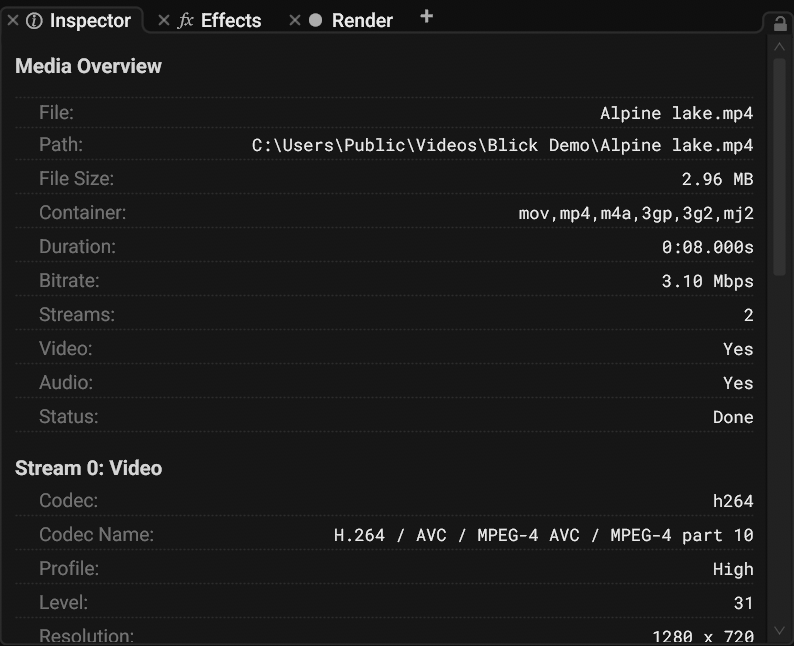
Details of the selected media or stream are shown in the Inspector panel.
Import Media
There are 4 ways to import media, it could be a video file, an audio file or an image
- Drag from file explorer / Finder and release it in the media panel
- Drag a single file from file explorer / Finder straight onto the timeline. Blick imports it and places the clip where you drop it in one step
- Title bar > File > Import Media
- Keyboard shortcut: Ctrl+I
Media is ready to use as soon as you import it. Video plays and scrubs without waiting for an index, see Instant playback under Playhead.
Add Clip to timeline
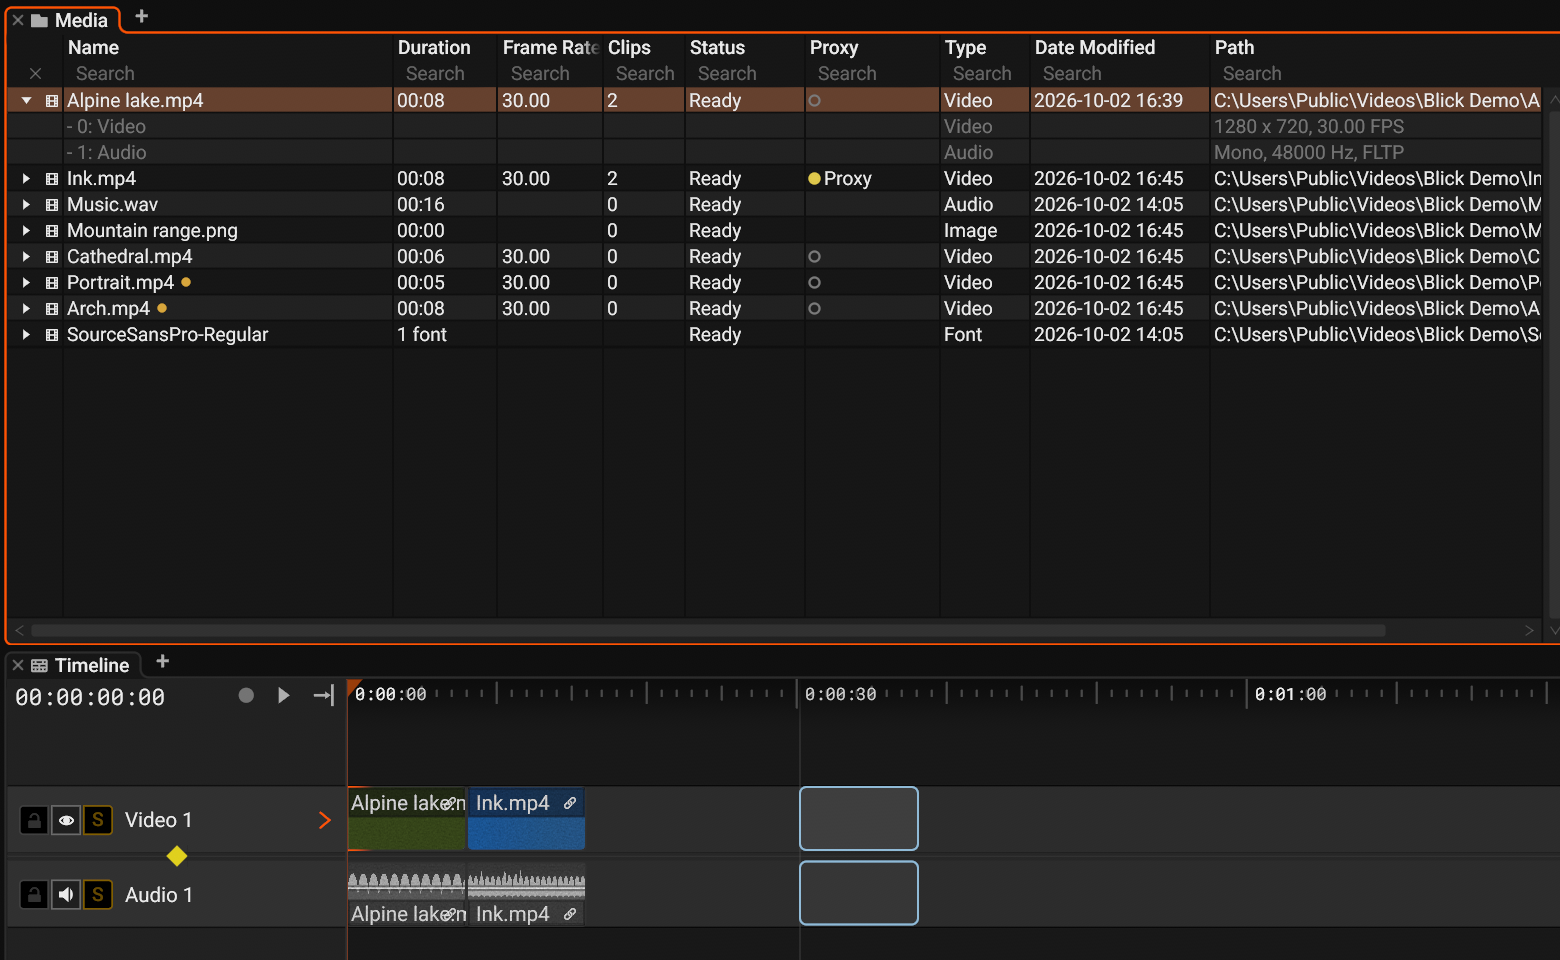
Import clip by dragging from a media panel to the timeline
- If the media contains multiple video/audio streams, and you only want to add a specific stream to the timeline, you can drag the stream. The streams can be opened by clicking the triangle in the beginning of the media file.
- Drag the media item from the media panel
- Drag the media item to the timeline, it will show a preview of where the clip will be placed
Release the drag to place the clip in the timeline.
A file with several streams creates one clip per stream when dropped. Video streams stack on video tracks, audio streams on audio tracks, and the clips land linked together.
The Media Table
Media is listed as a table with Name, Duration, Frame Rate, Clips, Status, Proxy, Type, Date Modified, and Path columns. The table supports sorting, filtering, and selection:
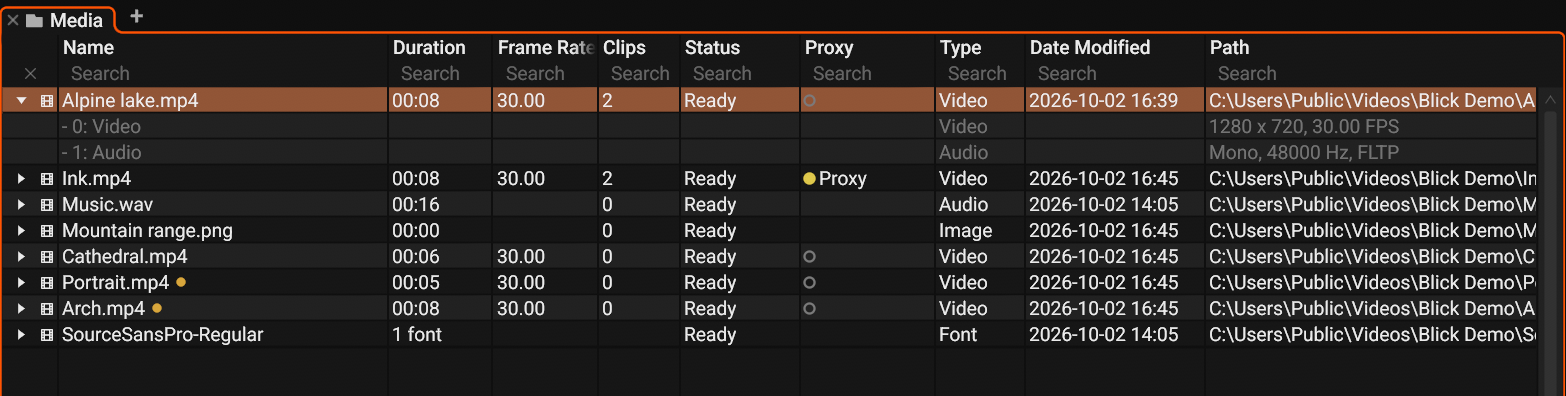
- Click a column header to sort by it, click again to flip the direction. Sort several columns at once by clicking more headers, the first one you clicked takes priority
- Drag a header to reorder columns, drag the divider between headers to resize them
- Each column has a search field under its header. Type to filter the list to matching entries, combine fields to narrow down further
- The clear button resets all filters
- Click to select, right click drag to box select, Ctrl to add single files, Shift for a range, Ctrl+A for everything while the panel is focused. Double click a media item to open it in a Monitor player
- Each row shows how many clips on the timeline use that media. Hovering a row highlights those clips in the timeline
- The Status column shows whether a file is Ready, Loading, Not Found on disk, or being removed
- The Proxy column shows whether a file plays its proxy or its source, see Proxies below
- The Type column shows the kind of file: Video, Image, Audio, or Font
Blick does not analyze a file until you put it on the timeline. Importing a big batch is instant. Waveforms, Überblick strips, and frame indexes are built the first time a file gets used.
Proxies
A proxy is a lower resolution copy of a media file. While a file uses its proxy, Blick plays, edits, and renders with the proxy instead of the source. Proxies place less load on playback, which helps with high resolution or high bit rate footage. A proxy never changes the source file.
Each media file has a source and, optionally, a linked proxy, and uses one of the two at a time. Blick can generate proxies for you, or you can link a file you made yourself.
Generate proxies
Select one or more media files, right click, and choose Generate proxies. Blick transcodes each source to a proxy file and links it to that media. The audio of the source is kept. Generation runs in the background while you keep working, and a progress bar shows the state of the queue.
- Generate proxies for a selection from the right click menu, or click Generate? in a file's Proxy column in the Media table. Drag down the column to queue several files
- The Proxy column shows whether each file plays its proxy or its source, and shows Queued and Generating while a proxy is built
Link your own proxy
Link a file you already have as the proxy of a media file.
| Action | Description |
|---|---|
| Link proxy from file | Pick a file on disk and link it as the proxy of the selected media. Both files must load and both must contain video, and their aspect ratio and duration must match. |
| Link selected media as proxy pair | Select two media files and link one as the proxy of the other. |
| Link proxies by name | Match imported media to proxy files by file name in one pass. |
| Mark media as proxy, Mark media as source | Set the role of a file. |
| Swap source and proxy | Exchange which file is the source and which is the proxy. |
| Unlink proxy | Break the link. The source stays in the project. |
Switch between proxy and source
Click a file's Proxy column in the Media table to switch it between its proxy and its source, or drag across several rows to switch them together. Right click a selection and choose Use proxies or Use sources, or run Enable proxies or Disable proxies to switch every file at once. Renders use whichever file is active. Switch back to the sources before a final render: the Render panel shows how many media items will render from proxies.
Right click the empty space under the files for the commands that work on the whole project:
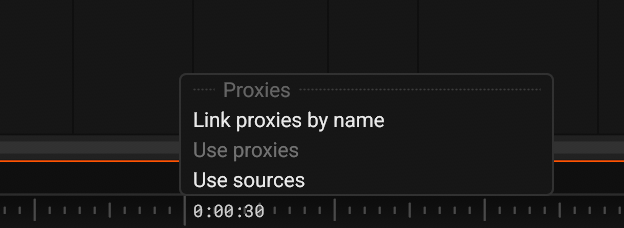
- Link proxies by name: match imported media to proxy files by file name in one pass
- Use proxies: every file plays its proxy
- Use sources: every file plays its source
Proxy settings
Proxy generation settings are in Title bar > Settings Menu > General. Set the proxy size as a fraction of the source, such as half size or quarter size, and set the codec and quality. Set where proxy files are written: next to the original, in the project folder, or in a custom folder.
Fonts as Media
Font files are project media too. Import a .ttf, .otf, or .ttc by dropping it onto the Media panel, dragging it in from your file explorer, or hitting Import Font in a text clip's Text Content effect. Imported fonts sit in the Media panel alongside your video and audio, with collection files listing their faces underneath. They save with the project.
- Imported fonts appear in the font picker of every text clip alongside your system fonts
- Drag a font from the Media panel, or straight from your file explorer, onto the timeline to create a text clip in that font
- Select a font to see its file, face count, and face index in the Inspector panel
Right click a font for its context menu Context Menu:
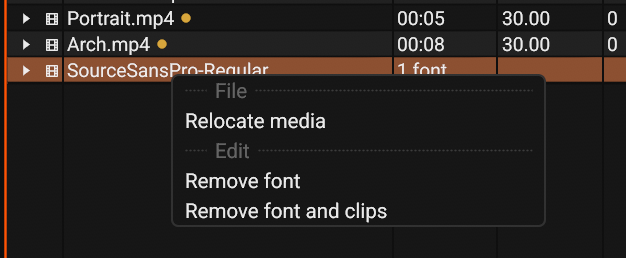
- Relocate media: point the font at a different file on disk
- Remove font: take the font out of the project
- Remove font and clips: take the font out of the project and delete the text clips that use it
Context Menu
Right click on a media or media stream. Grey entries do not apply to the selection.
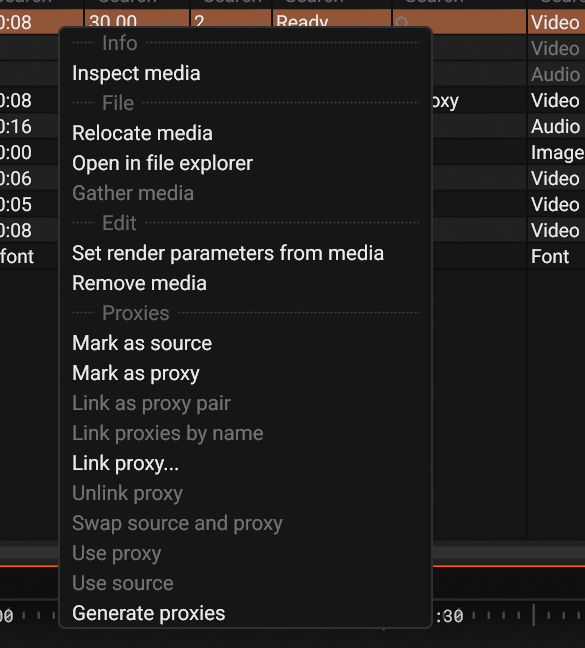
| # | Action | Description |
|---|---|---|
| 1 | Inspect media | Focus on a Inspector panel (create one if there is no existing inspector panel) to show information of the selected media file or media stream |
| 2 | Relocate media | Replace the media source with a different file on disk. Opens a file selector. All clips linked to the old media switch to the new file. Applies when the original file is missing or is replaced by another version. |
| 3 | Open in file explorer | Reveal the file in Finder / Explorer |
| 4 | Gather media | Copy the selected files into the project folder and relink their clips, with progress shown as it runs. Select files first to gather only those, or use File > Gather media to project folder for the lot. |
| 5 | Set render parameters from media | Set the project's render parameters, such as resolution and frame rate, to match this media file. |
| 6 | Remove media | Remove the selected files from the project together with their clips on the timeline. Blick asks for confirmation and tells how many clips go with them. |
| 7 | Mark as source | Set the role of the file to source. |
| 8 | Mark as proxy | Set the role of the file to proxy. |
| 9 | Link as proxy pair | Select two media files and link one as the proxy of the other. |
| 10 | Link proxies by name | Match imported media to proxy files by file name in one pass. |
| 11 | Link proxy... | Pick a file on disk and link it as the proxy of the selected media. Both files must load and both must contain video, and their aspect ratio and duration must match. |
| 12 | Unlink proxy | Break the link. The source stays in the project. |
| 13 | Swap source and proxy | Exchange which file is the source and which is the proxy. |
| 14 | Use proxy | Play, edit, and render with the proxy. |
| 15 | Use source | Play, edit, and render with the source. |
| 16 | Generate proxies | Transcode the selected files to proxies in the background, see Proxies above. |
Timeline Panel
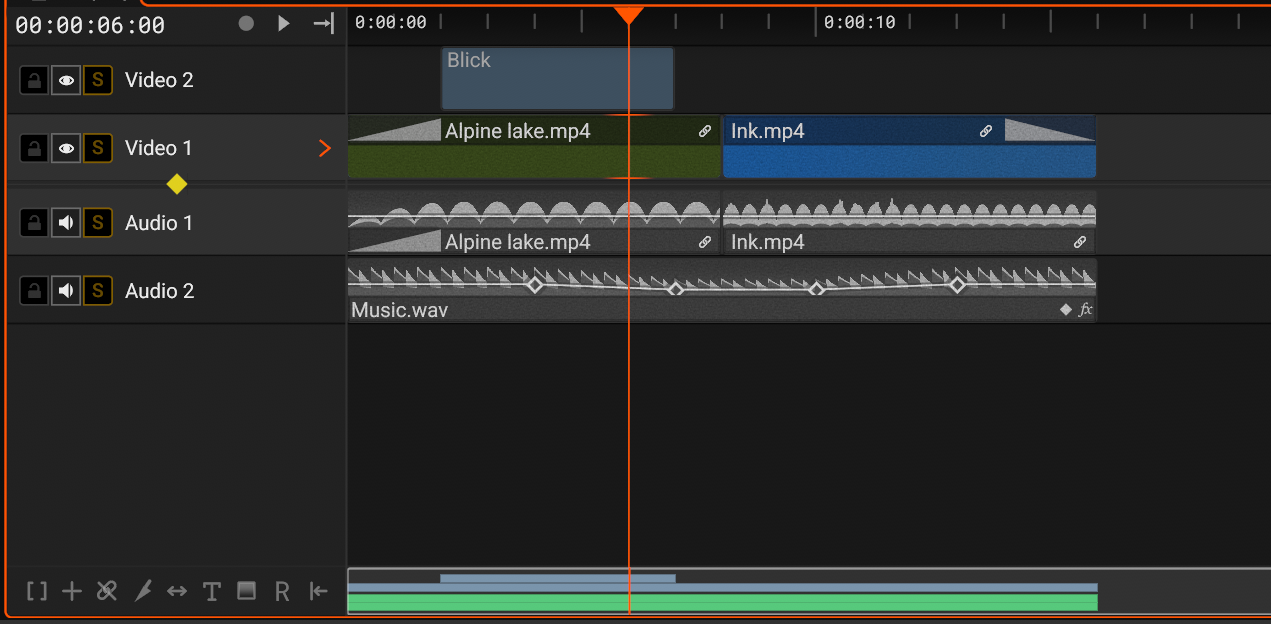
Clips carry a few markers: an fx diamond means the clip has added effects or keyframes, image clips take a tint from their most prominent color, and stretched or reversed clips show their speed.
Navigating the Timeline
The timeline uses one small set of mouse rules, plus a few modes you turn on by holding a key.
Mouse buttons
| Input | What it does |
|---|---|
| Left click | Seeks when you click empty space or the ruler, and clears the selection. Selects whatever you click on: clips, keyframes, transitions. |
| Left drag | Moves what you grab: drag a clip to move it, a keyframe to retime it, or scrub the playhead when you start on the ruler or empty space. |
| Right click | Opens the context menu for whatever is under the cursor: clips, keyframes, transitions, tracks, media, and empty timeline space. |
| Right drag | Box selects clips or keyframes without moving anything. |
| Middle drag | Pans the timeline. |
| Scroll wheel | Pans vertically. With modifier keys it pans horizontally and zooms, see the Scroll section below. |
Modal input: hold to enter, release to leave
Timeline tools work by holding a key: hold it, act with the mouse, then let go. The mode is on only while you hold the key.
While a mode is active, its chip lights up in the bottom-left corner of the timeline, and the status bar shows what the mouse buttons do in that mode. Every hold key can be rebound in Title bar > Settings Menu > Keybindings.
| Hold | Mode | What it does |
|---|---|---|
| Ctrl | Range select | Dragging selects a time range inside clips instead of whole clips. |
| Shift | Add | Selections add to the current selection instead of replacing it. Clicking adds keyframes, dragging clips duplicates them, and dragging a range selection duplicates it. |
| Alt | Unlink | Clicks and drags ignore clip links. Use it to grab one clip out of a linked group. Clicking an amplitude keyframe on a clip deletes it. |
| S | Knife | Clicking splits the clip under the cursor. Add Shift to split every track at once. |
| D | Slip | Dragging slides the source content inside the clip without moving the clip. |
| R | Rate stretch | Dragging a clip edge changes the clip's speed instead of trimming it. |
| A | Ripple trim | Dragging a clip edge trims it and shifts everything after it to follow, see Ripple Editing. |
| T | Text | Clicking a video track places a text clip. |
Modes combine with the mouse rules. Hold Ctrl and drag to select a range, add Shift to select a second one, then release both to go back to normal selection.
Keyboard
Space toggles playback, J/K/L shuttle backward, stop, and forward at variable speed. Left/Right jump between clip edges on the selected track, Up/Down move the track selection, ,/. step a single frame, Shift+,/Shift+. jump a whole second, V or Shift+V selects the clip under the playhead, and Ctrl with the arrows jumps to the start or end of the timeline. See the Playhead section for the full list.
The selected track
The timeline keeps one selected track in the video section and one in the audio section, and highlights the current one. Click a track to select it, or move the selection with Up/Down. The selection crosses between the video and audio sections when it reaches the boundary, and Tab jumps it straight to the other section.
The selected track is the reference point for track work:
- Left/Right jump the playhead between clip edges on the selected track
- Alt+L, Alt+M, and Alt+S toggle lock, mute (hide on video tracks), and solo on the selected track
- Ctrl+Shift+Left/Ctrl+Shift+Right select every clip before or after the playhead on the selected track, add Alt to do it across all tracks
- Pasted clips land relative to the selected tracks, see Select clips
- Insert a new track next to the selected one with Ctrl+Shift+N: above it in the video section, below it in the audio section
- Move the selected track, with everything on it, up or down with Ctrl+Shift+Up/Ctrl+Shift+Down
- Click a track's name in its header to rename it
- Delete a track from its right click menu. The confirmation dialog states how many clips will be deleted with it.
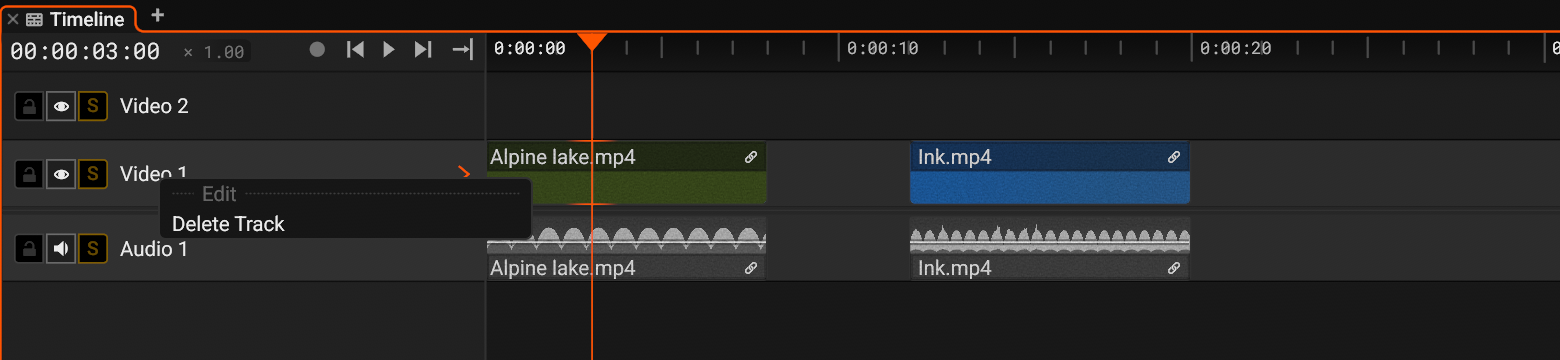
- Delete Track: delete the track and the clips on it. It is grey when the track is the last one of its kind
Timeline Context Menu
Right click empty space on a track. The playhead moves to that point and the track under the cursor becomes the selected track, so a paste lands there. Right click a gap between two clips and the gap menu opens instead, see Deleting gaps.
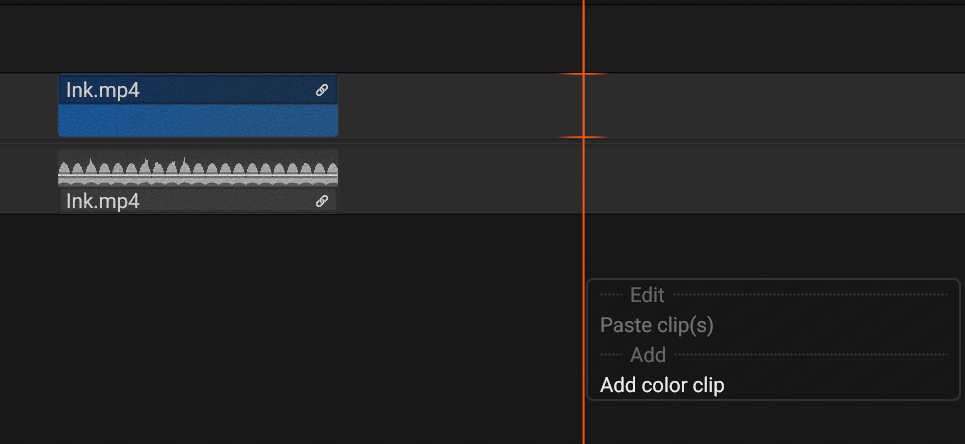
- Paste clip(s): paste the copied clips at the playhead. It is grey when nothing is copied
- Add color clip: place a color clip at the playhead, see Create Color Clip
Playhead
Move the playhead by clicking or scrubing on the empty spaces in the timeline (the area that has no tracks) or on the timeline ruler, Blick will highlight the ruler to indicate the the area that you can interact with.
Playhead in Blick always line up with the frame rate of the project (Can be modified in Render Panel > Sequence frame rate). You can move the playhead 1 frame forwards by ., and backwards by ,
The video shows a user viewing a 4k video frame by frame
More Actions
- Play/Pause video by hitting Space
- Jump one second forward/backward by hitting Shift+./Shift+,
- Jump to start/end of timeline by hitting Ctrl+Left/Ctrl+Right
- Zoom the timeline in or out around the playhead by hitting =/-
- Jump to the previous/next clip edge on the selected track by hitting Left/Right
- Move the track selection up/down by hitting Up/Down
The transport controls sit at the top left of the panel. Narrow timelines hide some of them, drag the divider between the track headers and the clips to show them all.

- The playhead time
- The playback speed and direction, see Shuttle. It is grey at 1x
- Record audio onto the selected audio track, see Recording Audio
- Jump to the start of the timeline
- Play or pause
- Jump to the end of the timeline
- What happens at the end of playback: stop there, or stop and return to where playback started
Shuttle: playback speed and direction
Blick uses the JKL convention found in most editors. L plays forward, J plays backward, and K stops. Tap L or J again while playing to multiply the speed by the step factor (2x by default, so 1x, 2x, 4x, 8x, up to 32x), and tap the opposite key to step the speed back down. The current speed shows next to the timecode whenever it is not 1x. Speed applies to previewing only and never changes your clips, use Rate Stretch for that.
- Hold L or J for half a second and the speed ramps up continuously for as long as you hold the key. Release it to drop back to the speed you started from, or to stop if you were not playing
- Hold K and tap L or J to step one frame at a time. Keep L or J held and the stepping repeats, getting faster the longer you hold
- The step factor is set in Title bar > Settings Menu > Shuttle controls
Audio stays audible at every speed, forward and backward. Pick how it sounds in Title bar > Settings Menu > Playback > Audio at speed. Spectral keeps the pitch and suits music, Speech is tuned for voice and keeps dialogue intelligible, Varispeed lets the pitch rise and fall like tape.
Instant playback
Blick does not build a frame index before playback. Playback and scrubbing are available immediately. Indexes build in the background and cache to disk. They make later seeks faster and more accurate on variable frame rate footage.
When playback starts, and after a seek during playback, the playhead waits until the current frame and the next three are decoded. If decoding falls more than 0.3 seconds behind during playback, the playhead pauses and resumes once frames are ready. At 1x speed, audio resyncs to the picture when it drifts by more than 40 ms.
Select clips
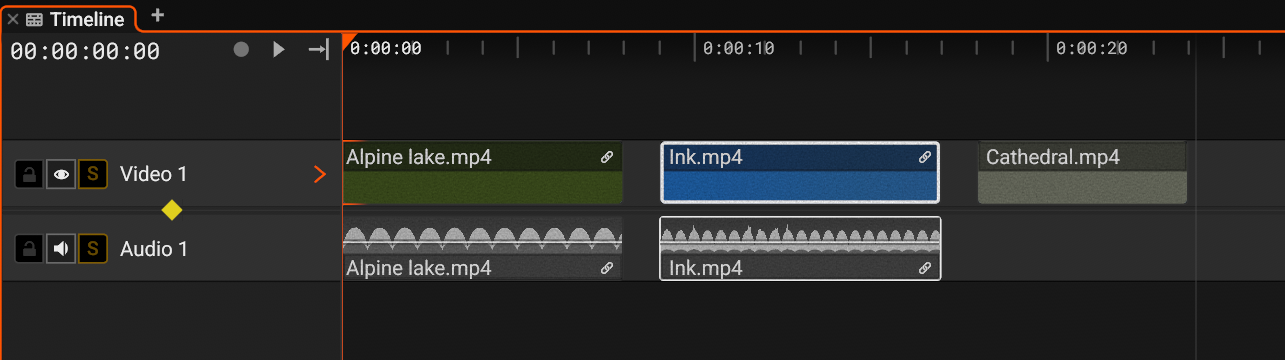
- Click to select a clip
Ctrl+C copies the selected clip. Ctrl+V pastes the clip at the playhead. The playhead is moved to the end of the clip after pasting.
- Select every clip with Ctrl+A. Clear the selection with Esc or by clicking empty timeline space
- Press V or Shift+V to select the clip under the playhead on the selected track, hold Shift to add it to the selection instead
- Select every clip before or after the playhead on the selected track with Ctrl+Shift+Left/Ctrl+Shift+Right. Add Alt to cover all tracks. Use it to shift everything downstream of an insert
Selecting multiple clips with right click drag
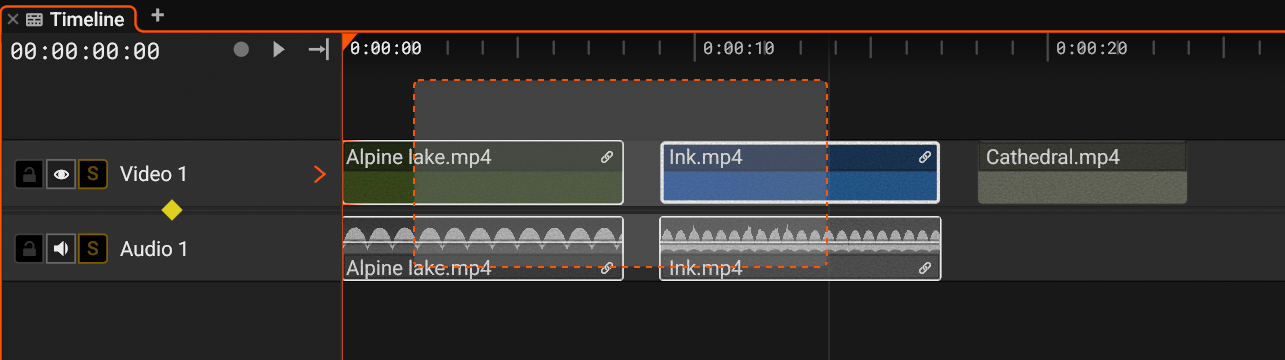
- Right click drag to box select multiple clips
Copy and paste works too! The playhead is moved to the end of the selected group after pasting.
Selecting multiple clips with Shift+Click/Shift+Drag
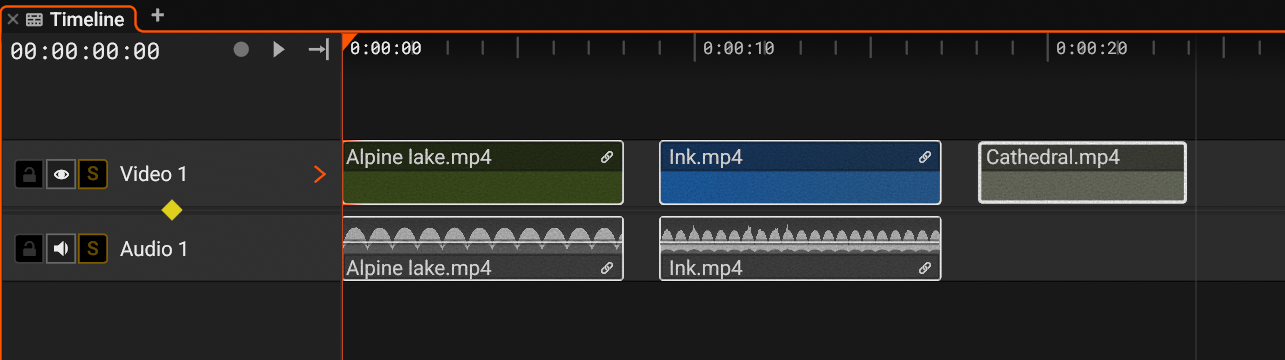
- Previously selected group of clips
- Hold Shift while clicking or box selecting to add more clips to the selection
Where pasted clips land
Pasting starts at the playhead and anchors on the selected tracks. For video, image, and text, the bottom clip of the copied group lands on the selected video track and the rest stack upward at their original spacing. For audio, the top clip lands on the selected audio track and the rest extend downward. Missing tracks are created, locked tracks are skipped.
Copies keep their links, effects, keyframes, and transitions. After a paste, the playhead sits at the end of the pasted group. A following paste is placed immediately after it. Right click empty timeline space to paste at that point instead.
Selection follows playhead
Settings > Timeline > Selection follows playhead makes the selection track the playhead. While you scrub, play, or step with the keyboard, Blick selects the clip under the playhead and drops the previous selection.
- Off: the selection stays as it is. This is the default.
- All tracks: selects the clip under the playhead on every unlocked track.
- Track cursor only: selects the clip under the playhead on the selected track only.
Linked clips are selected with them. Hold Alt to select the clip without its linked clips. The topmost selected clip becomes the active clip in the Effect panel. Locked tracks are skipped. When the playhead stops, the change is recorded as one undo step.
Link clips
Link clips to select and move a group of clips at once. When you add a video file that contains an audio stream and video stream to the timeline, Blick will automatically link both the video and audio clips.
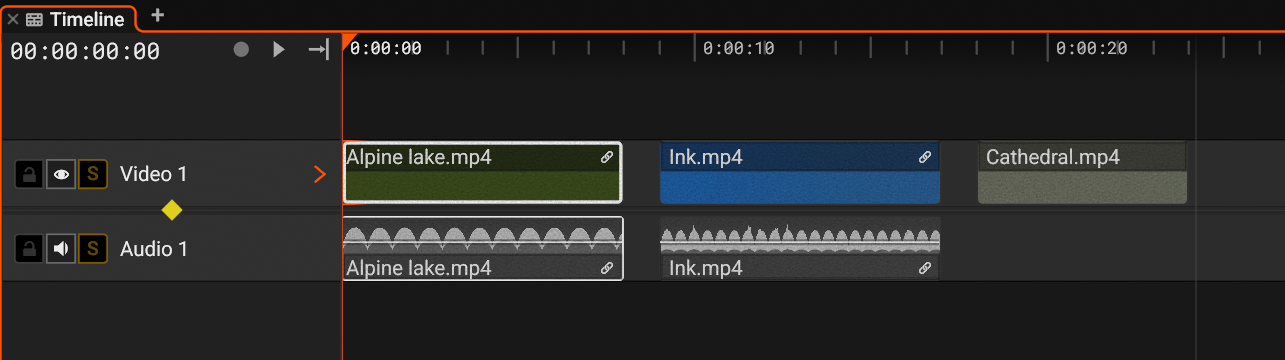
- The link icon on the clips denotes that they are linked.
- When you select one of the linked clips, all clips in the linked group are highlighted.
Link selected clips together with Context Menu > Link clips, or unlink them with Context Menu > Unlink clips, so the selected linked group is destroyed.
How to select one clip that is inside a linked group?
Normally, selecting one clip in a linked group results in selecting every clip in the group.
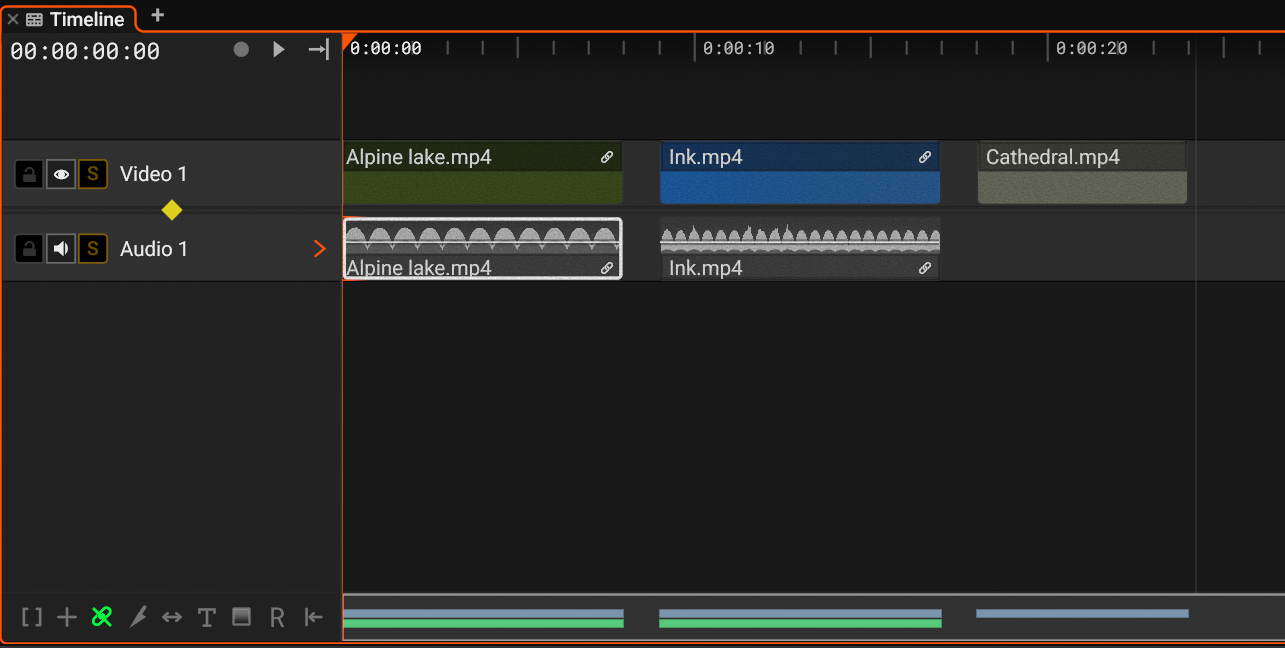
- Unlink Mode - Hold Alt+Click/Alt+Drag to select only the clip(s) that you want, even if it belongs to a linked group. This action does not remove the clip from the linked group. You can confirm that you are in Unlink Mode by checking the keyboard mode indicators in the bottom-left of the timeline panel.
- The Unlink chip lights up while the mode is active.
Move clips
Drag a clip to move it. Drag up or down to place it on another track, and drop it above the top track to create a new track for it. When several clips are selected, they move together and keep their relative positions.
- Clips always land on output video frames, which keeps cuts frame accurate
- While dragging, clip edges snap to the edges of other clips and to the playhead. Set the snap distance in Title bar > Settings Menu > Timeline > Snapping threshold, 0 turns snapping off
- Hold Shift when you start dragging to duplicate the selected clips instead of moving them. The originals stay in place and the copies follow your cursor, links included
- Locked tracks do not accept clips
Edit clips
Hold Ctrl and drag across the timeline to select a time range instead of whole clips. The selection clings to clip content, add Alt to select across empty space as well, and add Shift to keep previous ranges while selecting more. Delete a range to cut that span out of the clips underneath it, or copy it with Ctrl+C and paste it at the playhead with Ctrl+V.
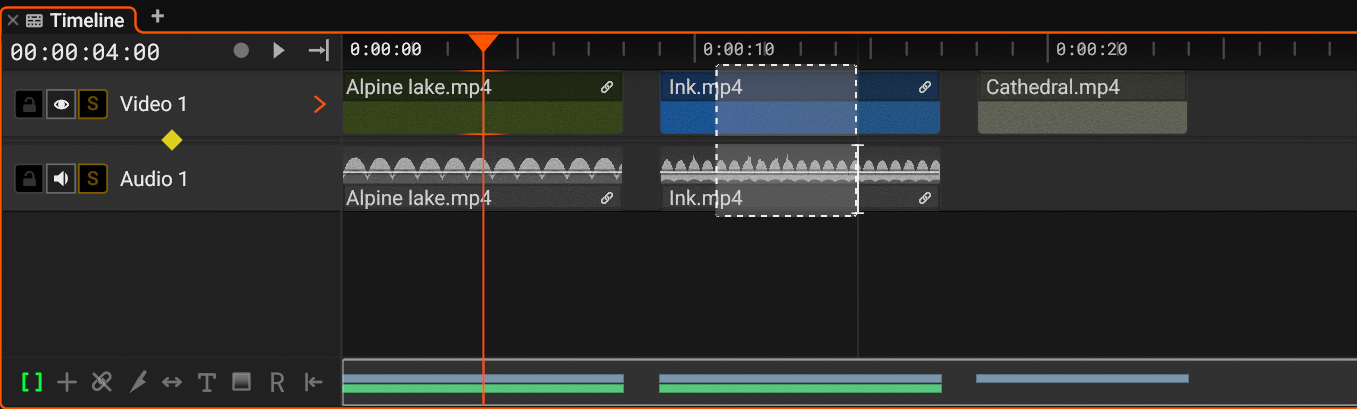
- The selected range covers part of the clips under it
- The Range chip lights up while you hold Ctrl
Right click a range for its menu:
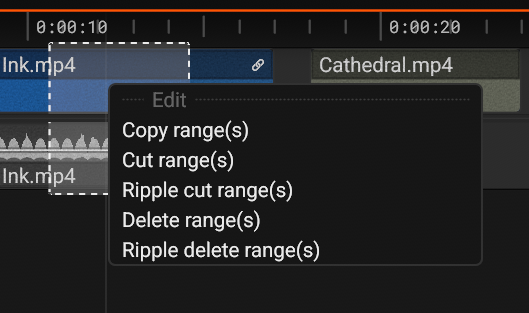
| # | Action | Description |
|---|---|---|
| 1 | Copy range(s) | Copy the selected spans to the clipboard. |
| 2 | Cut range(s) | Copy the selected spans and remove them from the clips, which leaves gaps. |
| 3 | Ripple cut range(s) | Copy the selected spans, remove them, and close the gaps. |
| 4 | Delete range(s) | Remove the selected spans from the clips, which leaves gaps. |
| 5 | Ripple delete range(s) | Remove the selected spans and close the gaps. |
Hold S to enter Knife mode, then click a clip to split it in two at the cursor. The cut lands on a project frame. You can also press B to split the selected clips at the playhead. Hold Shift as well to cut through every track at once.
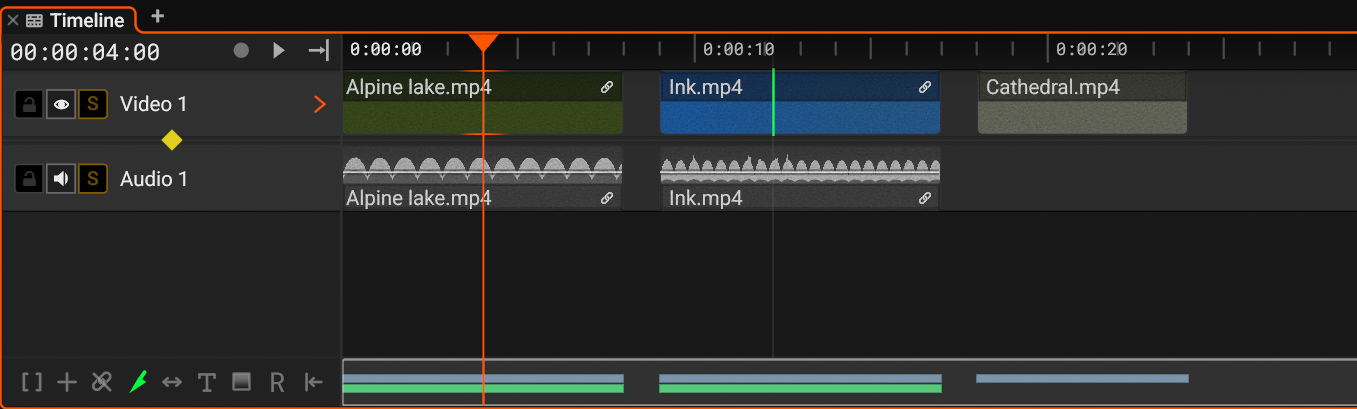
- The line shows where the click splits the clip
- The Knife chip lights up while you hold S
Drag the left or right edge of a clip to trim it. Video and audio clips stop at the bounds of their source media. Image and text clips extend as far as you want. Trimmed edges snap the same way moved clips do, and a ghost of the clip's previous extent stays visible while you drag. Hovering a trim handle also shows the matching handles on the linked clips that trim with it.
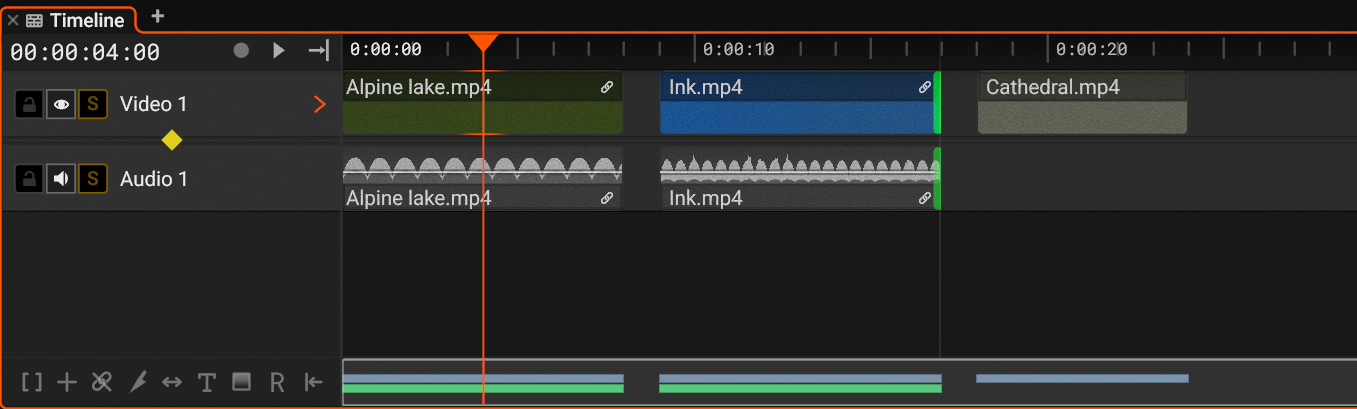
- Trim clips by dragging the beginning or end of a clip
Trim the clip under the playhead to the playhead without dragging. Press Shift+Q to trim its start to the playhead, and Shift+E to trim its end. These leave a gap where the trimmed part was. The ripple versions, Q and E, close the gap instead, see Ripple Editing.
Clip Context Menu
Right click a clip for its menu. Grey entries do not apply to the clip.
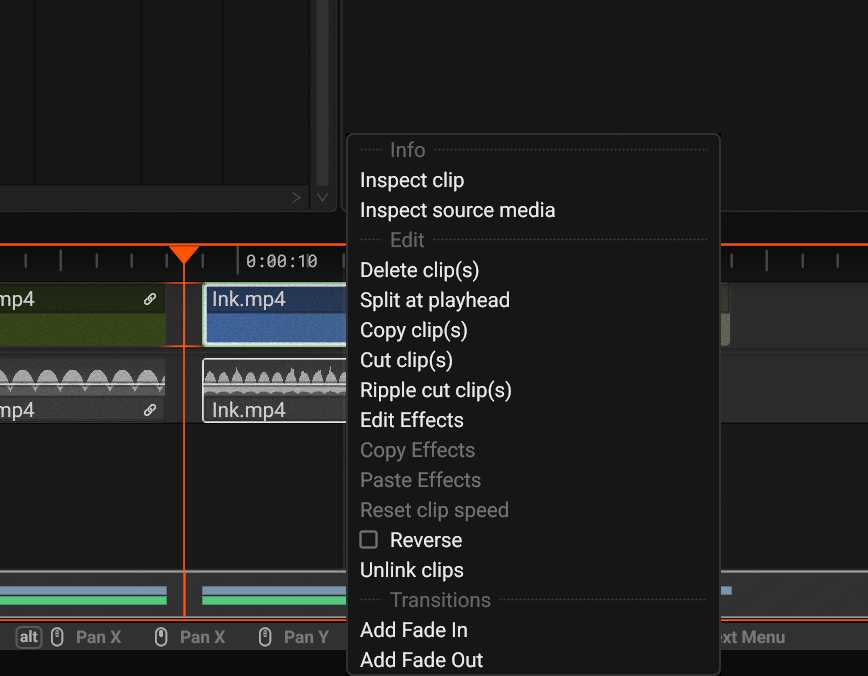
| # | Action | Description |
|---|---|---|
| 1 | Inspect clip | Show the clip in the Inspector panel. |
| 2 | Inspect source media | Show the media file of the clip in the Inspector panel. |
| 3 | Delete clip(s) | Delete the selected clips, see Delete clips. |
| 4 | Split at playhead | Split the selected clips at the playhead, the same as B. |
| 5 | Copy clip(s) | Copy the selected clips, the same as Ctrl+C. |
| 6 | Cut clip(s) | Copy the selected clips and delete them, the same as Ctrl+X. |
| 7 | Ripple cut clip(s) | Copy the selected clips, delete them, and close the gap, the same as Ctrl+Shift+X. |
| 8 | Edit Effects | Show the effects of the clip in the Effect panel. |
| 9 | Copy Effects | Copy the effects of the clip. |
| 10 | Paste Effects | Paste the copied effects onto the selected clips. |
| 11 | Reset clip speed | Return a stretched clip to 1x, see Rate Stretch. |
| 12 | Reverse | Play the clip backwards in place, see Reverse clips. |
| 13 | Unlink clips | Take the clip out of its linked group. Selected clips that are not linked show Link clips instead. |
| 14 | Add Fade In | Add a fade at the start of the clip, see Clip transitions. Audio clips show Add Ramp In. |
| 15 | Add Fade Out | Add a fade at the end of the clip. Audio clips show Add Ramp Out. |
Ripple Editing
A ripple edit trims or deletes content and shifts every clip after the edit point to the left, on all unlocked tracks. No gap is left at the edit point.
Ripple trim
Hold A and drag the edge of a clip. The clip trims as usual, and everything after the edit follows the moving edge. Press or release A while dragging to switch the trim between rippling and leaving a gap.
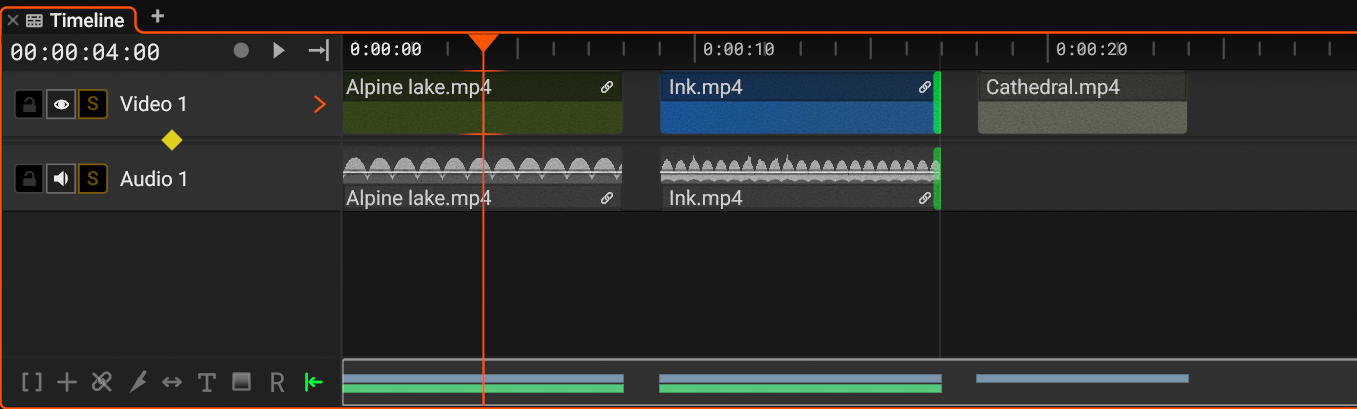
- Drag the edge to trim the clip
- The clips after the edit follow the moving edge
- The Ripple chip lights up while the mode is active
Ripple commands
All of them are remappable in Keybindings, and they appear in the clip and range context menus as well.
| Command | Keys | What it does |
|---|---|---|
| Ripple delete selection | Shift+X | Deletes the selected clips or ranges and closes the space they held. |
| Ripple cut | Ctrl+Shift+X | The same, but copies the selection to the clipboard first. |
| Ripple delete clip at playhead | W | Removes the clip under the playhead on the selected track and closes the gap. |
| Ripple trim start to playhead | Q | Trims the clip under the playhead to start at the playhead and pulls what follows along. The playhead moves back with the content and stays on the same frame. |
| Ripple trim end to playhead | E | Trims the clip under the playhead to end at the playhead and pulls what follows along. |
| Ripple delete gap at playhead | Shift+W | Removes the gap under the playhead on the selected track and closes it. |
Deleting gaps
Right click the empty space between two clips on a track. Blick selects the gap as a range and opens its menu. Choose Ripple delete range(s) and the gap closes. You can also place the playhead over a gap on the selected track and press Shift+W.
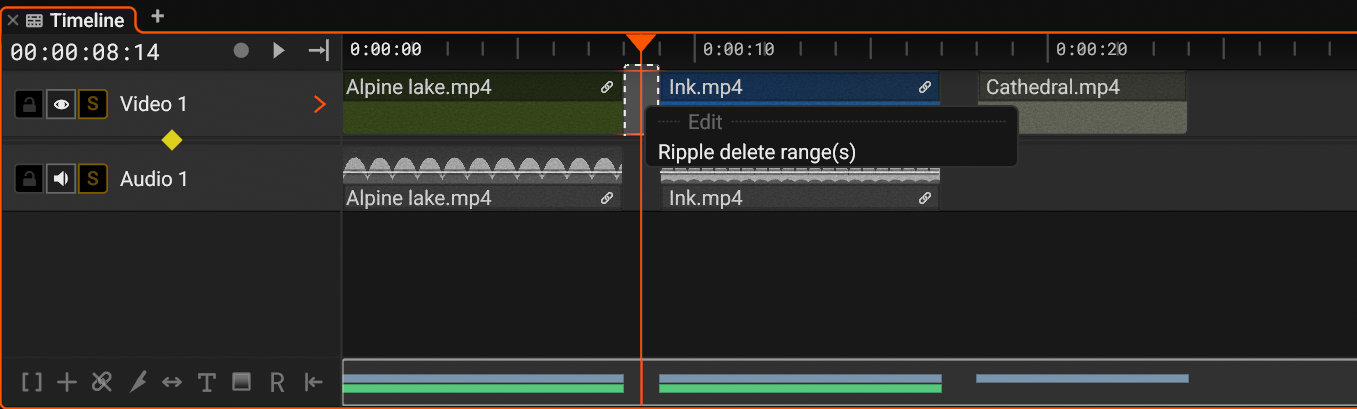
- The gap, selected as a range
- Ripple delete range(s) closes the gap
Slip clips
Hold D and drag horizontally inside a clip to slide the source material under it. The clip keeps its position and duration on the timeline, only the part of the source you see changes. Slipping needs spare material beyond the clip bounds, so it only works on clips trimmed shorter than their source.
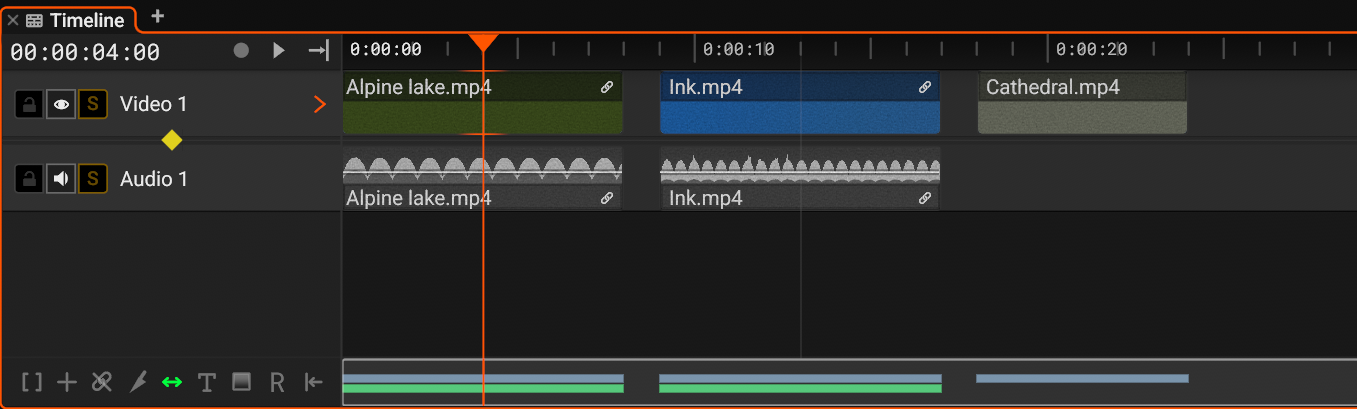
- Drag inside the clip to slide its source material
- The Slip chip lights up while you hold D
Rate Stretch
Hold R and drag the left or right edge of a clip to change its speed. Instead of trimming, the clip keeps all of its source material and plays it faster or slower to fit the new length: drag the edge outward and the clip slows down, drag it inward and it speeds up. Audio clips stretch too, with pitch preserved.
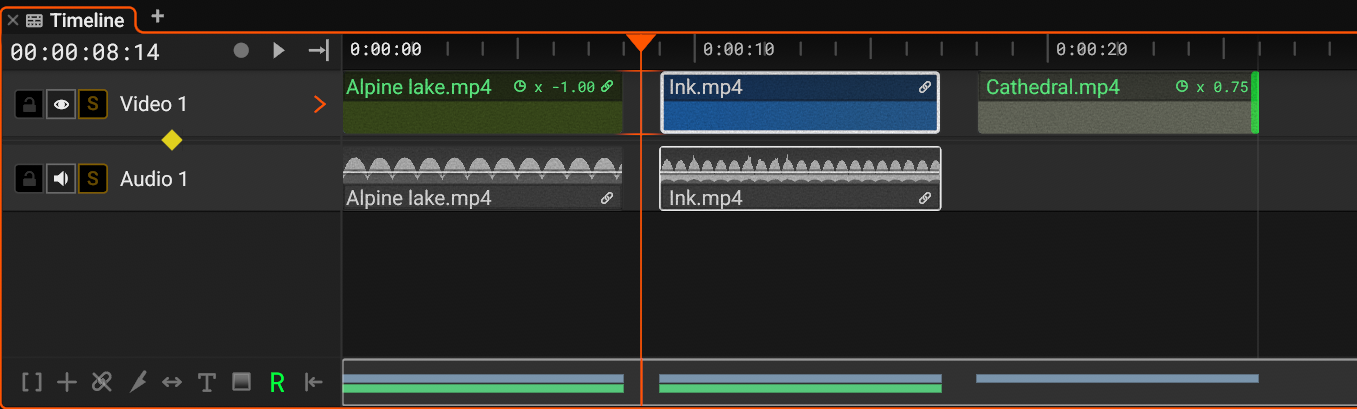
- Drag a clip edge to change its speed
- Stretched clips are marked on the timeline with their speed. Right click a clip and choose Reset clip speed to return it to 1x Context Menu
- A reversed clip shows a negative speed, see Reverse clips below
- The Rate stretch chip lights up while you hold R
- Linked clips and multi-selections stretch together, keeping video and its audio in sync. Hold Alt to stretch one clip out of a linked group
- While dragging, the edge snaps to other clips and to the point where speed is exactly 1x
Rate Stretch changes the clip and is baked into the render. To preview at another speed without touching your clips, use the shuttle controls.
Reverse clips
Right click a clip and tick Reverse to play it backwards in place. The clip keeps its position and length on the timeline, only the direction of its content flips, and it combines with rate stretching. Reverse works on video and audio clips and is baked into the render. The same toggle is available as the Reverse clip(s) command for a whole selection Context Menu
Delete clips
Delete the selected clips by pressing Del or Backspace or X, or with Click on clip > Context Menu > Delete clip(s). Deleting a range selection removes just that span from the clips underneath it.
Scroll
The timeline scrolls and zooms with the mouse wheel plus modifier keys. The defaults are listed below, and you can swap which modifier does what in Title bar > Settings Menu > Keybindings > Timeline scroll wheel.
- Scroll vertically Scroll
- Scroll horizontally Alt+Scroll
- Pan horizontally Middle Scroll
- Zoom vertically Shift+Scroll
- Zoom horizontally Ctrl+Scroll
Scrollbar
The strip at the bottom of the panel is a minimap of the whole timeline. The highlighted window marks the visible area. Drag it to pan to any part of the timeline. The chips on its left show the active timeline mode.
Clip transitions
Transitions blend a clip in or out over a set duration. Video, image, and text clips take Fade In and Fade Out, a linear opacity ramp. Audio clips take Ramp In and Ramp Out, a linear volume ramp.
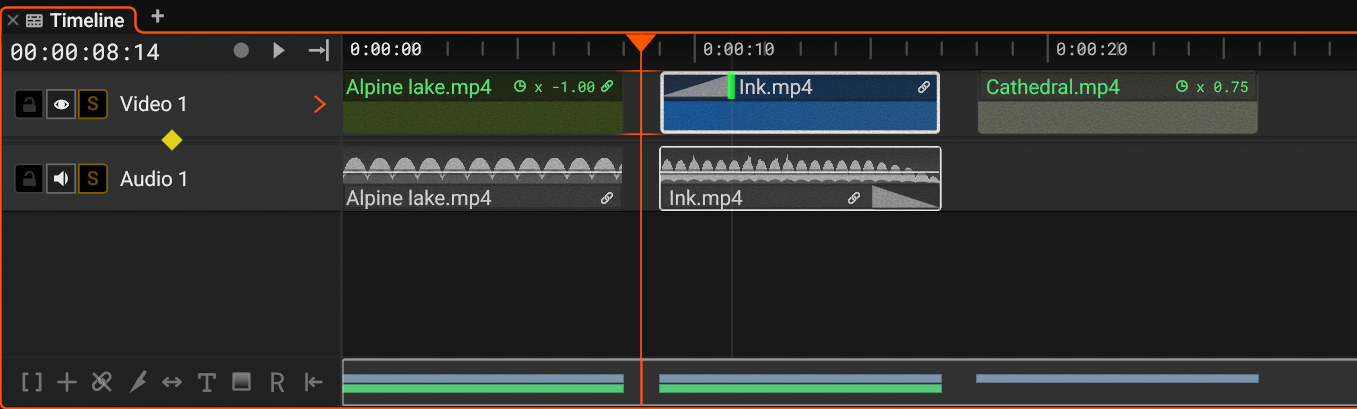
- A Fade In at the start of a video clip
- A Ramp Out at the end of an audio clip
- Drag the inner edge of a transition to change its duration
- Add a transition: right click a clip and choose Add Fade In or Add Fade Out (Add Ramp In and Add Ramp Out on audio clips) Context Menu
- With several clips selected, adding a transition applies it to every selected clip at once
New transitions start at 1.5 seconds. A transition can cover at most the whole clip.
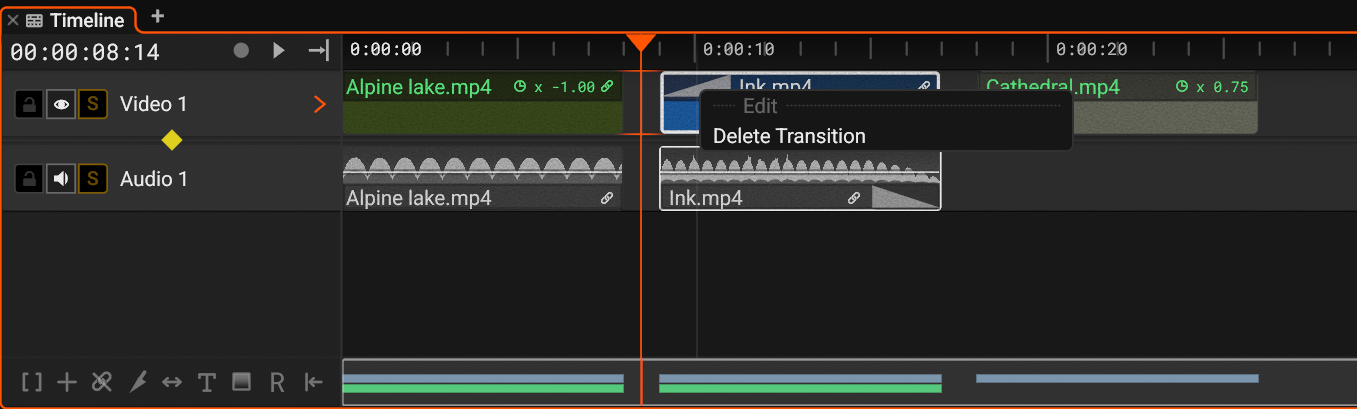
- Remove a transition: right click the transition and choose Delete Transition
Keyframe Editor
Keyframes change the value of an effect parameter over time. Each keyframe is a point on a curve, and Blick reads the value along the curve between points. The keyframe editor expands below the selected clip and shows one lane for every keyframe enabled channel of its effects. Enable keyframes on a channel from the Effect panel, see Keyframe Controls.
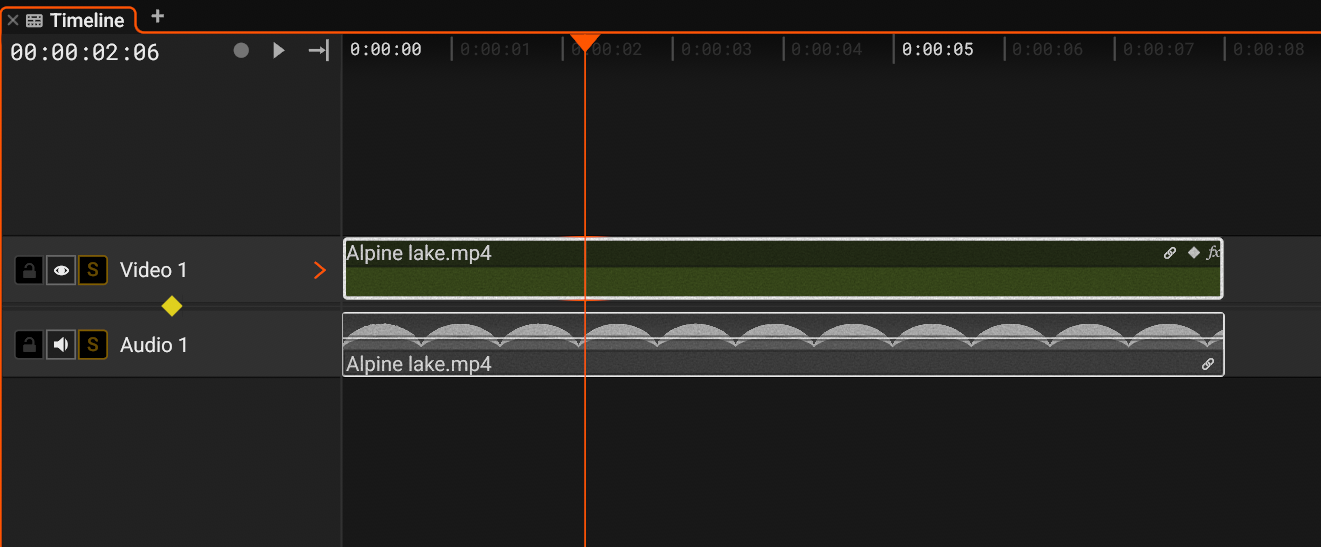
- The selected clip. The editor shows the keyframes of the selected clips
- Click the diamond to open the keyframe editor
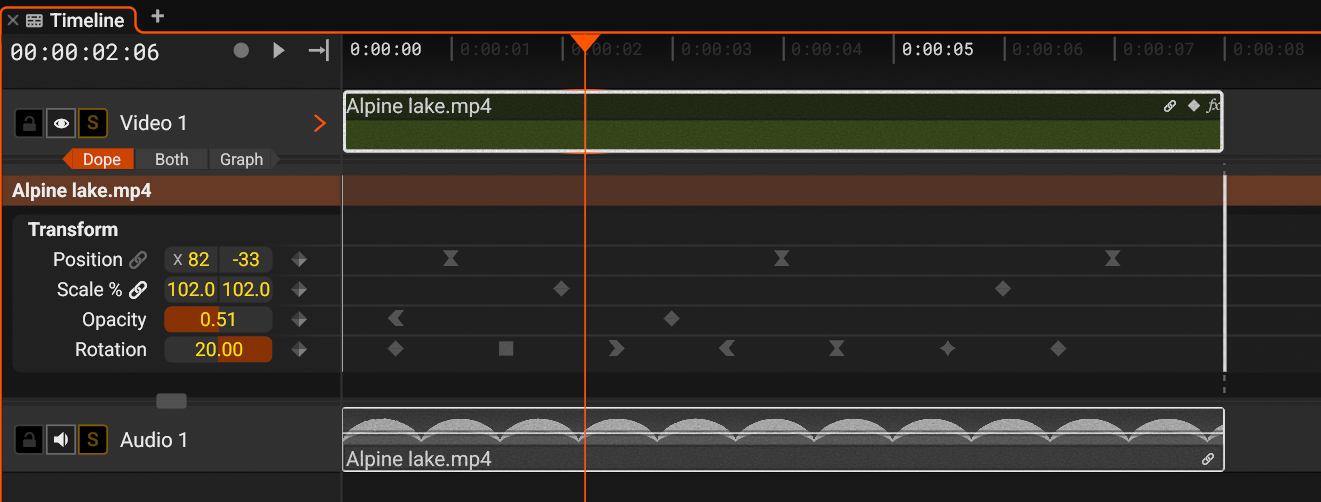
- The view of the editor: Dope, Both, or Graph
- The clip that the lanes below belong to
- One card for each effect with keyframes
- A keyframe. Its shape shows its preset
- Close the keyframe editor
Drag the divider above the editor or below it to give the editor more height.
Each lane starts with a header:
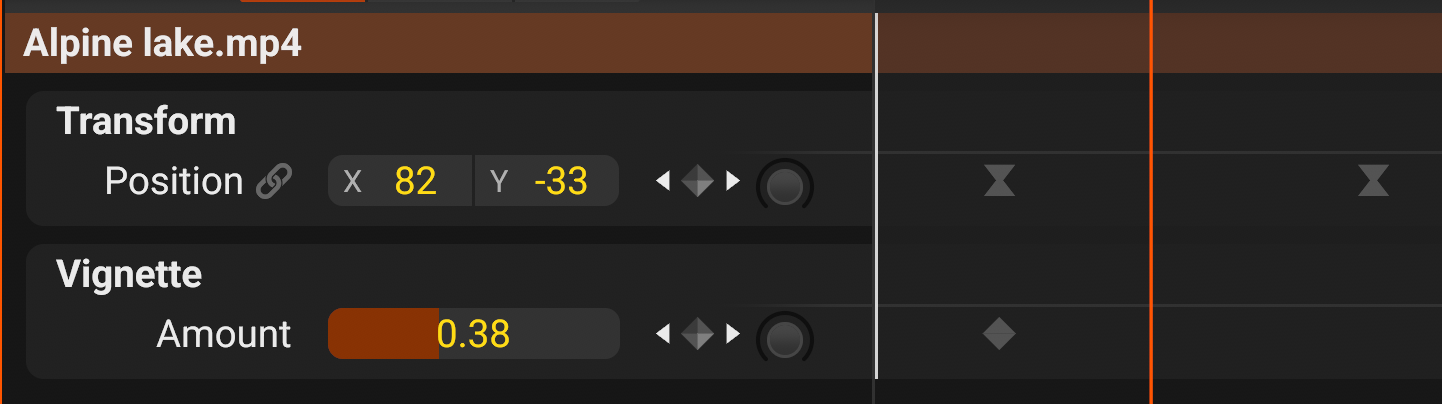
- The effect that the lanes belong to
- One lane for each field with keyframes. Click a lane to show its curve in the curve editor. Right click it for the lane menu
- The value of the field at the playhead
- Jump to the previous keyframe of the lane
- Add a keyframe at the playhead, or remove the keyframe that is at the playhead
- Jump to the next keyframe of the lane
- The smoothing knob, see Keyframe Controls in the Effect panel
- The keyframes of the lane
A narrow sidebar hides the arrows and the knob. Drag the divider between the lane headers and the lanes to show them.
Views: Dope sheet, Curve editor, Both
The three way toggle at the top of the editor sets the view.
- Dope: the dope sheet, a lane of keyframe points laid out in time.
- Graph: the curve editor, where each channel draws as an editable curve of value over time.
- Both: the dope sheet on top and the curve editor below.
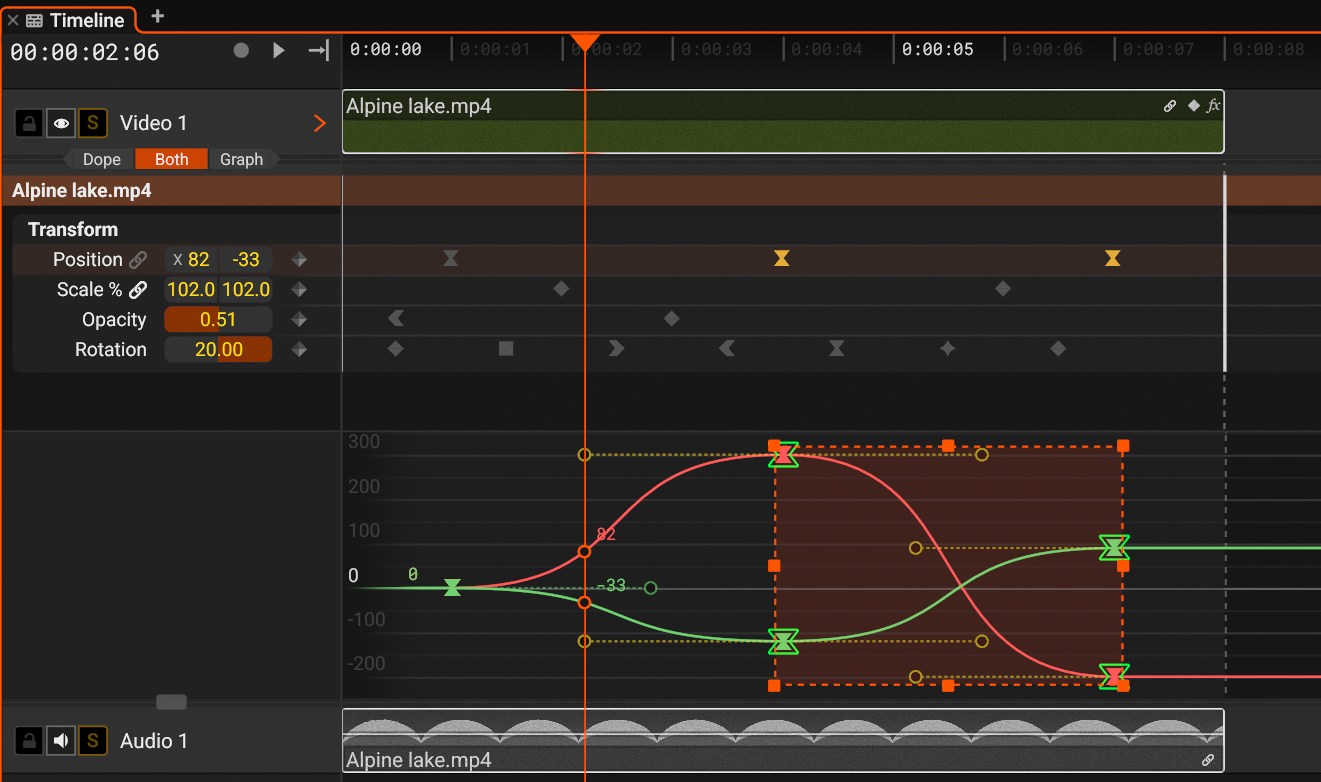
- The dope sheet
- The curve editor. It shows the curve of the selected lane
- Drag the divider to share the height between the two views
Presets
A preset sets the shape of the curve at a keyframe. Right click a keyframe and pick one. Each preset has its own keyframe shape:

- Linear: the value changes at a constant rate to the next keyframe
- Hold: the value stays fixed until the next keyframe, then jumps
- Ease in: the value starts slow and speeds up
- Ease out: the value starts fast and slows down
- Easy ease: the value eases at both ends
- Swish: the value overshoots and settles back
Editing a keyframe's handles by hand sets its preset to Custom. A Custom keyframe has the shape of Easy ease.
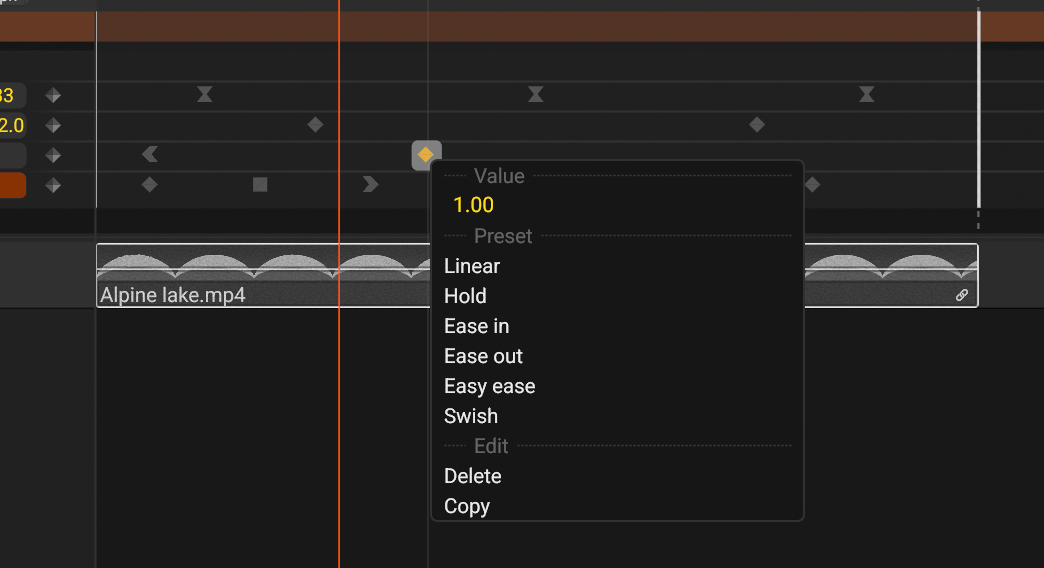
Keyframe Context Menu
Right click a keyframe for its menu.
| # | Entry | Description |
|---|---|---|
| 1 | Value | The value of the keyframe. Drag or type to change it. It shows when one keyframe of a number field is selected. |
| 2 | Linear | Set the preset of the selected keyframes, see Presets. |
| 3 | Hold | |
| 4 | Ease in | |
| 5 | Ease out | |
| 6 | Easy ease | |
| 7 | Swish | |
| 8 | Delete | Delete the selected keyframes. |
| 9 | Copy | Copy the selected keyframes, see Copying and pasting. |
Handles
In the curve editor each keyframe has two tangent handles that shape the curve into and out of the point. The two handles mirror each other by default. Hold Alt while dragging a handle to break the pair so each handle moves on its own.
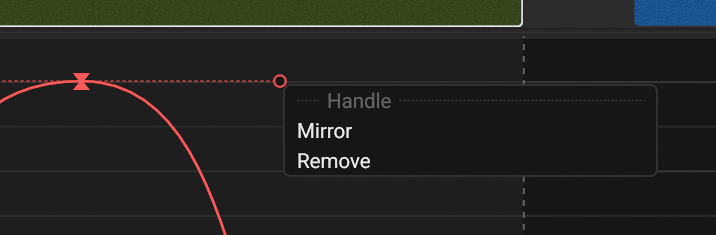
- Mirror: couple the two handles of the keyframe again
- Remove: delete this handle
Components
A field with more than one component, such as Position or Scale, keeps a separate curve for each axis in one lane, keyed at the same times. Right click a lane and choose Decouple to key each component on its own, or Couple to join them again. A color channel eases as one and draws as a gradient strip.
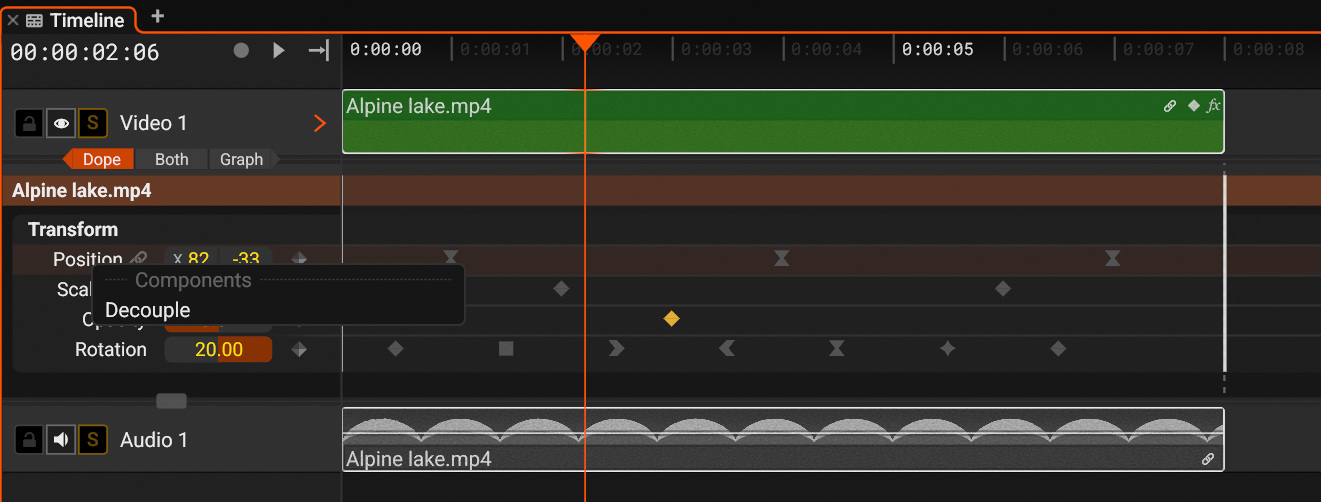
- Decouple: key each component of the field on its own
Editing in the curve editor
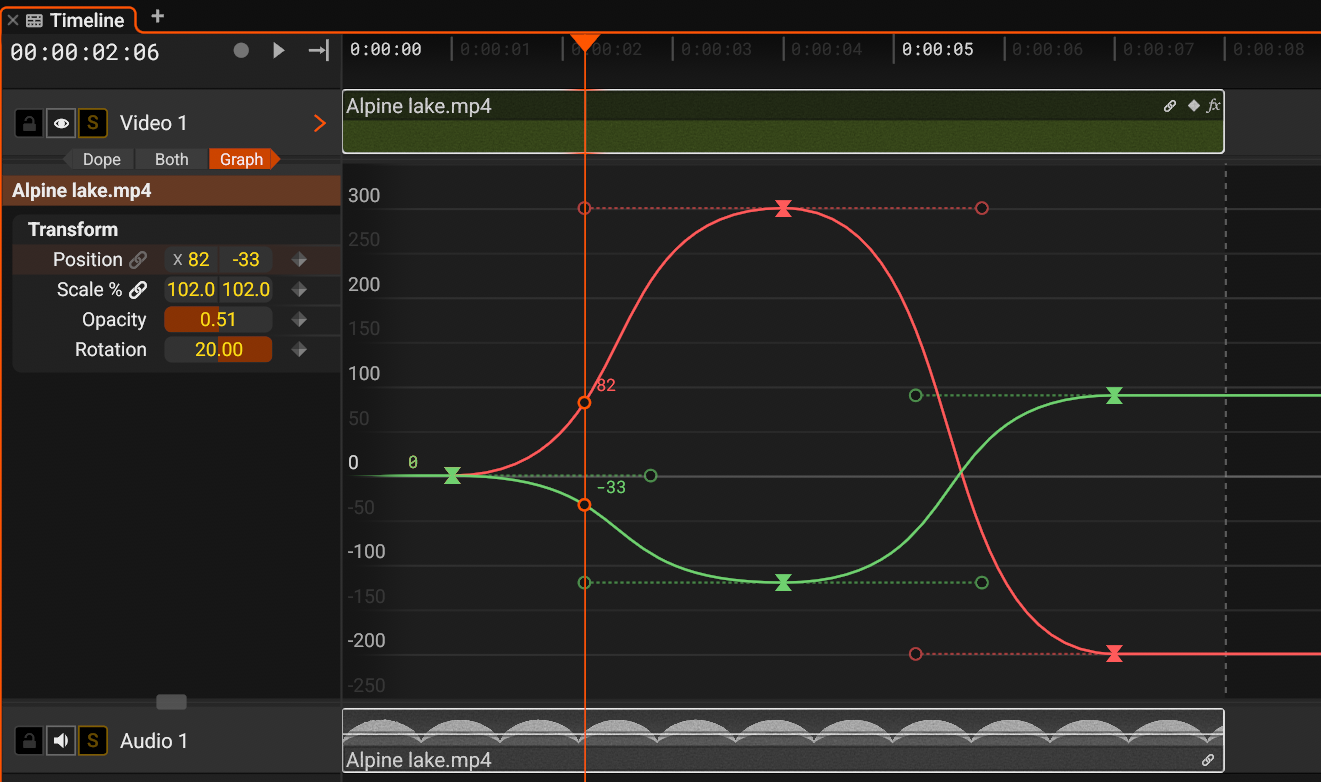
- The selected lane. The curve editor shows its curves, one color for each component
- The value ruler. Double click it to fit the curves into the view
- A keyframe. Drag it to move it in time and value
- A tangent handle. Drag it to shape the curve
- Seek: left click or drag on empty graph space.
- Add a point: hold Shift and click a curve, or double click a curve.
- Remove a point: hold Alt and click a keyframe.
- Move a point: drag it. Dragging in time moves the whole selection; dragging in value moves the active channel.
- Move a handle: drag its dot.
- Pan and zoom: the mouse wheel pans the value axis, Shift+Wheel zooms it, Alt+Wheel pans time, and Ctrl+Wheel zooms time. The bindings are remappable under Settings > Keybindings > Timeline scroll wheel.
Right drag on empty graph space to box select keyframes. A transform box appears around the selection.
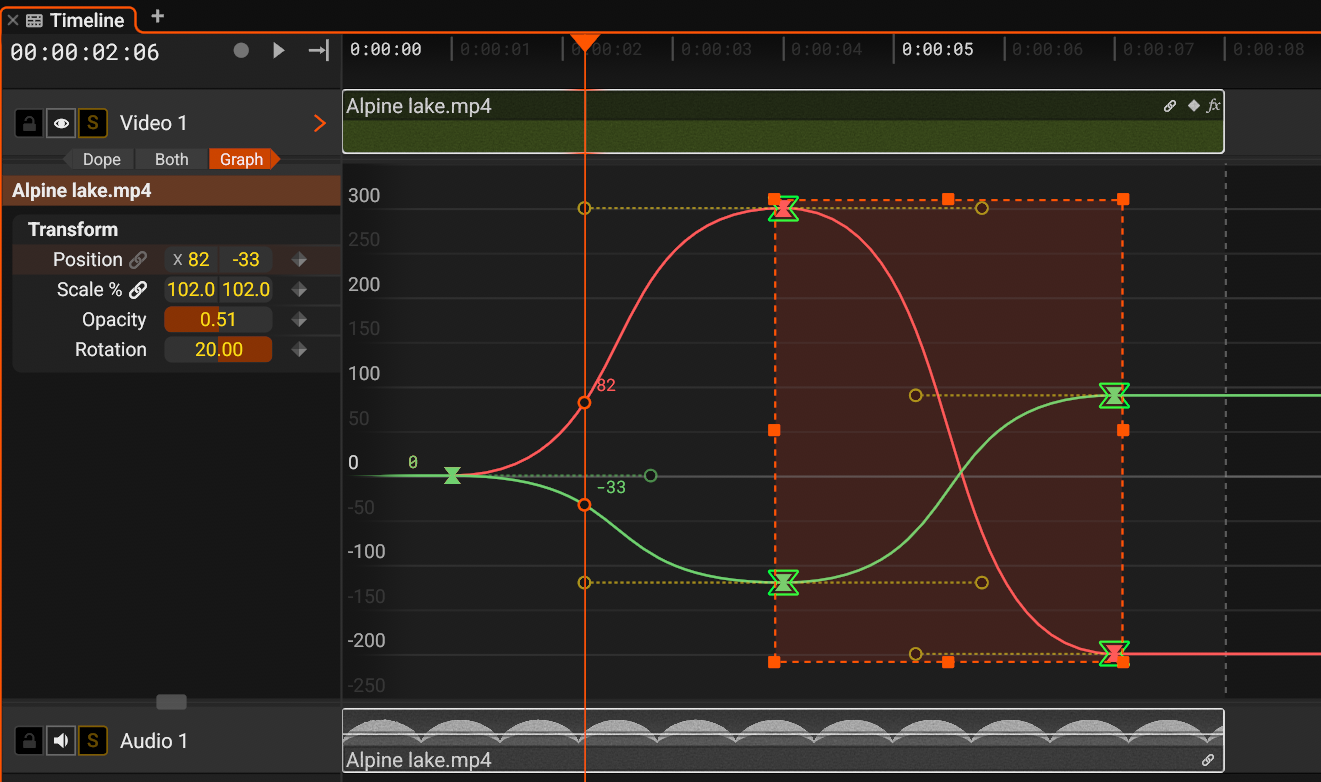
- Drag the edges and corners of the box to scale the keyframes in time and value. Hold Ctrl to scale about the center
Right click empty graph space for the curve editor menu.
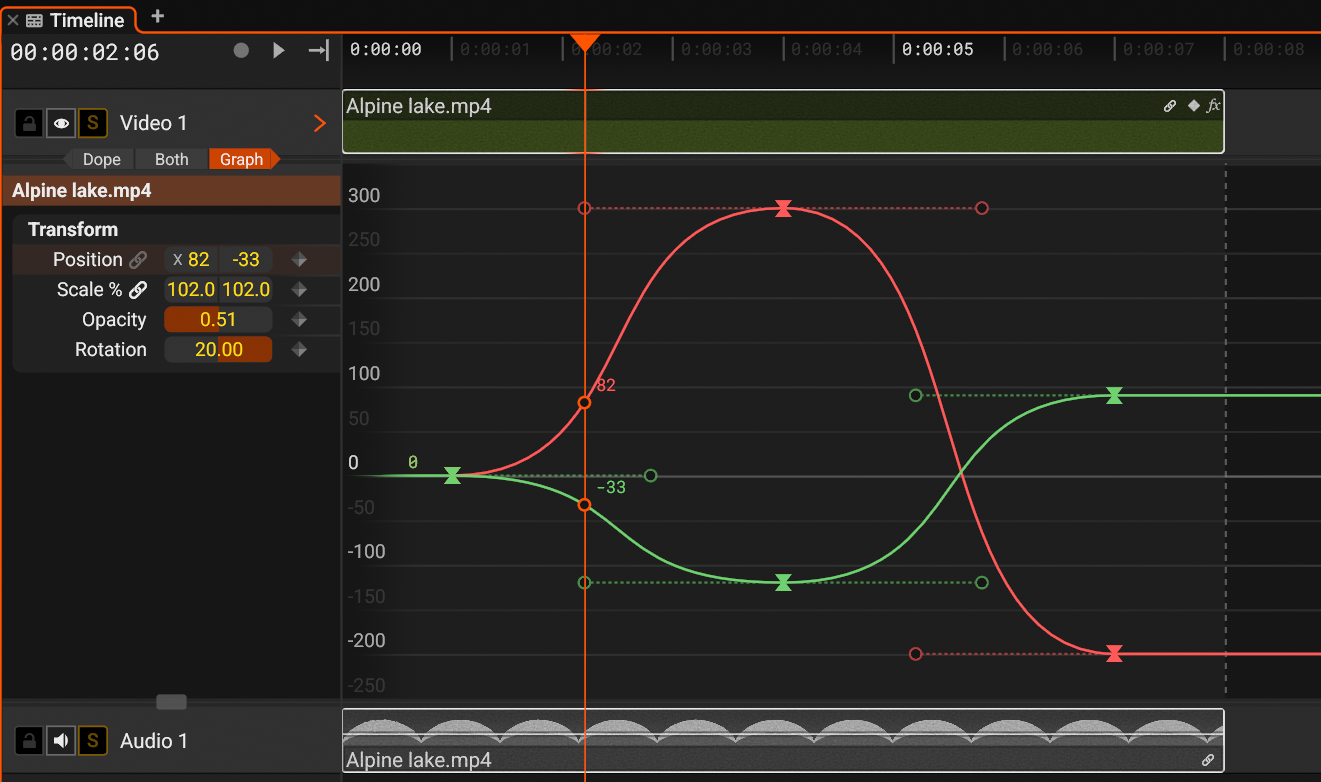
- Fit view: fit the curves of the selected lane into the view. The menu also shows Paste keyframe(s) when you have copied keyframes
Editing in the dope sheet
The dope sheet edits timing. Hold Shift and click a lane to add a keyframe at that point, hold Alt and click a keyframe to remove it, and drag a keyframe to move it in time. Left click selects, right click drag box selects, and right click opens the keyframe menu.
Copying and pasting
Copy selected keyframes with Ctrl+C or from the right click menu, then paste them at the playhead with Ctrl+V. Keyframes paste into another clip when the channel matches: copy Position keyframes from one clip, select another, and the same motion lands there.
Working across several clips
With several clips selected, the keyframe editor shows the channels of all of them at once. Selected keyframes drag together, even across different clips and tracks.
Keyframe times are anchored to the clip. Move the clip and its keyframes travel with it. They can also sit outside the clip's current bounds, anywhere the clip could be extended into, and that motion continues if you lengthen the clip later.
Create Text Clip
Hold T and click a video track to place a text clip there. You can also right click inside the Monitor panel and choose Add text clip.
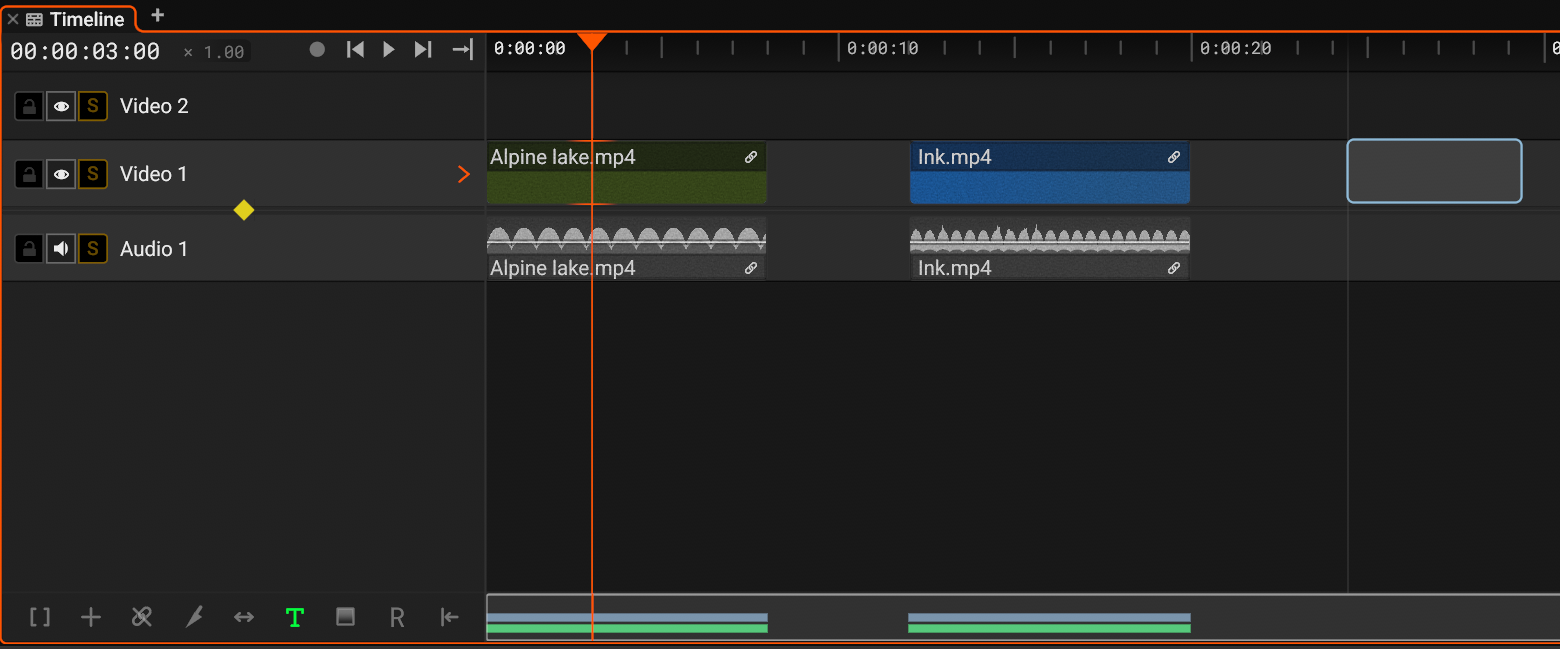
- The ghost shows where the text clip lands. Click to place it
- The Text chip lights up while you hold T
Select the text clip and open the Effect panel to type your text and set its font, size, and color under Text Content. Everywhere else, text clips behave like any visual clip: trim them to any length, move them, and apply effects and keyframes.
A new text clip takes the font, size, and color of the last text clip you selected. While you hold T, a ghost of the clip in those settings follows your cursor over the timeline.
Editing text on the canvas
Double click a text clip in the Monitor to edit its text in place. Text can span several lines. Text shaping applies ligatures and joins glyphs, and platform input methods work for scripts that need them, including Chinese, Japanese, and Korean. The caret and selection follow the shaped text.
A selected text clip shows a box in the Monitor. Drag the rotation handle to rotate the text. When the clip uses a fixed box, drag the edge handles to resize the box.
Create Color Clip
A color clip is a generated clip filled with a solid color or a gradient. It uses no media.
- Hold C and click a video track to place a color clip there
- Or right click empty timeline space and choose Add color clip, see Timeline Context Menu
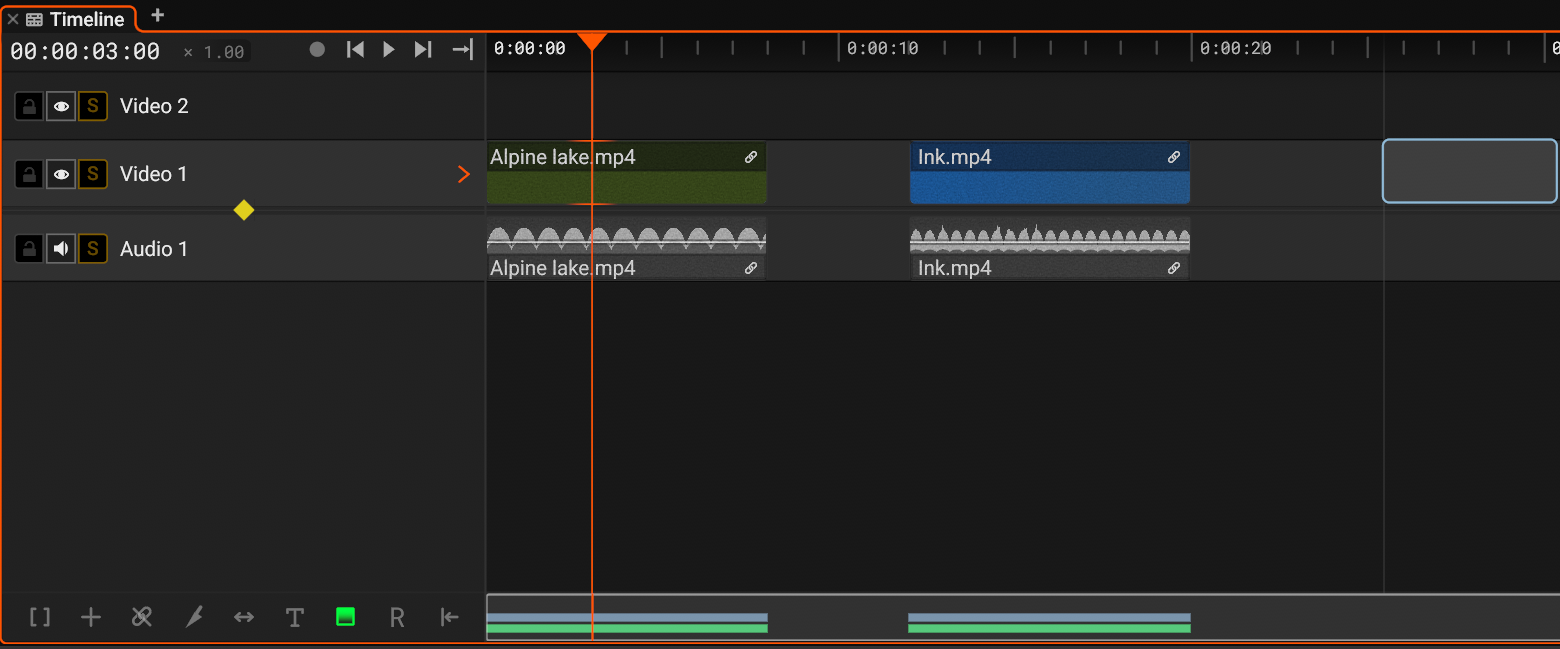
- The ghost shows where the color clip lands. Click to place it
- The Color chip lights up while you hold C
Select the color clip and open the Effect panel to set its fill under Color Clip Intrinsics. Choose Solid or Gradient, set the gradient shape to horizontal, vertical, or radial, and set the colors and size. A color clip behaves like any visual clip: trim it, move it, and add effects and keyframes. See Color Clip Effects in the Effect panel.
Recording Audio
Blick records audio from an input device onto the timeline. The take is written to disk and placed on the timeline as an audio clip.
Record a take
- Select the audio track to record onto. The track must be unlocked.
- Move the playhead to where the take should start.
- Click the record button in the transport controls, or run the Start Audio Recording action.
- Click Stop, or press Space, to finish.
Recording starts at the playhead on the selected audio track. The playhead advances as you record. A level meter shows on the track, and the recorded region shows its running length. Seeking or stopping playback while recording ends the take.
Input and output devices
Choose the input under Settings > Audio devices > Recording device, and the output under Playback device. Refresh the device list from the same section. System default follows the operating system's current device.
Where takes are saved
Each take is a mono WAV file. A saved project writes to a Recordings folder next to the project file. An unsaved project writes to a Recordings folder in your Documents folder. Files are named Recording followed by the date and time.
Rules
- An audio track must be selected and unlocked.
- Audio already on the track under the take is trimmed or split to make room for the new clip.
- The track being recorded is not played back while recording. Other tracks play as usual.
- One take records at a time, and recording is not available while a render is running.
Effect Panel
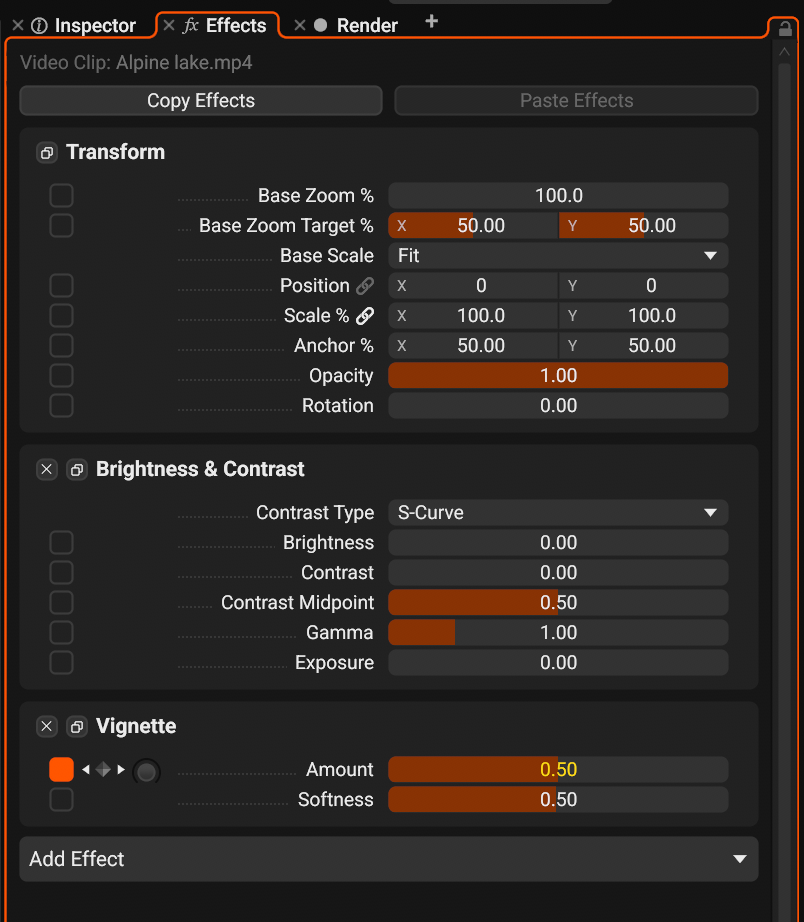
| # | Element | Description |
|---|---|---|
| 1 | Clip info | The type and the name of the clip that the panel shows. |
| 2 | Copy Effects | Copy all the effects of the clip, keyframes included. |
| 3 | Paste Effects | Paste the copied effects onto every selected clip. It is grey when nothing is copied. |
| 4 | Lock | Keep showing this clip when the selection changes. |
| 5 | Default effect | Each clip type has effects that cannot be removed, here Transform. |
| 6 | Copy effect | Copy only this effect. |
| 7 | Added effect | An effect from the Add Effect list. |
| 8 | Remove effect | Remove this effect from the clip. |
| 9 | Keyframes | Turn keyframes on for this field, see Keyframe Controls. |
| 10 | Link | Pair the two axes: edit one value and the other follows. |
| 11 | Option | A setting that has no keyframes, here the base scale. |
| 12 | Value | Drag to change the value, double click to type it. The fill shows the value inside its range. |
| 13 | Keyframe controls | Shown when keyframes are on, see Keyframe Controls. |
| 14 | Add Effect | Add an effect to the clip. |
Copying effects between clips
Every effect header carries a copy button that copies just that effect. Copy Effects in a clip's right click menu takes all of the clip's effects at once, and Paste Effects applies the copied effects to every selected clip, keyframes included.
Color controls
Click a color swatch to open the color picker.
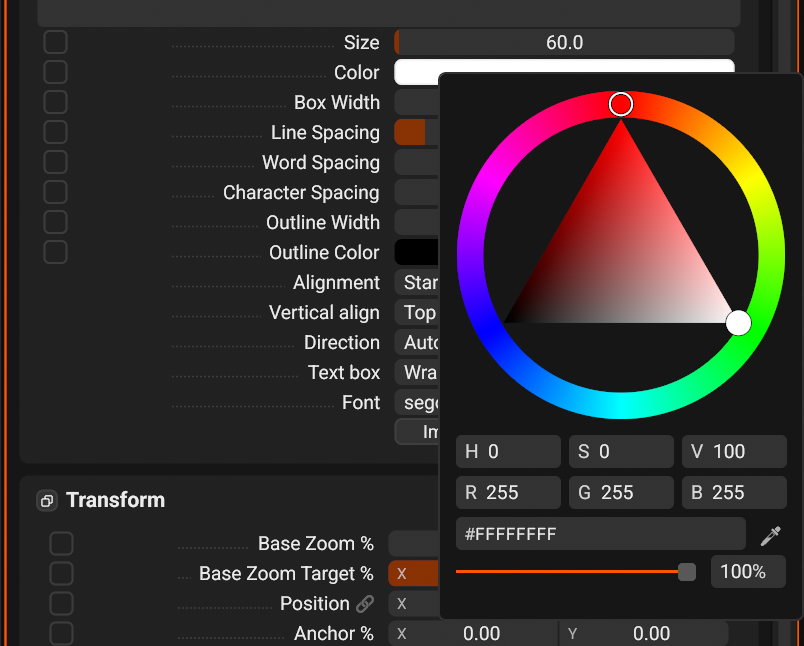
- The hue ring
- Saturation and brightness for the hue
- Hue, saturation, and value fields
- Red, green, and blue fields
- The color as a hex code, with alpha
- Pick a color from anywhere on the screen
- The opacity of the color
Keyframe Controls
Channels with a checkbox in front are keyframeable. Tick it to open the keyframe controls.
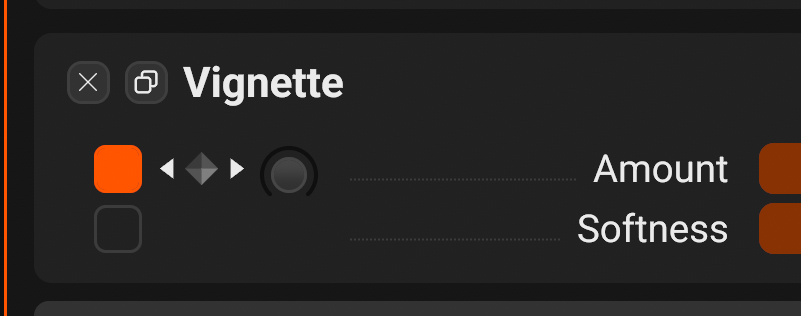
- Keyframes are on for this field. Click to turn them off
- Jump to the previous keyframe
- Add a keyframe at the playhead, or remove the keyframe that is there
- Jump to the next keyframe
- The smoothing knob
- Keyframes are off for this field. Click to turn them on
Ticking the checkbox turns the parameter into an animated channel and adds a keyframe at the playhead holding the current value. The diamond between the arrows adds a keyframe at the playhead, or removes the one already there. The two arrows jump the playhead to the previous or next keyframe of the channel.
While keyframes are enabled, the value field is driven by them and its number turns yellow: it shows the value at the playhead as it moves, and editing the value writes a keyframe at the playhead. Move the playhead and type or drag the value you want at that point. Before the first keyframe and after the last one, the channel holds that keyframe's value.
Each blendable channel also has a smoothing knob. Turn it up to soften the curve so the value eases through each keyframe. Smoothing sits on top of the keyframes and does not change their stored values.
Unticking the checkbox pauses the animation and the parameter goes back to a static value. The keyframes are kept and return when you tick it again.
The Effect panel supports keyboard navigation while it is focused.
- Next item Tab
- Previous item Shift+Tab
- Activate button / dropdown Enter
- Exit button / dropdown Esc
The Effect panel edits the value at the playhead. To shape the animation over time, its curves, handles, and presets, open the keyframe editor in the Timeline panel, see Keyframe Editor. Both views work on the same channels and stay in sync.
Effect Target
Effects apply to the current selected clip in the timeline.
If you have selected multiple clips, the effect applies to the last selected one. It has a thicker highlight in the timeline clip selection.
Default Visual Effects (Video / Image / Text Clips)
* = keyframeable
Text Intrinsics (Text Clips)
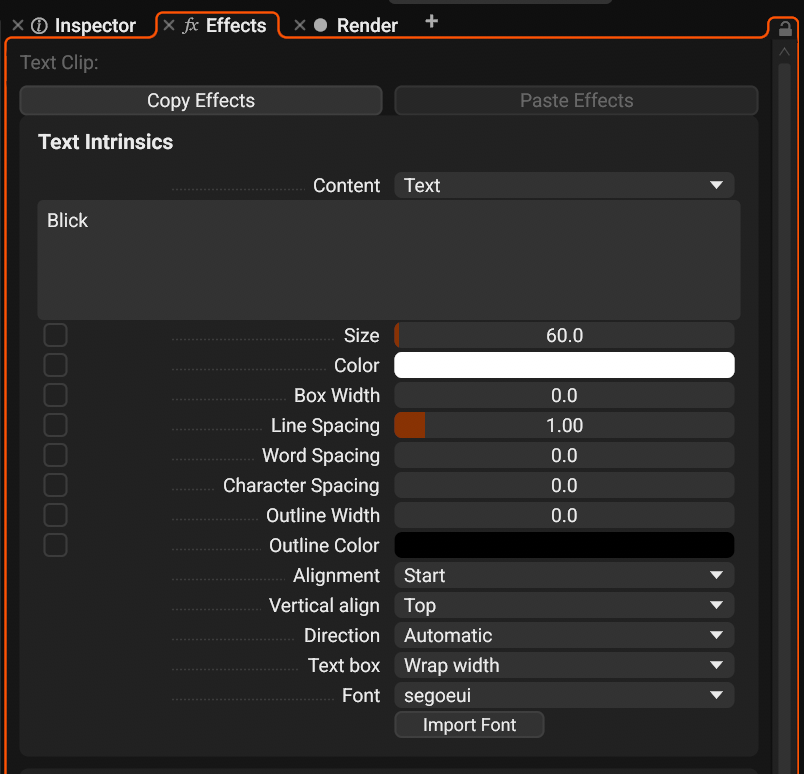
- Content: Text shows the typed text, Timer shows a running time, see Timer
- The text. It can span several lines
- The text size
- The text color, see Color controls
- The width where lines wrap. 0 wraps only at line breaks
- Line spacing, word spacing, and character spacing
- The outline width and color. An outline width of 0 is off, the maximum is 32
- Alignment: start, center, end, or justify
- Vertical alignment: top, middle, or bottom
- Text direction: automatic, left to right, or right to left
- Text box: Wrap width or Fixed box, see Text box
- The font, from the fonts installed on your system and the imported fonts. Hovering a font in the list previews it live
- Import a font file (.ttf, .otf, .ttc). The font becomes project media and is applied to the current clip, see Fonts as Media in the Media panel section
Changing the font, size, or color here also sets the defaults for the next text clip you create.
The size, color, the box width and height, the line, word, and character spacing, and the outline are keyframeable.
Text box
The Text box setting sets how the box is sized. In Wrap width mode the box grows with the text, and Box Width sets where lines break. In Fixed box mode you set a box width and box height, and the text wraps and clips to that box. Drag the edge handles in the Monitor to resize a fixed box.
Timer
Set Content to Timer to show a running time instead of typed text.
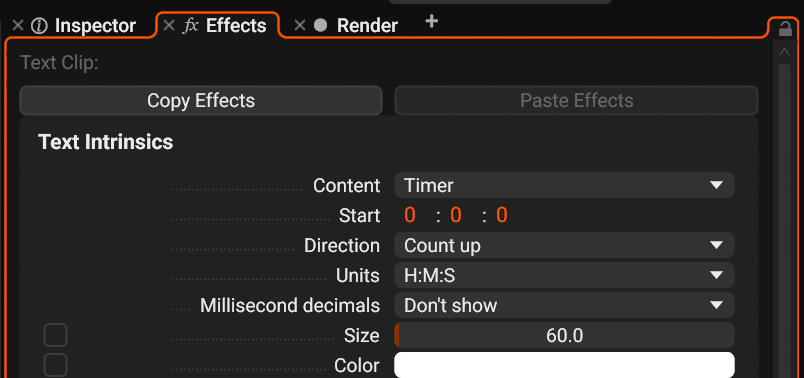
- Content: Timer
- Start: the time the timer shows at the start of the clip, in hours, minutes, and seconds
- Direction: count up or count down
- Units: the largest unit shown, H:M:S, M:S, or S
- Millisecond decimals: none, or one, two, or three digits
Transform
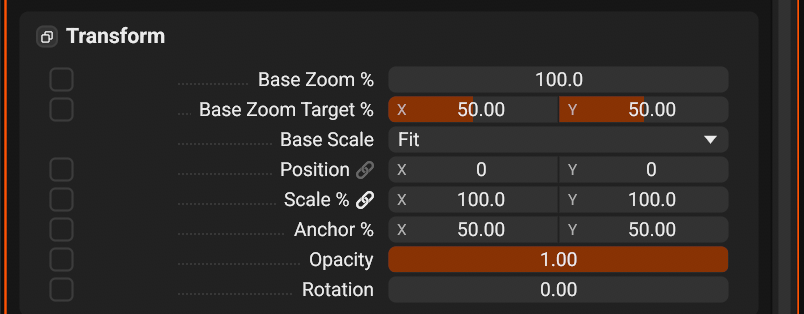
- * Base Zoom %: a punch-in on top of the base scale
- * Base Zoom Target %: the point the zoom moves toward
- (Video/Image clips) Base scale: Source / Fit / Fill / Stretch
- * Position: the anchor position on screen. (0, 0) is the center of the screen
- (Video/Image clips) * Scale % from the anchor
- * Anchor %: the anchor position in the clip. (0, 0) is the top left of the clip
- * Opacity
- * Rotation
- The link pairs the X and Y values
Base scale sets how the clip fits the canvas before any manual scaling: Source keeps the native pixel size, Fit letterboxes the clip inside the frame, Fill covers the frame and crops the overflow, Stretch ignores the aspect ratio. The link toggles next to Position, Scale, and Anchor pair the two axes. Edit one value and the other follows.
Base Zoom magnifies into the clip without moving it, like a punch-in. 100% is off. Base Zoom Target picks the point it zooms toward, as a percentage of the frame, where 50 / 50 is the center. Both values can be keyframed.
Additional Visual Effect List
Add these from the Add Effect button at the bottom of the Effect panel. The list shows only the effects that the clip type can take and does not have yet.
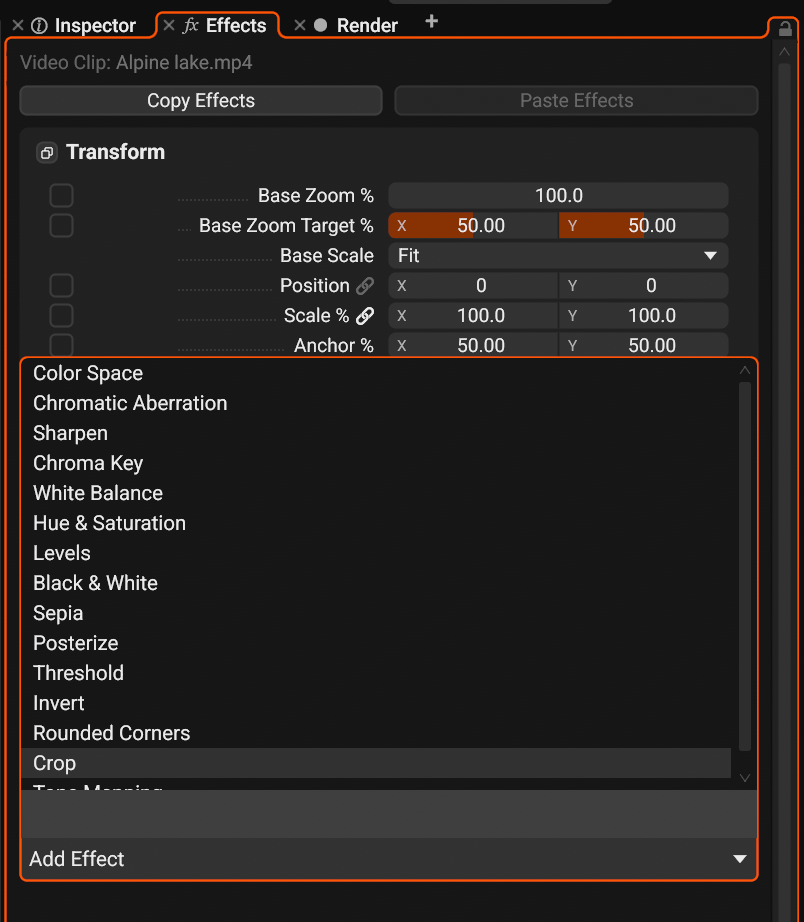
- Click an effect to add it to the clip
Each effect can be added once per clip, and effects always run in a fixed pipeline order, shown by their order in the panel, no matter when you add them. Right click a parameter to reset it to its default value, middle click does the same on sliders. Drag a slider to change its value from where it is: the full slider width spans the whole range, and Ctrl gives finer control. To set a slider by position, drag the edge at the end of its fill. Number fields without a slider change as you drag across them: hold Ctrl for finer control and Shift to move in whole steps. Scroll over a focused value to change it by one step, and double click a value to type a new one. Sliders cover the common range of each parameter. Type a value to go past the ends.
Color Space and Tone Mapping work together for camera log footage: Color Space tells Blick which curve and gamut the footage was recorded with so it can be converted into the project color space, and Tone Mapping compresses the extra highlight range down for standard output.
| Color Space | |
| Transfer | The gamma or log curve the footage was recorded with. Auto reads it from the file metadata and assumes sRGB / Rec.709 when the file does not say.Auto sRGB / Rec.709 Linear HLG S-Log3 V-Log S-Log2 Arri LogC3 Arri LogC4 Canon C-Log2 Canon C-Log3 BMD Film Gen5 RED Log3G10 F-Log F-Log2 N-Log D-Log Apple Log |
| Gamut | The color primaries of the footage. Auto reads it from the file metadata and assumes Rec.709 / sRGB when the file does not say.Auto Rec.709 / sRGB Rec.2020 P3-D65 S-Gamut3 S-Gamut3.Cine V-Gamut Rec.601 (NTSC) Rec.601 (PAL) Arri Wide Gamut 3 Arri Wide Gamut 4 Cinema Gamut BMD Wide Gamut REDWideGamut D-Gamut |
| Chromatic Aberration | |
| Amount | Splits the color channels apart toward the edges of the frame for a lens fringing look. |
| Sharpen | |
| Amount | Boosts edge contrast to make details stand out. |
| White Balance | |
| Temperature | Shifts the image between cooler blue and warmer orange. |
| Tint | Shifts the image between green and magenta. |
| Brightness & Contrast | |
| Brightness | Lightens or darkens the whole image. |
| Contrast | Increases or decreases the separation between dark and bright areas. |
| Contrast Midpoint | The brightness level the contrast pivots around. |
| Contrast Type | S-Curve rolls shadows and highlights off smoothly. Linear applies contrast evenly. |
| Gamma | Adjusts the midtones without moving the black and white points. |
| Exposure | Brightens or darkens in stops, like a camera exposure adjustment. |
| Hue & Saturation | |
| Hue | Rotates every color around the color wheel, in degrees. |
| Saturation | Strengthens or fades all colors equally. |
| Vibrance | Boosts muted colors more than colors that are already saturated. |
| Levels | |
| Black point | The input level that becomes pure black. Everything darker is crushed. |
| White point | The input level that becomes pure white. Everything brighter is clipped. |
| Grey point | Shifts the midtones between the black and white points. |
| Black & White | |
| Red | Converts the image to monochrome. Red sets how much the red channel contributes to the result. |
| Green | How much the green channel contributes to the monochrome result. |
| Blue | How much the blue channel contributes to the monochrome result. |
| Sepia | |
| Amount | Blends the image toward a warm brown monochrome tone. |
| Posterize | |
| Levels | Reduces the image to a fixed number of tonal steps per channel, from 2 to 32. |
| Threshold | |
| Threshold | Turns the image pure black and white. Pixels brighter than the threshold become white. |
| Invert | |
| Amount | Inverts the image colors. 1 is a full negative. |
| Vignette | |
| Amount | Darkens the corners and edges of the frame. |
| Softness | How gradually the vignette fades toward the center of the frame. |
| Rounded Corners | |
| Radius | Rounds the corners of the clip. 0 keeps them square, higher values round them further. |
| Crop | |
| Top | Pixels removed from the top edge of the clip. |
| Bottom | Pixels removed from the bottom edge. |
| Left | Pixels removed from the left edge. |
| Right | Pixels removed from the right edge. |
| Tone Mapping | |
| Operator | Reinhard · Clip. Reinhard rolls highlights off smoothly, Clip cuts them off hard. Applies to log footage converted through the Color Space effect. |
| White Point | How many stops of highlight range are mapped into display white. Higher values keep more highlight detail. |
| Chroma Key | |
| Key Color | The color the effect makes transparent, green by default. Click the swatch to set it, or sample it with the eyedropper. |
| Tolerance | How far a pixel's color can sit from the key color and still be removed. Higher values key a wider range. |
| Softness | The width of the fade between kept and removed pixels along the edge of the key. |
| Spill | Suppresses the key color that reflects onto the edges of the kept subject. Higher values remove more spill. |
Audio Effects (Audio Clips)
Every audio clip carries an Intrinsics effect that cannot be removed. It holds the clip's volume and how its audio behaves when the clip is rate stretched.
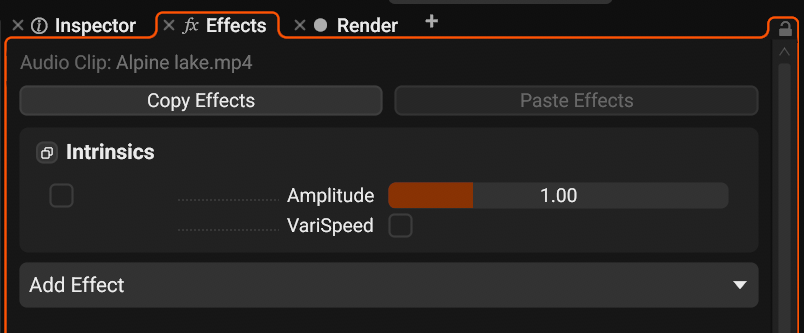
- * Amplitude: the clip volume. 1 is the source level, 0 mutes the clip, values above 1 boost it up to 4x. You can also drag the volume line directly on the clip in the timeline
- VariSpeed: when the clip is rate stretched, the pitch rises and falls with the speed, like tape. This is off by default
Color Clip Effects (Color Clips)
Every color clip carries a Color Clip Intrinsics effect that cannot be removed. It sets the fill the clip draws.
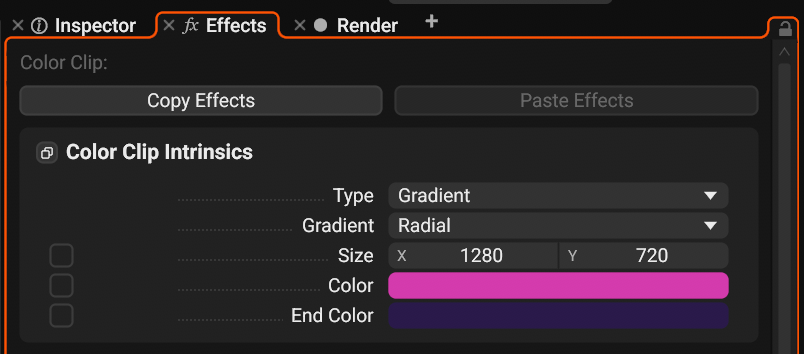
- Type: Solid or Gradient
- Gradient: the gradient shape, Horizontal, Vertical, or Radial. It shows when Type is Gradient
- * Size: the size of the filled area, in pixels
- * Color: the solid color, or the start color of the gradient
- * End Color: the end color of the gradient. It shows when Type is Gradient
A color clip also takes the Transform effect and the effects in the Additional Visual Effect List. Values marked * can be keyframed. See Create Color Clip in the Timeline panel for placing one.
Render Panel
The Render panel holds the project's sequence settings and exports your timeline to a video file. Blick encodes H.264 or AV1 video, and ProRes on macOS, with AAC audio. Output is 8-bit or 10-bit, depending on the encoder. Sequence settings are locked while a render is running.
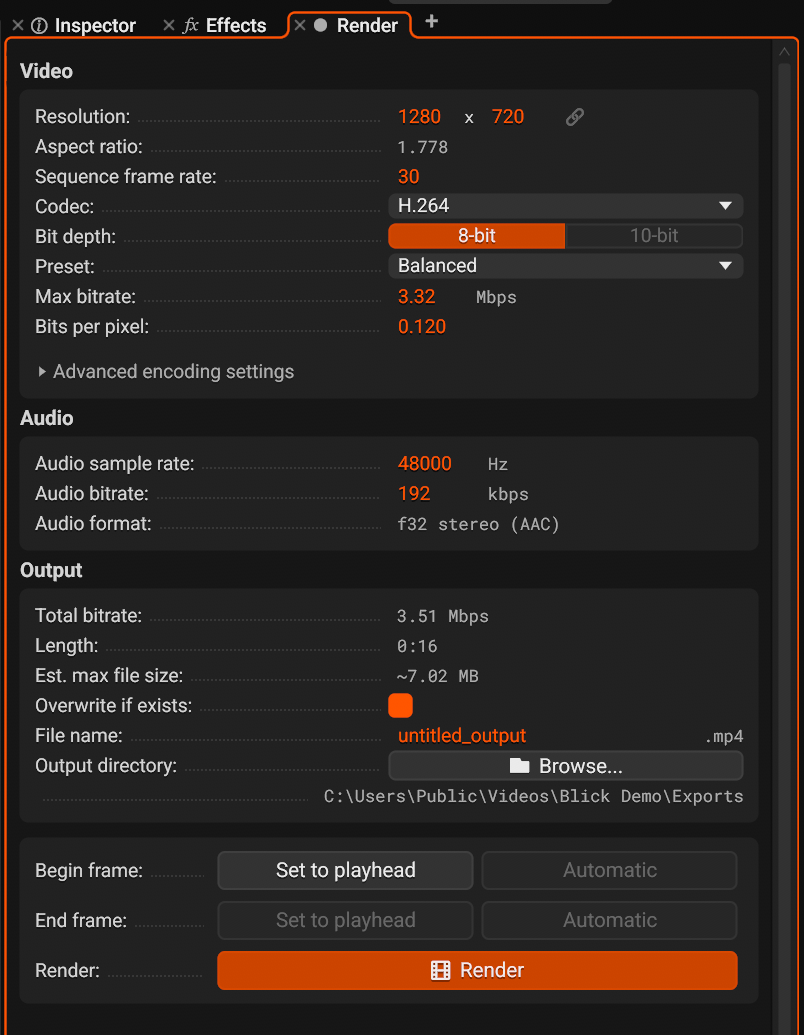
| # | Setting | Description |
|---|---|---|
| 1 | Resolution | The pixel size of the project canvas and the output video. Dimensions are kept even for encoding. |
| 2 | Aspect lock | Keep the aspect ratio: change one dimension and the other follows. |
| 3 | Aspect ratio | Computed from the resolution. |
| 4 | Sequence frame rate | The project frame rate, 1 to 240 fps. The playhead, clip edges, and cuts all align to it. |
| 5 | Codec | H.264, AV1, or, on macOS, ProRes. |
| 6 | Bit depth | 8-bit or 10-bit, see Encoder Settings. 10-bit is grey when the encoder cannot do it. |
| 7 | Preset | The speed and quality trade-off: Fast, Balanced, High, or Max, see Encoder Settings. |
| 8 | Bitrate | The data rate in Mbps. Its name follows the rate control: Max bitrate for Hybrid, Target bitrate for Bitrate. Type a target and bits per pixel updates to match. Use it when a platform asks for a specific number. |
| 9 | Bits per pixel | The same control as the bitrate. Video bitrate is resolution x frame rate x bits per pixel, so one value holds up across resolutions. This is what Blick stores. |
| 10 | Advanced encoding settings | Expand the manual encoder settings, see Encoder Settings. |
| 11 | Audio sample rate | Snaps to common rates between 8 and 192 kHz. |
| 12 | Audio bitrate | Snaps to common AAC bitrates between 64 and 320 kbps. |
| 13 | Audio format | 32 bit float stereo, encoded as AAC. |
| 14 | Total bitrate | Video and audio bitrate together, computed live from the settings above. It does not show for the Quality methods and ProRes, because their bitrate follows the footage. |
| 15 | Length | Duration of the render range. |
| 16 | Est. max file size | Upper estimate from the total bitrate and length. For the Quality methods and ProRes it shows "varies with footage". |
| 17 | Overwrite if exists | Replace a file that has the same name. Off, Blick writes a numbered duplicate instead. |
| 18 | File name | Name of the output file. The extension follows the codec. |
| 19 | Output directory | Where the file is written. Browse picks a folder. Saved projects render into the project output subfolder, unsaved projects into the untitled output folder. Both are configurable in Settings. |
| 20 | Begin frame | Automatic starts at the first frame of the timeline. Set to playhead I starts the render at the playhead instead, and Reset returns to automatic. |
| 21 | End frame | Automatic ends with the last clip on the timeline. Set to playhead O ends the render at the playhead instead, and Reset returns to automatic. Either marker can be set first. |
| 22 | Render | Starts encoding the render range to the output file. |
Encoder Settings
Blick polls the machine for available encoders at startup, hardware and software, for H.264, AV1, and ProRes. The Preset dropdown picks the speed and quality trade-off: Fast, Balanced, High, or Max.
Advanced encoding settings expands below it for manual control. Picking a preset resets these to that preset's defaults, and the rows on offer depend on what the selected encoder supports:
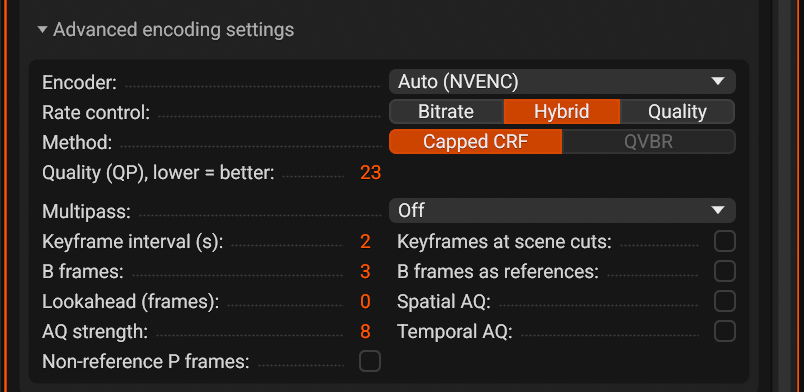
| # | Setting | Description |
|---|---|---|
| 1 | Encoder | Auto picks the best encoder found, or force a specific hardware or software one from the list. The list covers H.264, AV1, and, on macOS, ProRes. |
| 2 | Rate control | Sets how the encoder spends bits: Bitrate, Hybrid, or Quality. |
| 3 | Method | The method of the rate control, listed in the table below. |
| 4 | Quality (QP) | The quality level for the quality based methods. Lower is better quality and a larger file. |
| 5 | Multipass | Off, Quarter resolution, or Full resolution. An extra analysis pass gives a better bit distribution. |
| 6 | Keyframe interval (s) | Seconds between forced keyframes, 1 to 30. Longer intervals compress better, shorter ones seek better. |
| 7 | B frames | Number of bidirectional frames between references, 0 to 4. |
| 8 | Lookahead (frames) | How far ahead the encoder analyzes before it commits bits. |
| 9 | AQ strength | The strength of the spatial adaptive quantization. |
| 10 | Non-reference P frames | Lets the encoder insert P frames that no other frame refers to. |
| 11 | Keyframes at scene cuts | Adds a keyframe on hard cuts. |
| 12 | B frames as references | Lets B frames be referenced by other frames. |
| 13 | Spatial AQ | Adaptive quantization within a frame. |
| 14 | Temporal AQ | Adaptive quantization across frames. |
Other encoders show other rows. The Bit depth row offers 10-bit only on encoders that support it: 8-bit output plays everywhere, and 10-bit output keeps gradients and fades free of banding and keeps the precision of 10-bit sources. ProRes always outputs 10-bit and adds a ProRes profile row: 422 Proxy, 422 LT, 422, or 422 HQ, from smallest file to highest quality. Bitrate based methods add Target bitrate and Max bitrate fields, some encoders add Two-pass for a more accurate file size, and some add Weighted prediction, which helps fades.
The rate control method sets how bits are spent. The methods on offer depend on the encoder.
| Quality | |
| QP | Constant Quantization Parameter. Fixes the quantizer, the same for every frame. Simple and predictable, but not efficient. |
| CRF | Constant Rate Factor. Holds a perceptual quality and adapts the quantizer per frame for better quality per byte. |
| Hybrid | |
| Capped CRF | Constant Rate Factor with a bitrate cap. Aims at a quality, but never exceeds the maximum bitrate. |
| QVBR | Quality defined Variable Bitrate. Aims at a quality level, shaped toward the maximum bitrate. |
| Bitrate | |
| CBR | Constant Bitrate. A flat data rate and a predictable file size, for strict bandwidth limits. |
| ABR | Average Bitrate. Aims for an average over the whole file, varying within a peak. |
Encoder settings are locked while a render is running.
Rendering and Rewinding
More controls appear when you click the render button. The rest of the app stays usable while it encodes. At render start Blick checks the free disk space against the estimated file size and warns you when it looks tight.
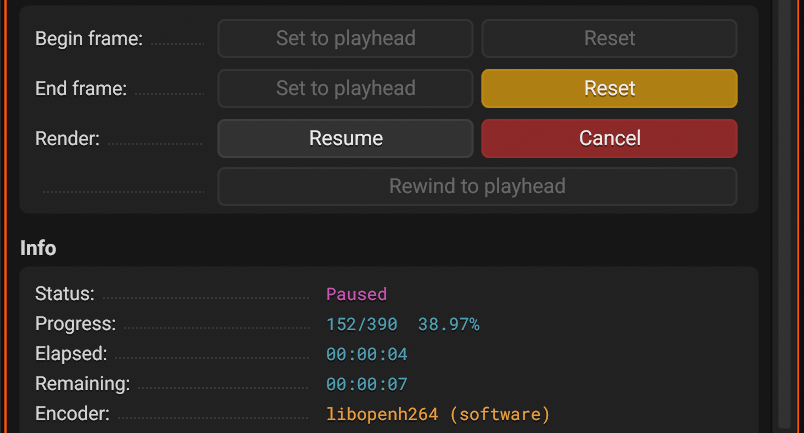
- Pause or resume the encoder
- Cancel the render and delete its output
- Rewind to playhead: if you spot a mistake mid-render, move the playhead to the right spot and press it. The render carries on from there
- The stage of the render: video, audio, or muxing, or Paused
- The frames done, of all frames in the render range
- The time since the render started
- An estimate of the time left, covering all three stages
- The encoder in use, hardware or software
While a render runs, the timeline shows its progress.
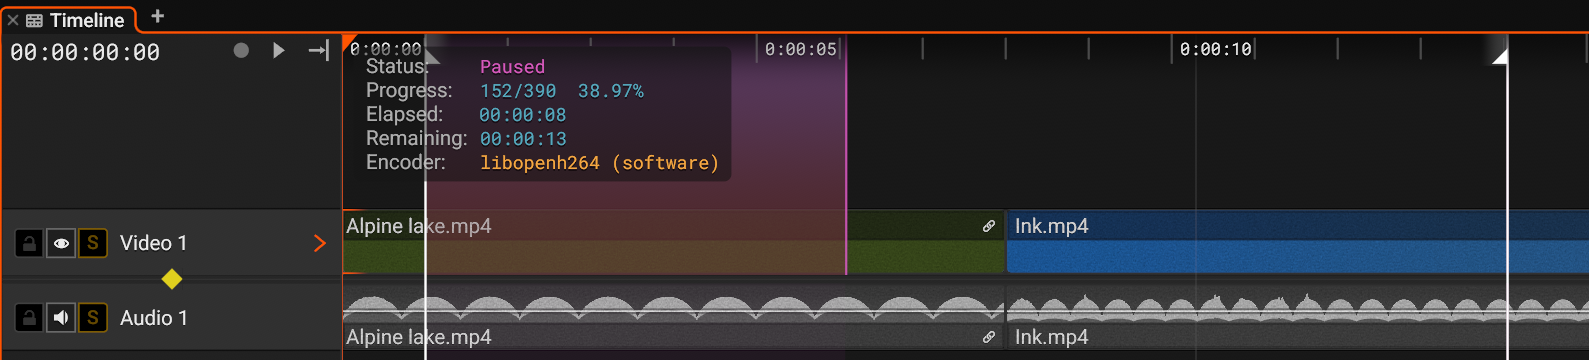
- The begin frame of the render
- The part of the render range that is encoded
- The same information as in the Render panel
- The end frame of the render
The video encodes first. The audio encodes after the video finished encoding, then Blick muxes the two into the file.
When the render finishes, the panel shows a summary.
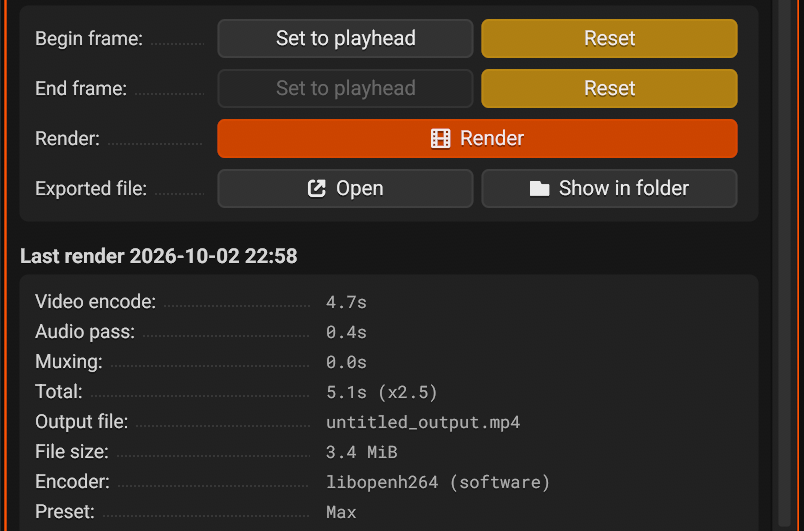
- Open the exported file in the default player
- Show the exported file in the file explorer
- The time each stage took, the speed relative to real time, and the file name, size, encoder, and preset
Monitor Panel
The Monitor shows the composited frame at the playhead. Select a clip in it to move, scale, and center it on the canvas.
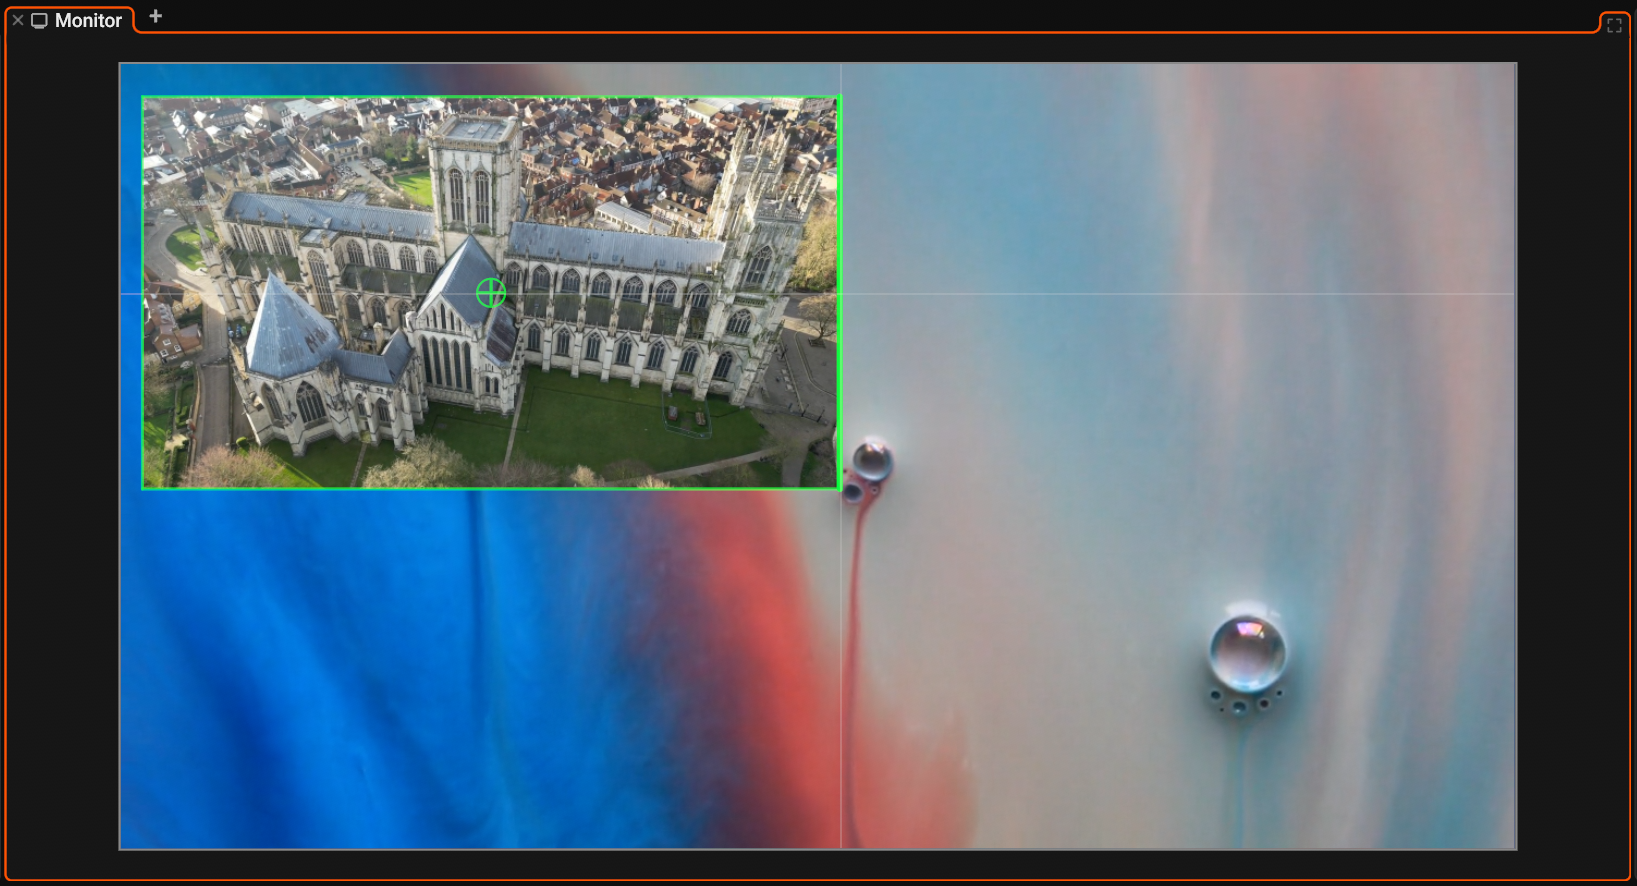
- The composited frame at the playhead
- The selected clip has an outline. Drag inside it to move the clip
- Drag an edge to scale the clip around its anchor point. The edge under the cursor gets thicker
- The anchor point, the origin of the scale and the rotation. Drag it to move it
- Fullscreen the Monitor
The cursor position over the frame, in project pixels, shows at the bottom right of the Status Bar.
Actions
Click a clip in the monitor to select it, then drag to reposition it. All these controls edit the clip's Transform effect, and every change here can be keyframed like any other Transform value.
- Reposition the clip by dragging it
- Scale the clip with the edges. The scale keeps the aspect ratio, hold Shift to scale only the dragged axis
- Move the anchor point by dragging it
While you drag, the clip's center snaps to the middle of the canvas, with guide lines showing the snap. Hold Alt to drag without snapping. Hold Shift to lock the drag to one axis, picked from the direction you move in. Dragging the anchor point snaps the same way.
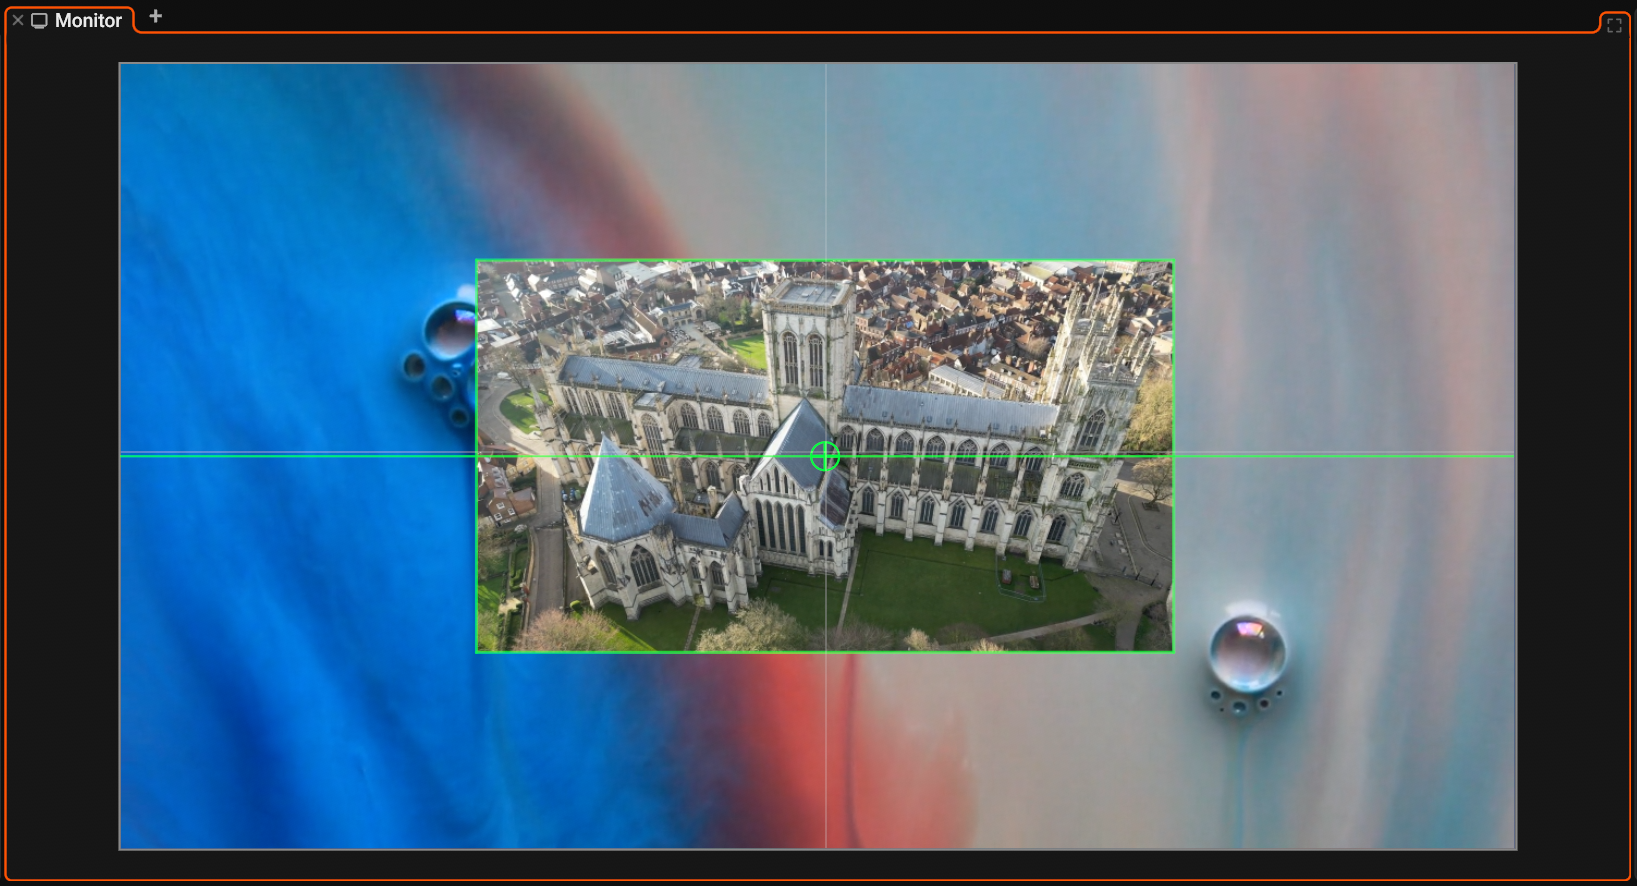
- The clip center snaps to the vertical middle of the canvas
- The clip center snaps to the horizontal middle of the canvas
Right click a clip in the Monitor for its menu:
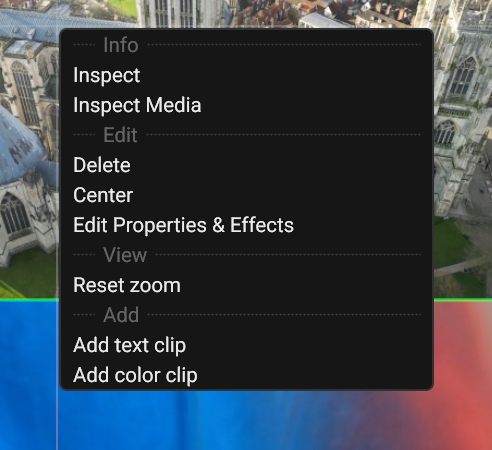
| # | Action | Description |
|---|---|---|
| 1 | Inspect | Show the clip in the Inspector panel. |
| 2 | Inspect Media | Show the media file of the clip in the Inspector panel. |
| 3 | Delete | Delete the clip. |
| 4 | Center | Move the clip back to the middle of the frame. |
| 5 | Edit Properties & Effects | Show the clip in the Effect panel. |
| 6 | Reset zoom | Fit the frame to the panel again, see Zoom & Pan. |
| 7 | Add text clip | Create a text clip at the playhead on the topmost video track. |
| 8 | Add color clip | Create a color clip at the playhead. |
Right click an empty spot in the monitor for the same View and Add entries:
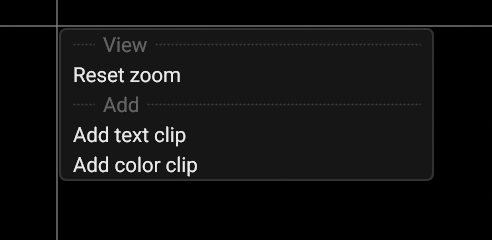
- Reset zoom
- Add text clip: create a text clip at the playhead on the topmost video track
- Add color clip: create a color clip at the playhead
- Fullscreen the monitor F, and leave it with F or Esc
- Screenshot the current monitor frame to an image file Ctrl+Shift+E
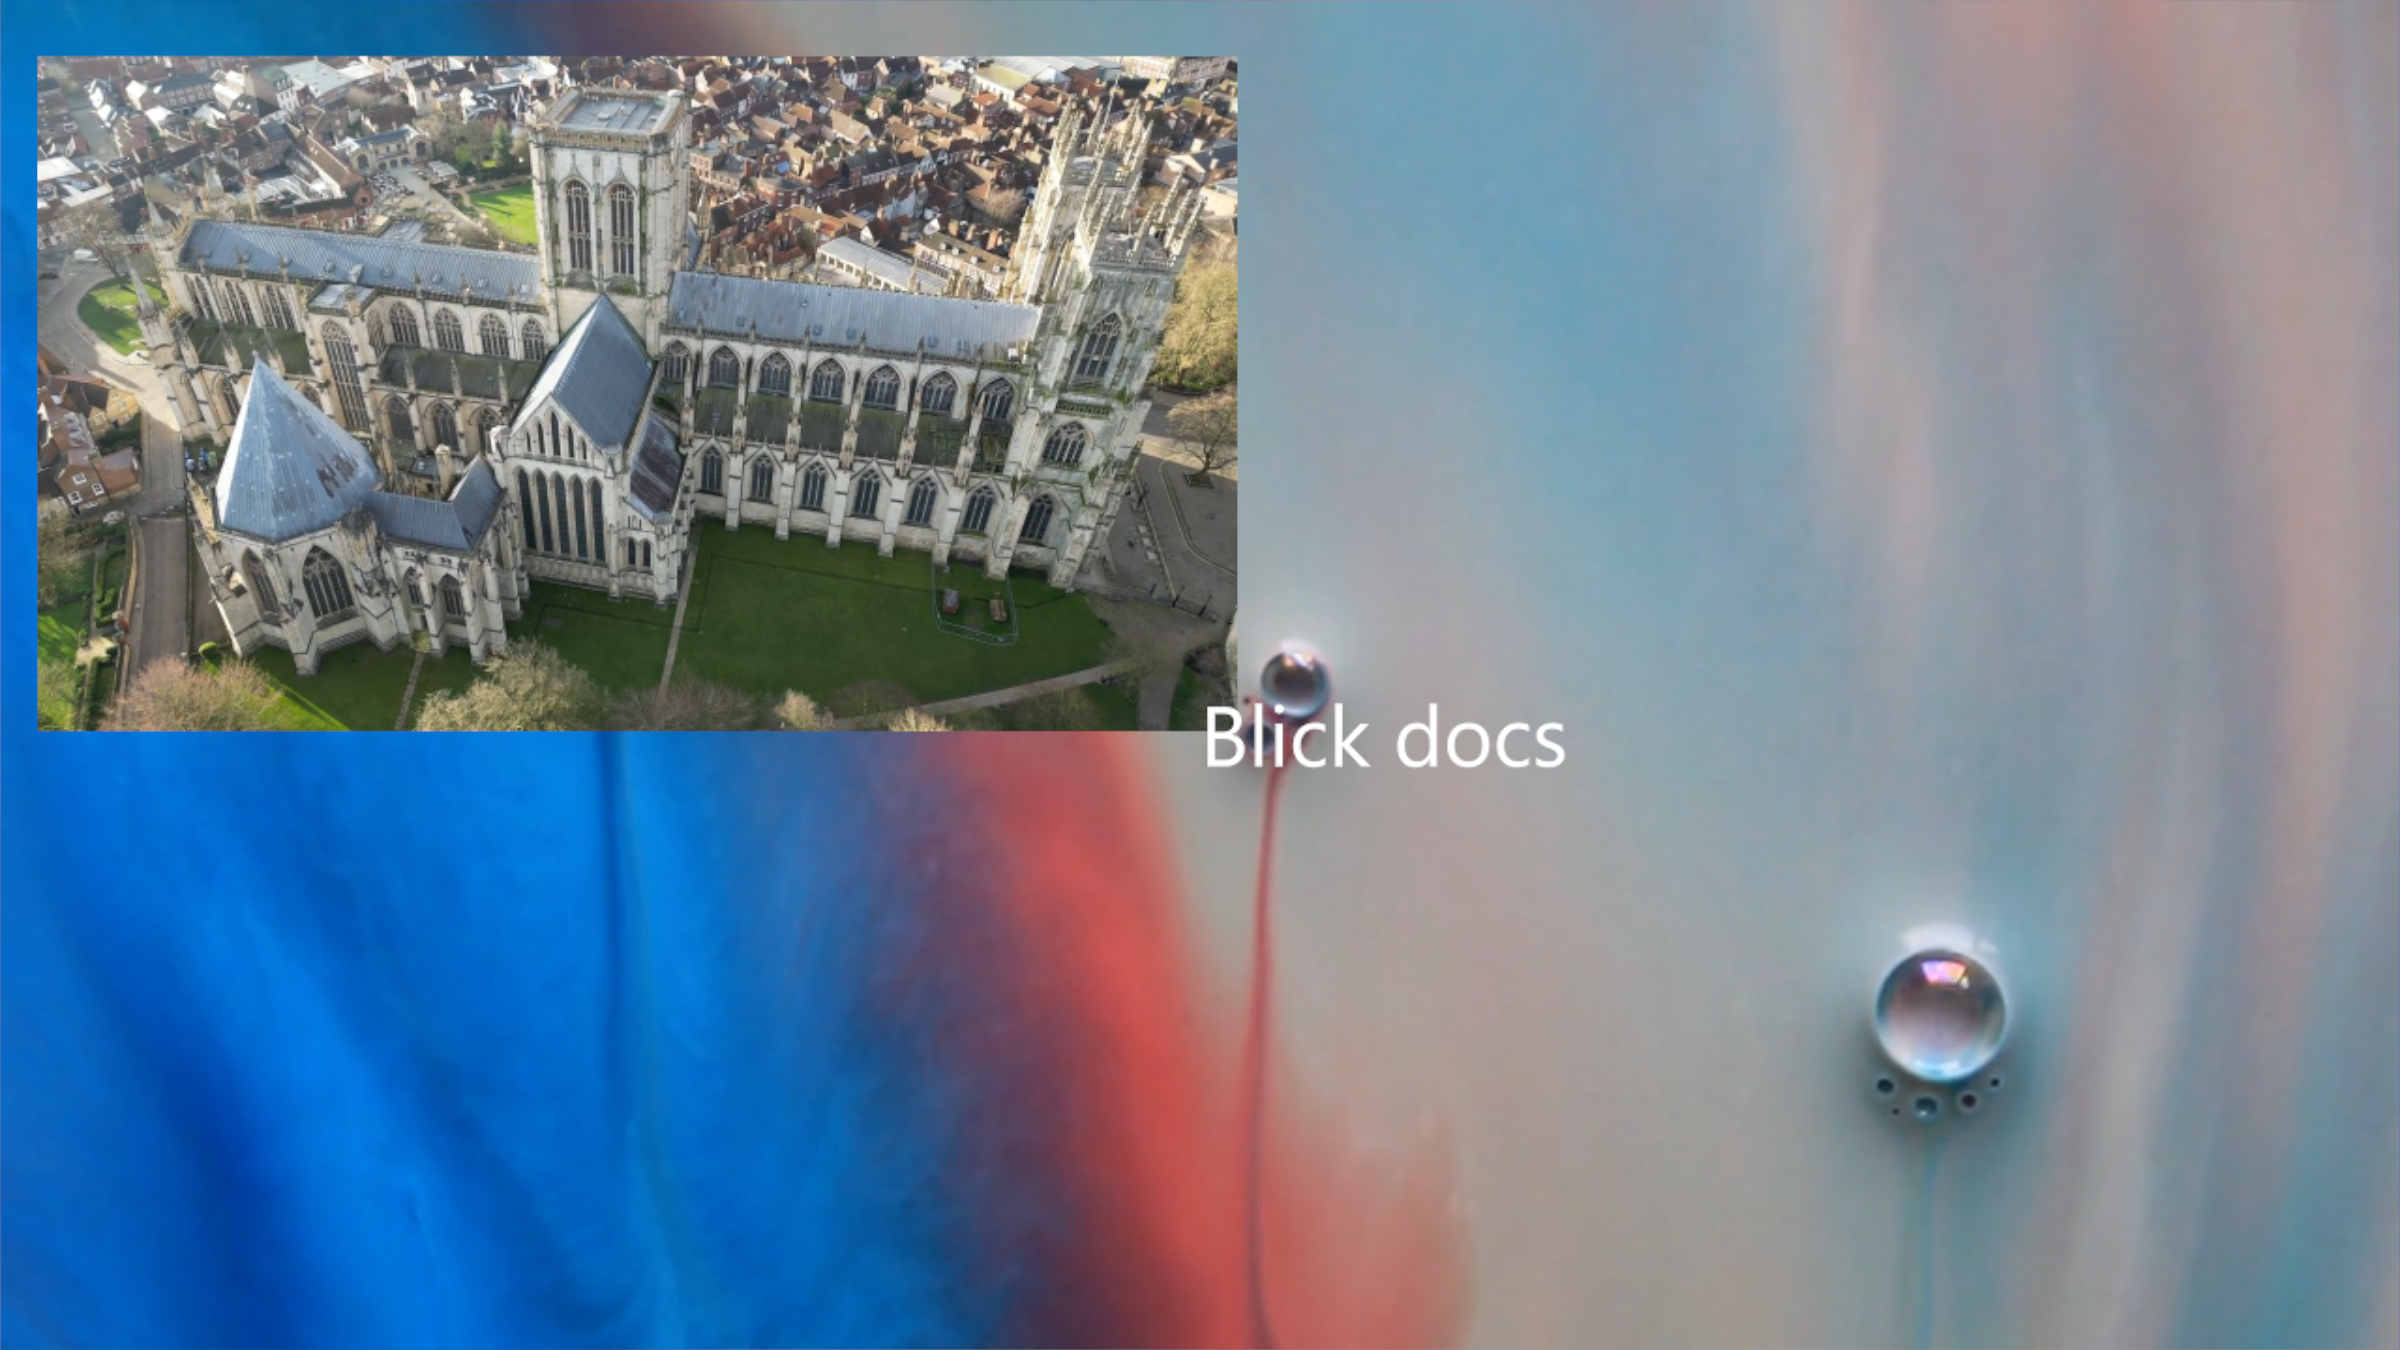
- The frame fills the whole window
Editing text on the canvas
Double click a text clip in the Monitor to edit its text in place. The usual text keys work: arrows, Home, End, Shift to select, and the clipboard keys. Press Esc to stop editing.
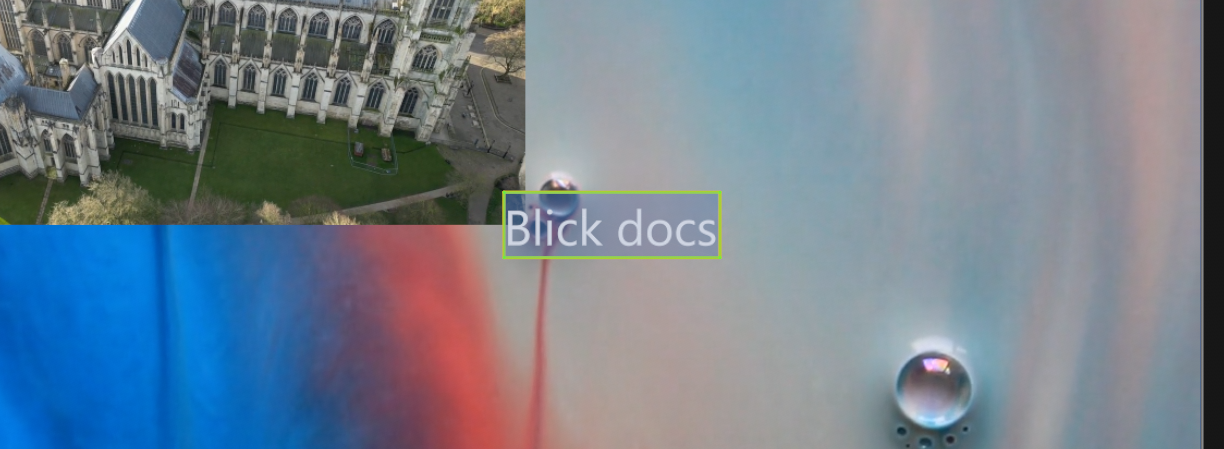
- The text box. The selection shows over the text
Zoom & Pan
Scroll in the Monitor to zoom toward the cursor, up to 16x. Once zoomed in, Shift+Scroll pans horizontally, Alt+Scroll pans vertically, and dragging with the middle mouse button pans freely.
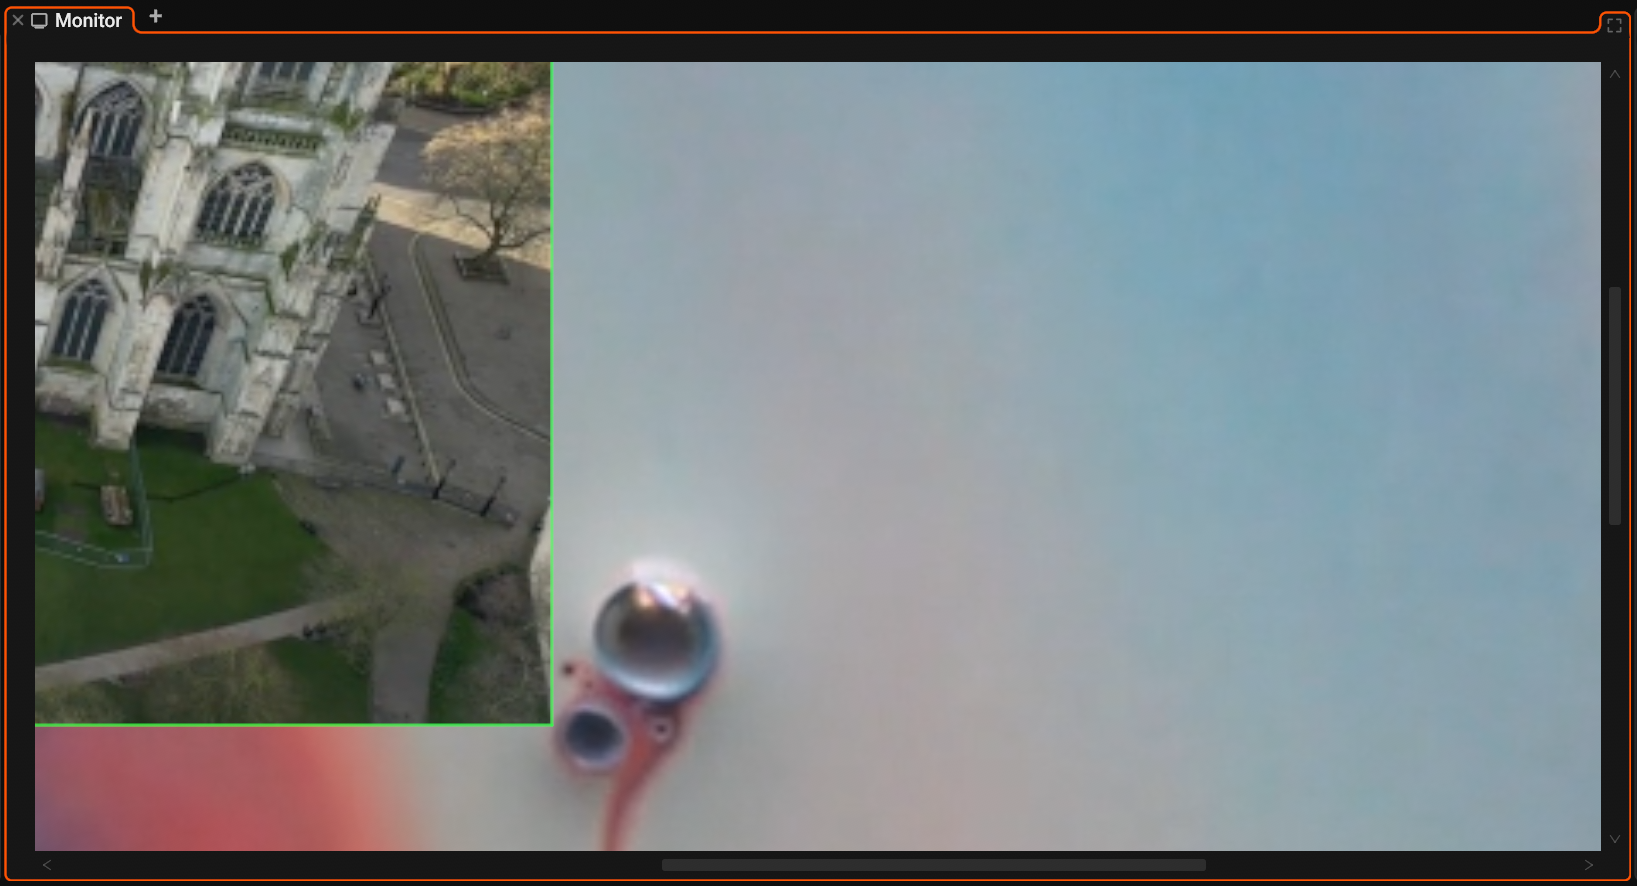
- Scrollbars show where you are in the frame. Drag them to pan
- The horizontal scrollbar
Zooming changes the view only. The project resolution and the render are untouched, and zooming back out to 1x fits the frame to the panel again. Reset the zoom from the monitor right click menu, or with the Reset monitor zoom action. Set how fast scrolling and zooming react under Title bar > Settings Menu > Monitor.
Media Players
A Monitor panel can act as a media player. Drop a file onto it from the Media panel or the file explorer, and the panel switches from the timeline to that file. Double clicking a media item in the Media panel opens it in a player as well. Video, audio, and image files are accepted; an image displays as a still frame. Each Monitor panel holds its own player, and several can be open at once.
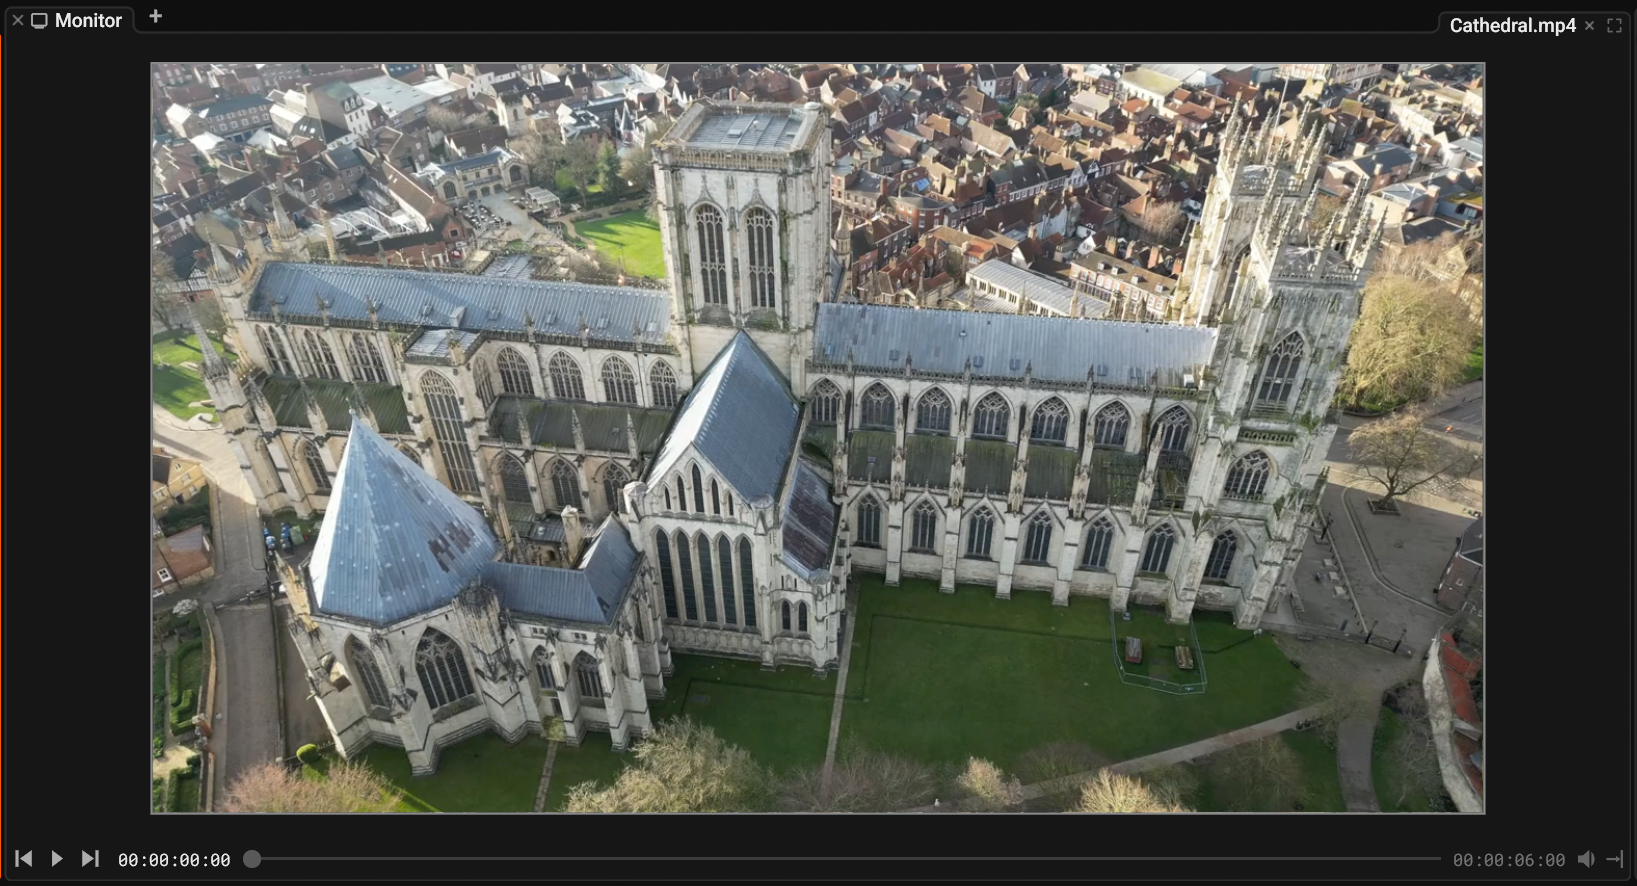
- The name of the file in the player
- Close the player and show the timeline again
- Rewind to the start
- Play or pause
- Skip to the end
- The current time
- Drag to scrub through the file
- The duration of the file
- Mute this player
- What happens at the end: stop there, or return to the start
The player shows the file as it is: its own frame rate and resolution instead of the project's, with the file's color space and rotation metadata applied. Drop a single stream from the Media panel, for example one audio track of a multi-stream file, and only that stream plays. Player audio mixes into the output, and up to two players can run at once. Starting a player pauses the timeline, and starting the timeline pauses every player. The Pause all monitor players command stops them all.
Players last for the session only and are not saved in the project.
Inspector Panel
The Inspector panel can show three types of information, depending on what you have selected. Media Info covers video, audio, image, and font files:
- Media Info: the media file itself
- Clip Info: the individual clip you have selected
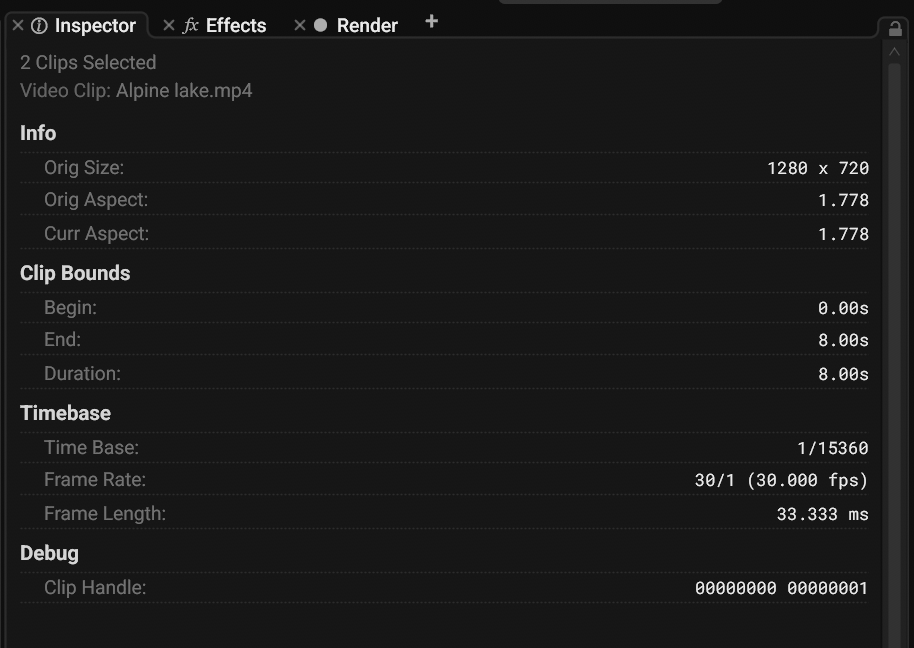
- The number of selected clips, and the type and name of the main selected clip
- The size and aspect ratio of the clip
- Where the clip starts and ends in its source media
- The timing units of the source
- The internal id of the clip
- Keep showing this clip or media when the selection changes
Select a media item in the Media panel to see its media info instead:
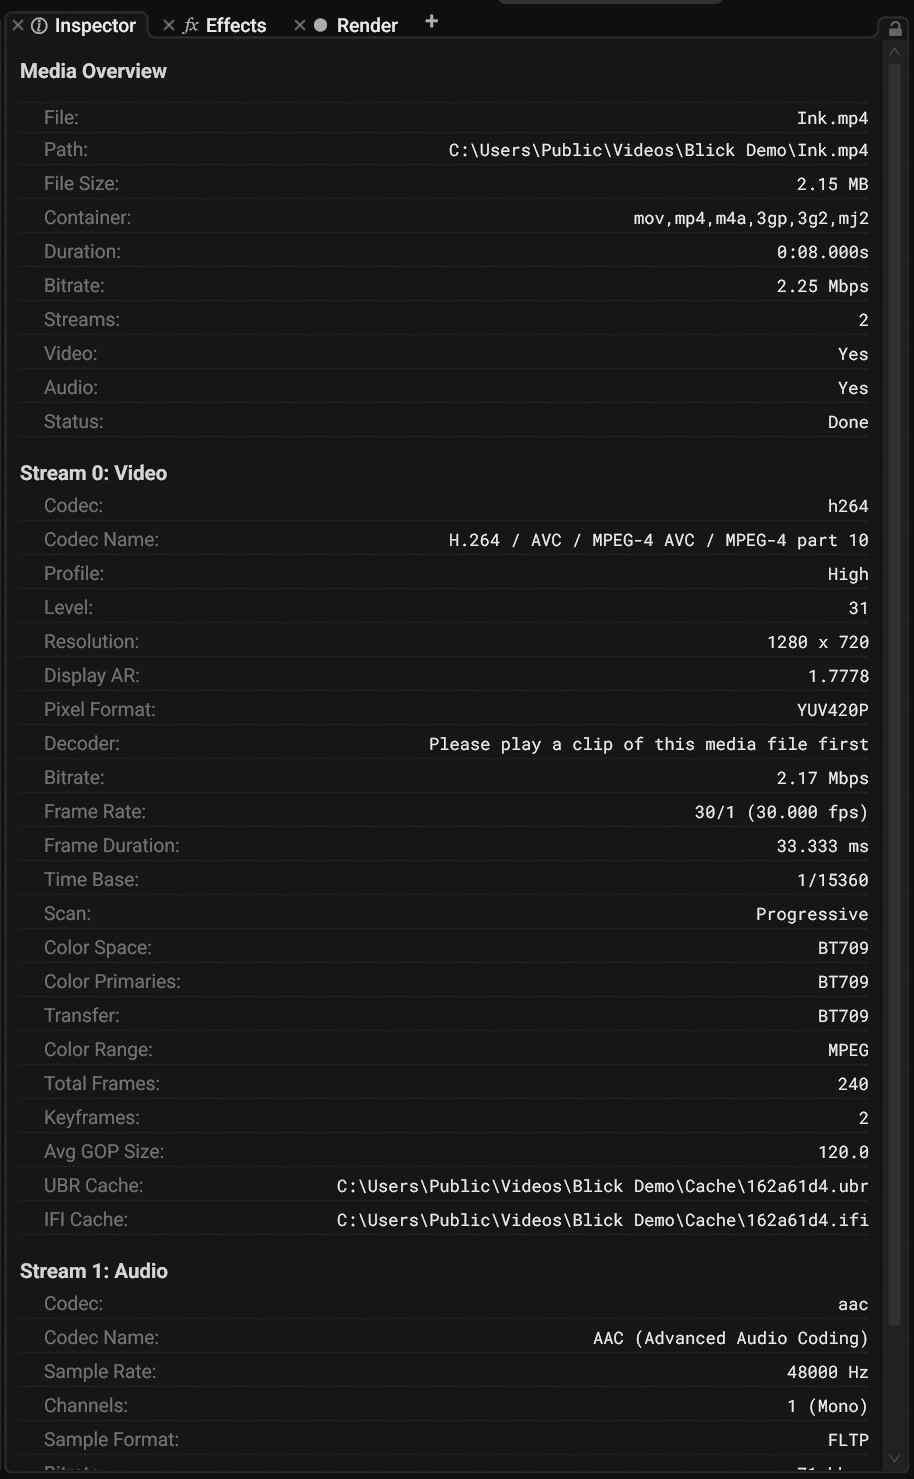
- The media overview, see Media Info
- One section for each stream in the file, see Video Stream Info
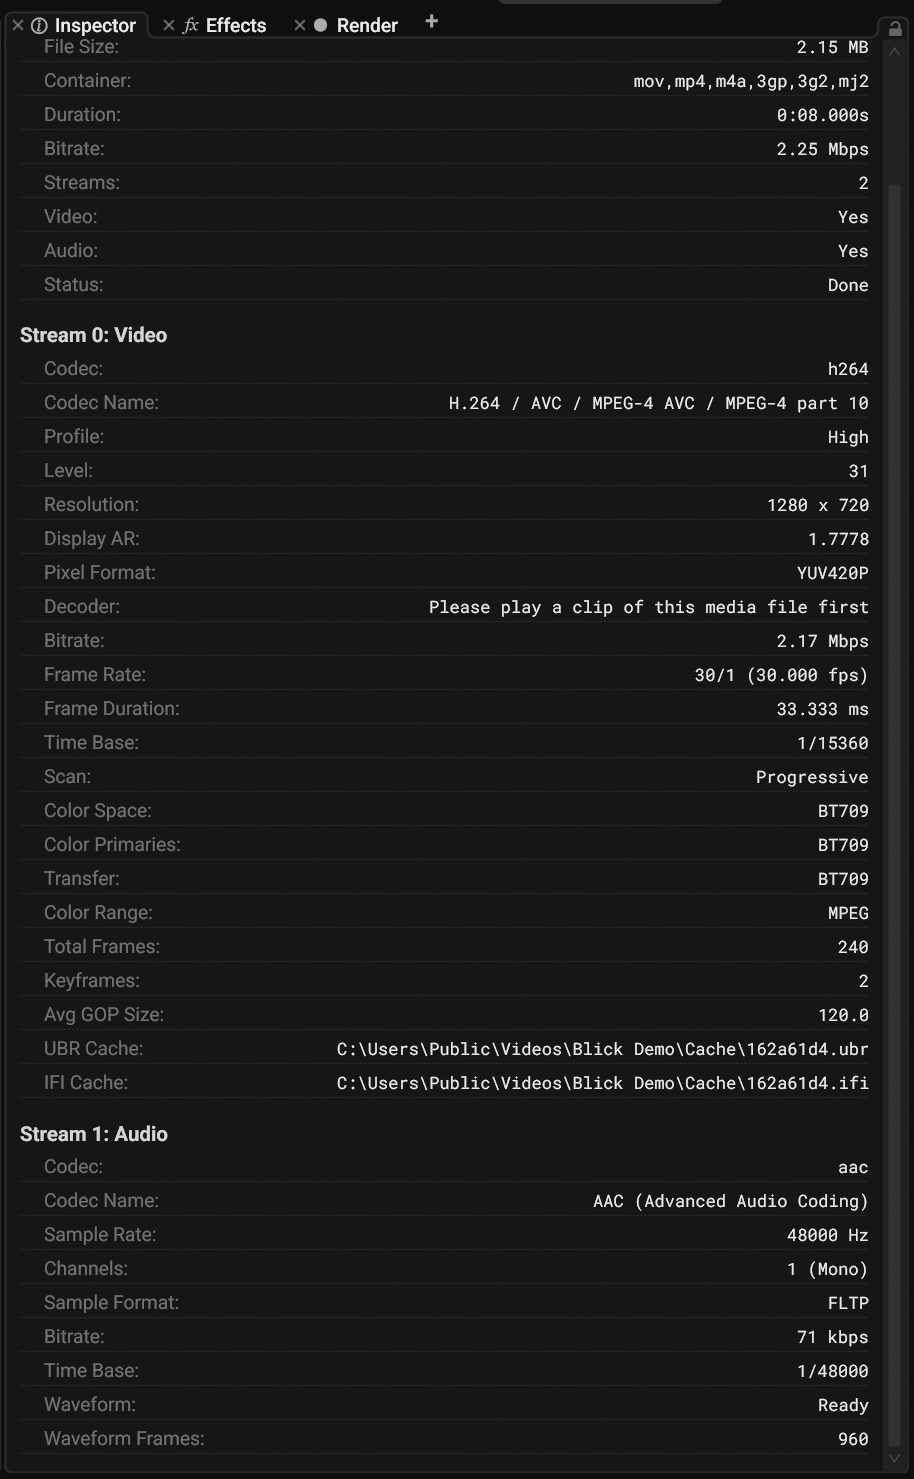
- The audio stream of the same file, see Audio Stream Info
Selecting multiple clips
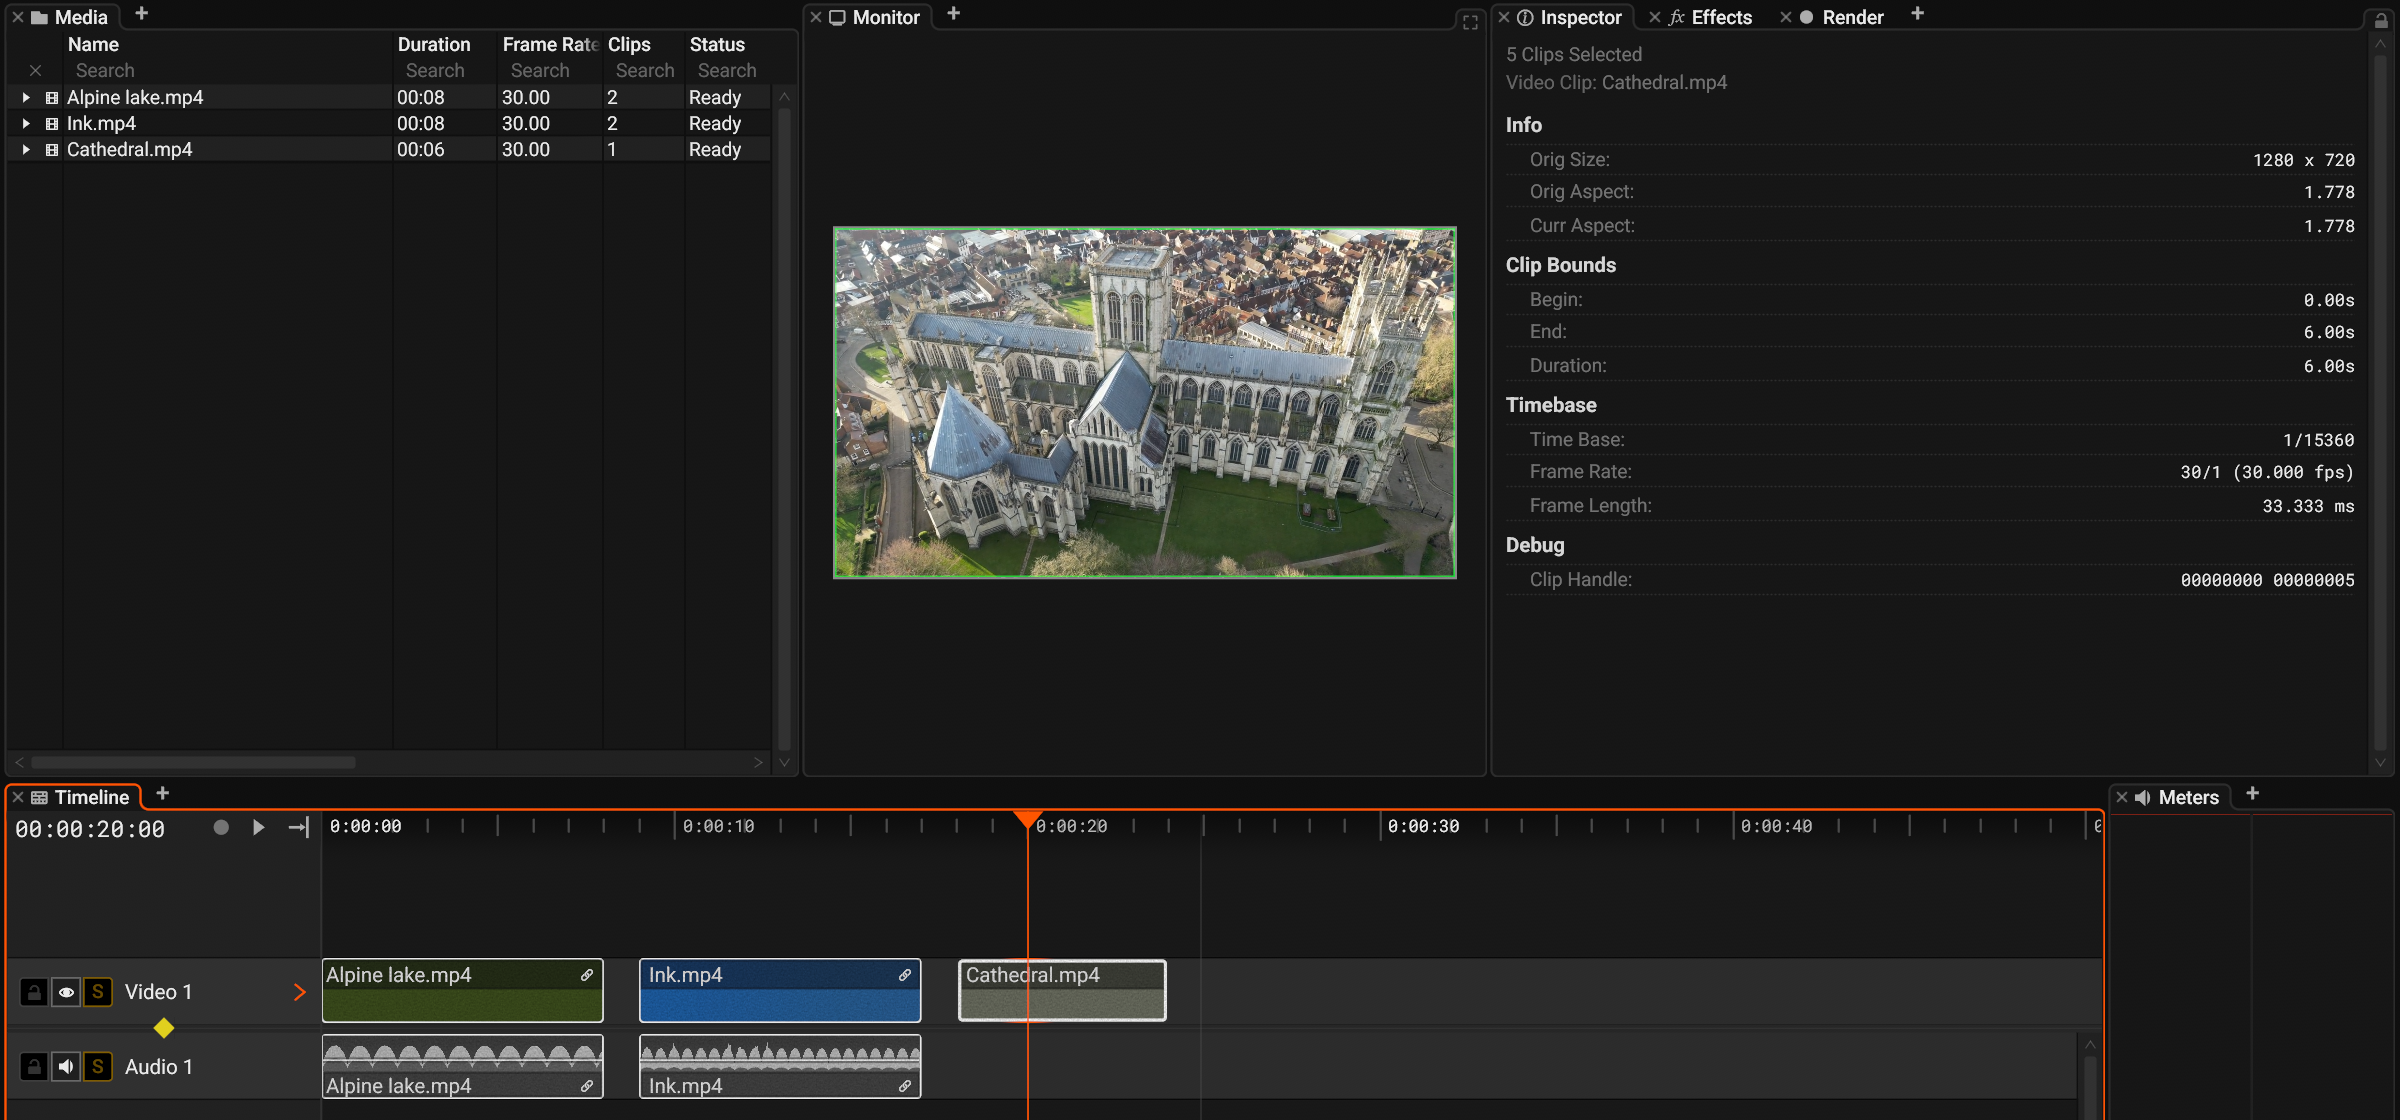
- The main selected clip has a thicker border. It is always the last selected clip
- The other selected clips
- The Inspector shows the number of selected clips and the name of the main selected clip
If you have selected multiple clips, the panel shows clip info on the last selected one.
Media Info
| Media Overview | |
| Filename | Name of the file on disk. |
| File path | Full location of the file on disk. |
| File size | Size of the file on disk. |
| Container names | The container formats the file matches, for example mov or mp4. |
| File duration | Total length of the media file. |
| Stream count | Number of data streams inside the container. |
| Contains video | Whether the file carries at least one video stream. |
| Contains audio | Whether the file carries at least one audio stream. |
| Loading status | Not loaded · Loading… · Loaded · Failed · Done |
| Video Stream Info | |
| Video codec | Compression format of the video stream, for example H.264 or ProRes. |
| Video codec name | Full name of the codec. |
| Profile | Codec capability tier the stream was encoded with. |
| Level | Codec constraint level within the profile. |
| Resolution | Frame size in pixels. |
| Display AR | Aspect ratio the video is meant to be shown at. |
| Pixel AR | Shape of the individual pixels. 1:1 is square. |
| Pixel format | Memory layout and chroma subsampling of the decoded frames, for example yuv420p. |
| Decoder | N/A · Hardware · Software. Whether frames decode on the GPU or the CPU. This is the decoder last used for the file, so play a clip of it first. |
| Bit rate | Average data rate of the stream. |
| Frame rate | Frame rate declared by the stream. |
| Frame duration | Length of a single frame. |
| Avg frame rate | Measured average rate. Differs from the declared rate on variable frame rate media. |
| Time base | The unit the stream uses for its timestamps. |
| Scan | Progressive · Interlaced TFF · BFF · TB · BT |
| Color space | YUV matrix declared by the file, for example BT.709. |
| Color primaries | Color gamut declared by the file. The Color Space effect reads this in Auto mode. |
| Color transfer | Gamma or log curve declared by the file. Also read by the Color Space effect in Auto mode. |
| Color range | Limited or full range coding of the pixel values. |
| Total frames | Number of frames in the stream. |
| Keyframes | Number of intraframes, the points where playback can seek directly. |
| Avg GOP size | Average distance between keyframes. Long groups make seeking more expensive. |
| Start PTS | Timestamp of the first frame. |
| Last frame PTS | Timestamp of the last frame. |
| Last frame time | The last timestamp converted to clock time. |
| UBR cache location | Where the Überblick color strip for this stream is cached on disk. |
| IFI cache location | Where the intraframe seek index for this stream is cached on disk. It makes reopening the same media faster. |
| Audio Stream Info | |
| Audio codec | Compression format of the audio stream, for example AAC or PCM. |
| Audio codec name | Full name of the codec. |
| Sample rate | Samples per second. |
| Channel count | Mono · Stereo · 5.1 · 7.1 · number of channels |
| Sample format | Number format of the samples, for example 16 bit integer or 32 bit float. |
| Bitrate | Average data rate of the stream. |
| Bit depth | Bits stored per sample. |
| Time base | The unit the stream uses for its timestamps. |
| Waveform status | Ready · Processing…. Whether the waveform display has been analyzed. |
| Waveform frame count | Resolution of the cached waveform data. |
| Playback decoder count | Decoders currently open for this stream. |
| Font Info | |
| Font File Overview | Name, path, and the number of faces in the font file. Collection files (.ttc) carry several faces. |
| Font Overview | The selected face's name and its face index inside the file. |
| Image Stream Info | |
| Image codec | Compression format of the image, for example PNG or JPEG. |
| Image codec name | Full name of the codec. |
| Resolution | Image size in pixels. |
| Pixel format | Memory layout of the decoded image. |
Clip Info
| Overview | |
| Selected clip count | How many clips are currently selected. |
| Selected clip type and name | Type and name of the main selected clip. |
| Info | |
| Original size | Pixel size of the source media. Video / Image clips |
| Original aspect ratio | Aspect ratio of the source media. Video / Image clips |
| Current aspect ratio | Aspect ratio after the clip's transform. Video / Image clips |
| Source file name | File the clip pulls its audio from. Audio clips |
| Clip Bounds | |
| Begin time | Seconds relative to original media duration |
| End time | Seconds relative to original media duration |
| Duration | Length of the clip on the timeline. |
| Timebase | |
| Timebase | The unit the clip's source uses for its timestamps. |
| Frame rate | Source frame rate. Video clips |
| Frame length in ms | Length of one source frame. Video clips |
| Debug | |
| Clip handle | Internal id of the clip. Worth quoting in a bug report. |
Meters Panel
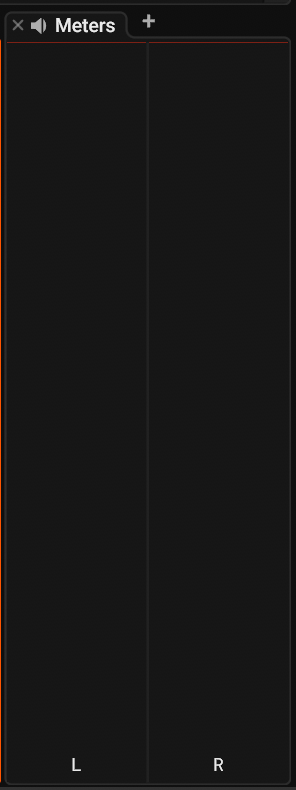
Shows the output level of the left and right audio channel while the project plays. The bars run from green through yellow into red as the signal approaches clipping, and a thin marker holds the recent peak for a moment before it decays. Multi-channel layouts are planned.
Title Bar

- File menu
- Edit menu
- View menu
- Help menu
- The name of the open project
- The application version
- Layout presets, see Layouts in the Panels section
- Settings menu
- Minimize, maximize, and close the window
When a newer version of Blick is out, an "Update available" button appears in the title bar and takes you to the download page. Blick only checks a version file for this, it sends nothing about you or your machine.
File Menu
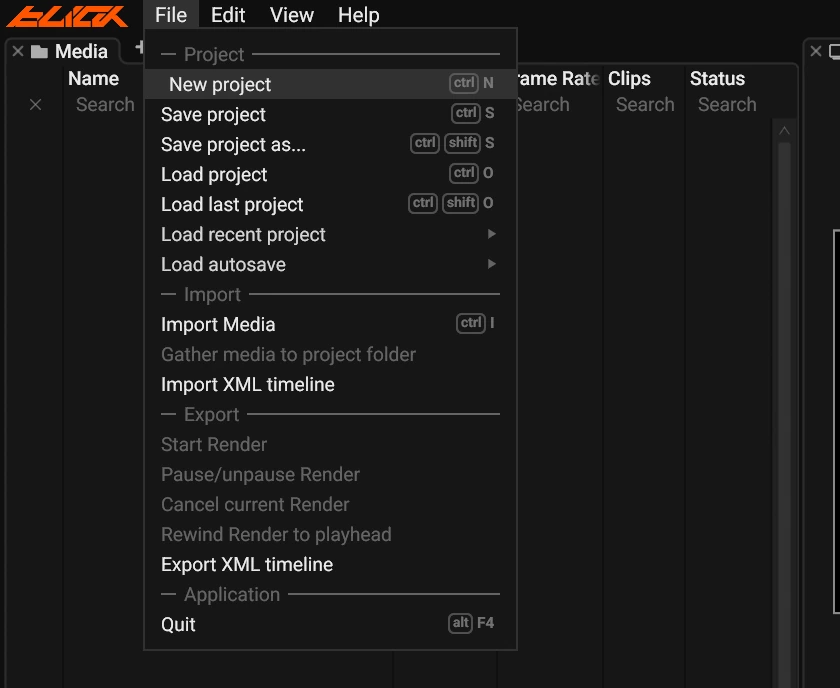
| # | Entry | Description |
|---|---|---|
| 1 | New project | Ctrl+N |
| 2 | Save project | Ctrl+S |
| 3 | Save project as... | Ctrl+Shift+S |
| 4 | Load project | Ctrl+O |
| 5 | Load last project | Ctrl+Shift+O |
| 6 | Load recent project | A submenu with your recently opened projects. |
| 7 | Load autosave | Loads an autosaved project. The newest autosaves are listed first. Autosaves of unsaved projects are stored under "Untitled". |
| 8 | Import Media | Ctrl+I |
| 9 | Gather media to project folder | Copies the media files used in the project into one folder and relinks the clips. It needs a saved project with media. |
| 10 | Import XML timeline | Final Cut Pro 7 XML, experimental. |
| 11 | Start Render | The same as the Render button in the Render panel. |
| 12 | Pause/unpause Render | |
| 13 | Cancel current Render | |
| 14 | Rewind Render to playhead | |
| 15 | Export XML timeline | Final Cut Pro 7 XML, experimental. |
| 16 | Quit | With unsaved changes, Blick asks to save, discard, or cancel. |
| 17 | Keybinding | The keybinding of the entry. Click it to edit it in place. |
Edit Menu
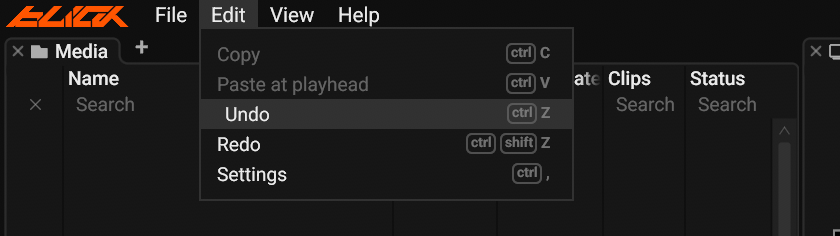
| # | Entry | Keys |
|---|---|---|
| 1 | Copy | Ctrl+C |
| 2 | Paste at playhead | Ctrl+V |
| 3 | Undo | Ctrl+Z |
| 4 | Redo | Ctrl+Shift+Z |
| 5 | Settings | Ctrl+, |
View Menu

- Command Palette Ctrl+Shift+P or F1
Help Menu
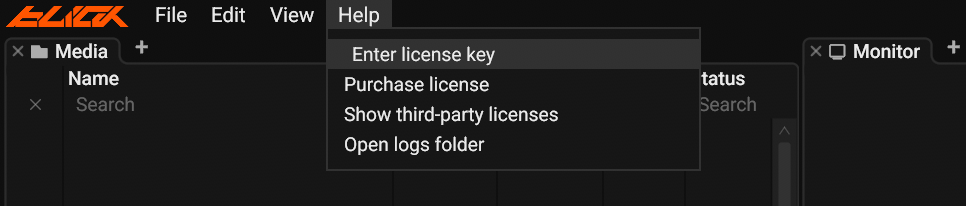
| # | Entry | Description |
|---|---|---|
| 1 | Enter license key | Enter or remove your license key, see Manage License. |
| 2 | Purchase license | Opens the pricing page. |
| 3 | Show third-party licenses | Lists the open source components Blick uses. |
| 4 | Open logs folder | Opens the folder with Blick's log files in your file explorer. Attach the latest log when reporting a problem. |
Actions
- Windows Edit keybindings inside the menus
Settings Menu
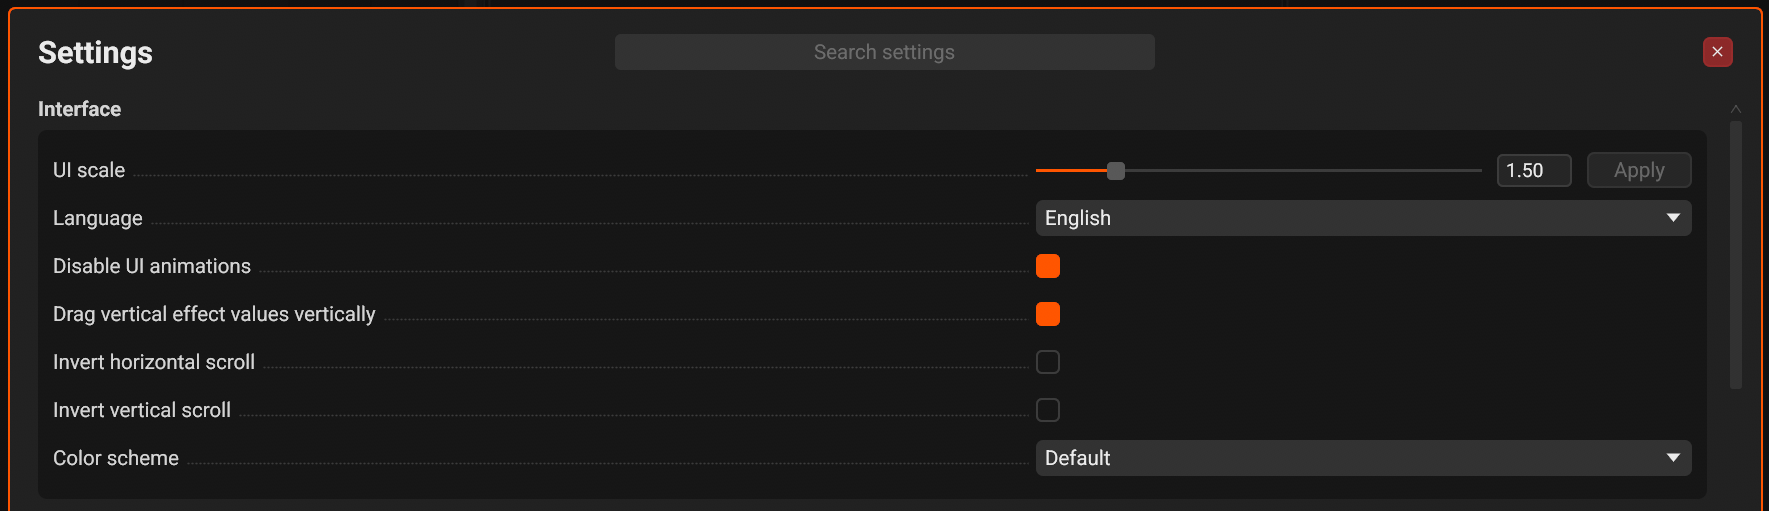
- Search the settings by name
- Close the Settings menu
- The settings are grouped in sections
- UI scale: move the slider or type a value, then press Apply
- A choice opens a list
- A checkbox turns a setting on or off
- Color scheme
Type in the search field to show only the matching settings:
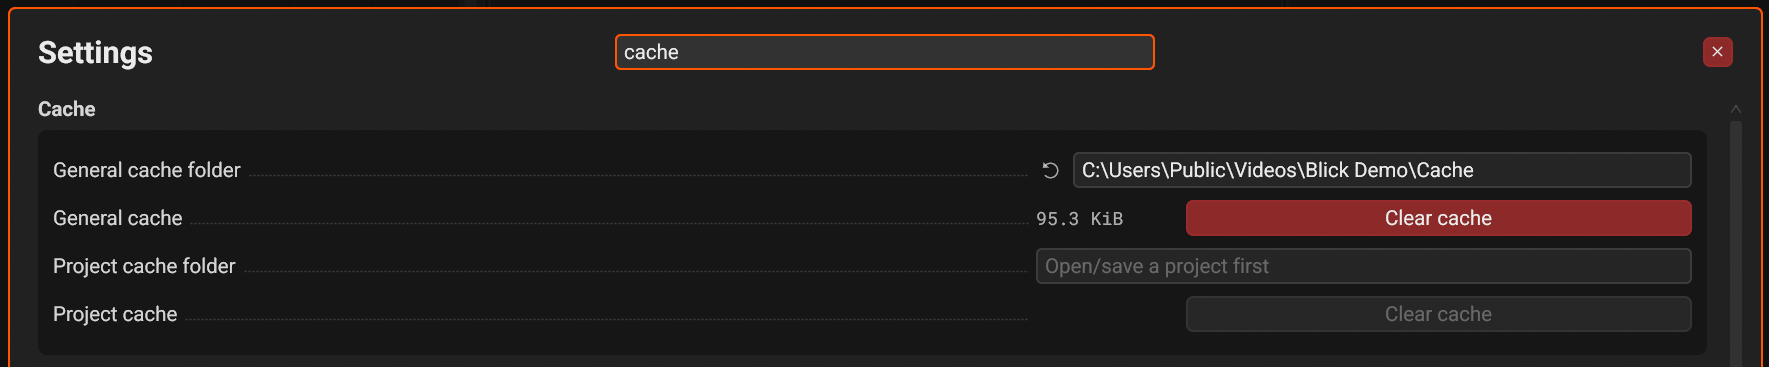
- The search text
- Only the matching settings show
Every setting can also be found and changed from the command palette, see Command Palette.
| Interface | |
| Change UI scale | Scales the whole interface, from 1.0x to 4.0x, with the resulting multiplier shown next to the slider. Move the slider and press Apply to confirm. Ctrl+= and Ctrl+- adjust it anywhere. |
| Change language | Choose from 13 interface languages. |
| Disable UI animations | Turns off interface animations. |
| Drag vertical effect values vertically | When on, values that move a clip vertically are dragged vertically, matching the direction they act in. |
| Invert horizontal scroll | Flips the horizontal scroll direction. |
| Invert vertical scroll | Flips the vertical scroll direction. |
| Change color scheme | Picks a color theme for the interface. Hovering a theme in the list previews it live. Requires an active license. |
| Startup | |
| Open last project on startup | Reopens the most recent project when Blick launches. |
| Playback | |
| Force software decoding | Decodes video on the CPU even when a hardware decoder is available. Restart Blick to apply. |
| Stop playback after seeking | When on, seeking while the project plays stops playback instead of resuming it. |
| Audio devices | |
| Playback device | The output device Blick plays through. System default follows the operating system. |
| Recording device | The input device used for audio recording. System default follows the operating system. |
| Device list | Lists the detected devices, with a Refresh button to rescan them. The recording device cannot be changed while a recording runs. |
| Shuttle controls | |
| Speed step factor (J/K/L) | How much each tap of J or L multiplies or divides the playback speed, 1 to 8. The default of 2 gives 1x, 2x, 4x, 8x and so on. |
| Audio at speed | How audio is stretched during sped-up or slowed-down playback. Spectral keeps the pitch and suits music, Speech is tuned for voice, Varispeed lets the pitch change like tape. |
| Timeline | |
| Mouse scroll step | How far one mouse wheel step scrolls the timeline. |
| Mouse zoom step | How far one mouse wheel step zooms the timeline. |
| Keyboard zoom step | How far the keyboard zoom shortcuts zoom the timeline. |
| Snapping threshold | How close a dragged clip edge must get to a snap target before it latches. 0 turns snapping off. |
| Timecode | HH:MM:SS:FF, HH:MM:SS.mmm, frames, or seconds. |
| Selection follows playhead | Off, All tracks, or Track cursor only. Selects the clips under the playhead while you scrub, play, or step with the keyboard. See Select clips in the Timeline panel. |
| Monitor | |
| Mouse scroll step | How far one wheel step pans the zoomed Monitor view. |
| Mouse zoom step | How far one wheel step zooms the Monitor view. |
| Autosave | |
| Interval (minutes) | Minutes between autosaves, 1 to 120. |
| Keep at most | Autosave files kept before the oldest is replaced, 1 to 100. |
| Folder | Where autosave files are written. |
| Export | |
| Untitled output folder | Where renders of unsaved projects are written. |
| Project output subfolder | The subfolder created next to a saved project for its renders. |
| Cache | |
| General cache folder | Where generated waveforms, thumbnails, and frame indexes are stored. Shows the current size, and Clear cache deletes the generated files. They are rebuilt when needed. |
| Project cache folder | The cache tied to the currently open project. Shows its size and can be cleared separately. |
| New project defaults | |
| Resolution | Canvas size a new project starts with. Dropping the first video clip in can adjust it automatically. |
| Frame rate | Frame rate a new project starts with, 1 to 240 fps. |
| Bits per pixel | Render quality a new project starts with. |
| Audio sample rate | Sample rate a new project starts with. |
| Audio bitrate | Audio bitrate a new project starts with. |
| Proxy generation | |
| Location | Where generated proxies are written: next to the original, in a custom folder, or in the project folder. See Proxies in the Media panel section. |
| Custom folder | The folder for the Custom folder location. |
| Name prefix, Name suffix | Text added before and after the original file name. |
| Long edge | The size of the long edge of a proxy, in pixels. |
| Codec | The codec of the proxies. |
| Quality (lower is better) | The quality of the proxies. |
| Keyframe every N frames | 1 makes every frame a keyframe: the fastest scrubbing, but the largest files. |
| Overwrite existing files | Replace a proxy file that exists. |
Keybindings
The Keybindings section is at the end of the Settings menu.
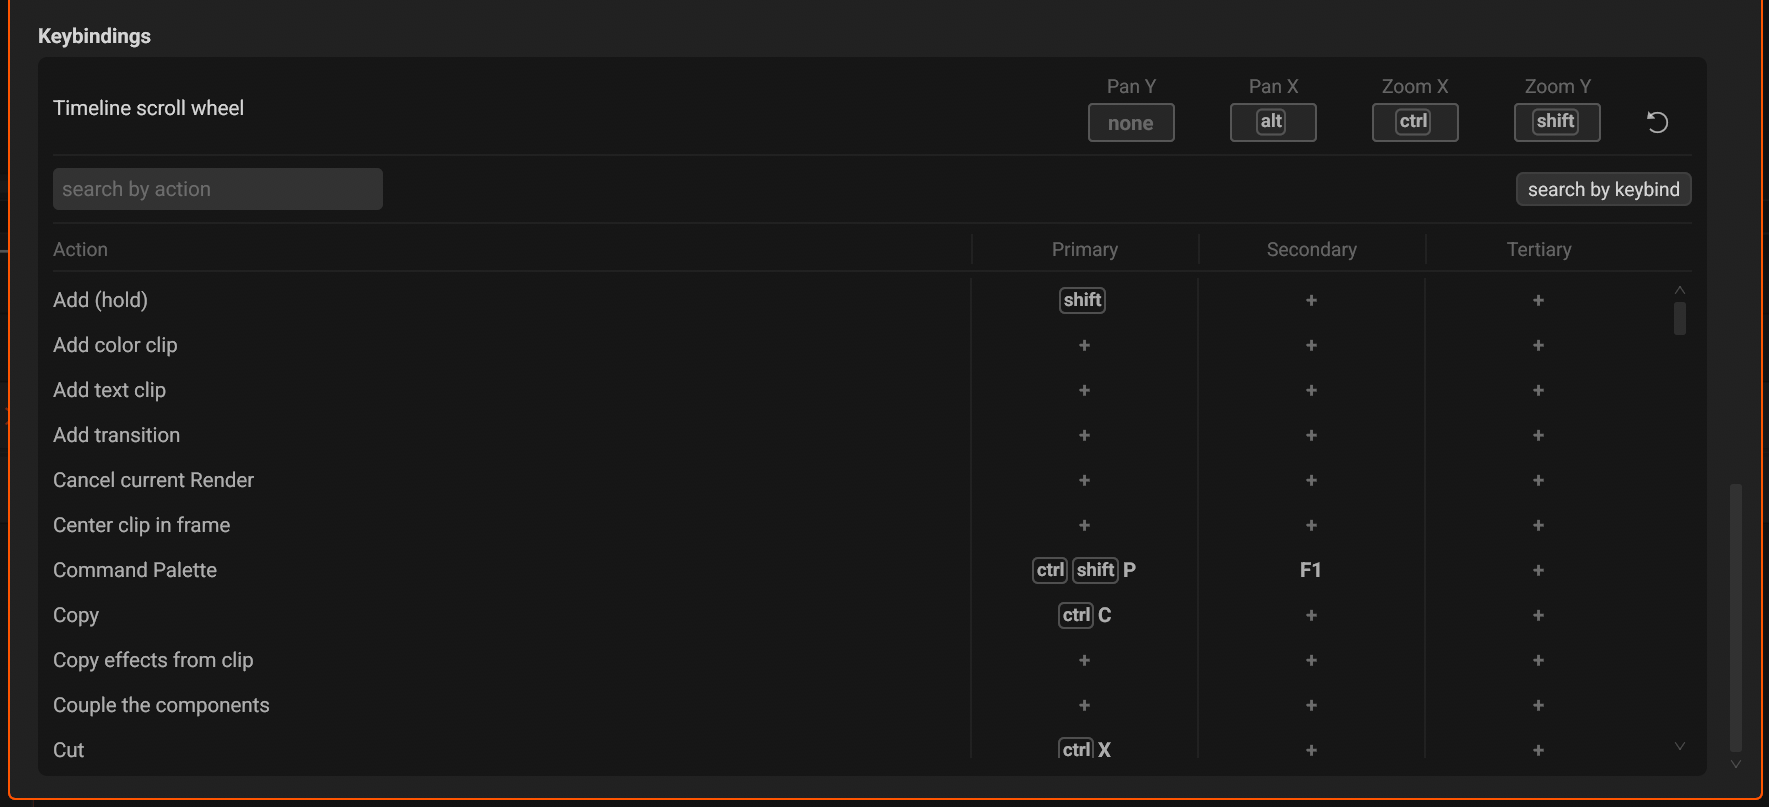
- The modifier for each of the 4 kinds of scroll in the Timeline Panel: none, Ctrl, Shift, or Alt
- Restore the default scroll keybindings
- Fuzzy search by action name
- Search by keybinding: press the keys and the list shows the actions that use them
- The primary keybinding of an action. Click it to change it
- Each action takes up to 3 keybindings: Primary, Secondary, and Tertiary
- Click the plus button to add a keybinding
You can map Ctrl, Shift, and Alt as modifiers for scrolling in the Timeline Panel, giving you personalised scroll keybindings without conflicting with other actions.
Every action in Blick can be rebound. Your changes are saved to blick.json in the local config folder: %LOCALAPPDATA%\blick on Windows, ~/Library/Application Support/blick on macOS.
Command Palette
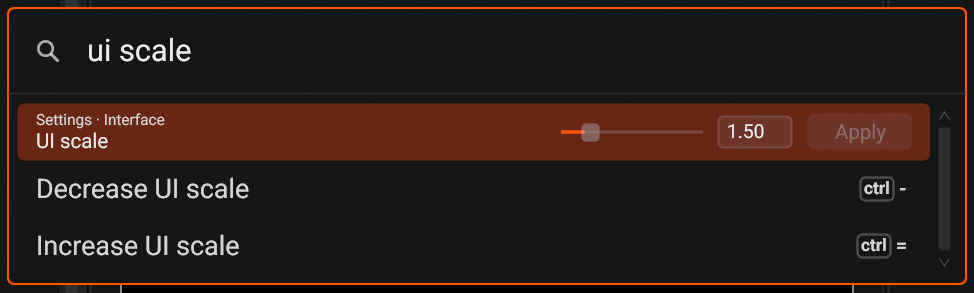
- The search text
- A setting shows its control in the row, so you change it there
- A command. Press Enter or click it to run it
- The keybinding of the command
- Open Command Palette Ctrl+Shift+P or F1
- Navigate results with Ctrl+UpArrow/Ctrl+DownArrow, PageUp/PageDown, Home/End
Search all commands and settings in Blick from the keyboard. Picking a command runs it. A setting shows its control in the result row, so you change its value there without opening the Settings menu.
Commands act on the current selection and the focused panel, and the palette only lists the commands that can run now. Some commands need a choice, such as Add transition and the keyframe presets. Choose the command and the palette opens a second page to pick the choice.
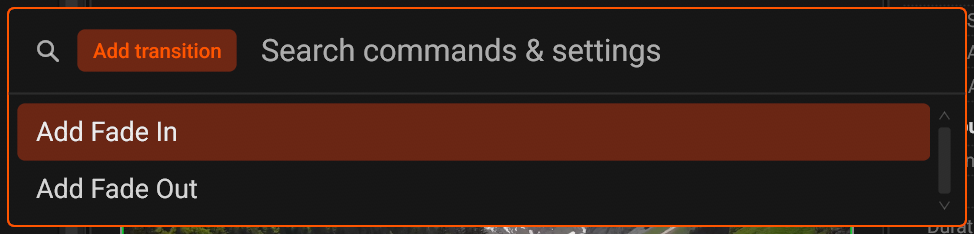
- The command that waits for a choice
- Pick a choice to run the command
You can edit the keybindings of each command directly inside the command palette: click a keybinding to change it, or the plus button of a command without one to add it.
Manage License
Choose Help > Enter license key and enter your license key after purchase. Keys start with "BLICK-". The dialog shows your activation state and the end date of your update period, which runs for two years from the purchase date.
- Type or paste your license key
- Submit License activates the key
- Purchase license opens the pricing page
- Close the dialog
The license permanently activates every version of Blick released on or before the end date. Versions released after the end date require a new license.
Example: a license purchased on March 10, 2026 has an update period ending March 10, 2028. It activates every version released before that date. It does not activate a version released in April 2028. The last covered version remains usable; a later version requires a new license.
Without an active license you can try Blick freely, but opening saved projects is locked, and so are the extra color themes. The title bar shows an UNLICENSED badge in that state. Remove License clears the key from this installation.
Status Bar
The status bar runs along the bottom of the window. Its left side shows the hovered panel and what the mouse does there. Its right side shows positions and opens the Command Palette.

- The hovered panel type
- The keybindings available in the panel, including your custom scroll bindings. They change with the hovered area and the active timeline mode

- The start and end of the selected clip
- The time under the cursor
- Open the Command Palette with all commands
When you hover a button, the status bar shows its description and its keybinding:

- The description of the hovered button
Over the Monitor, the right side shows the cursor position in output pixels:

- The cursor position on the frame, in output pixels
Alerts appear in the status bar briefly and fade out, for example the autosave path when Blick autosaves the project.